Go intergrator user guide
Overview
Go Integrator is an application for Windows Desktop that integrates Lotus Notes, Microsoft Outlook and leading Business Applications (i.e. CRM system) into the WHC service. It works in conjunction with a User’s primary* phone and Windows/Mac Business Application software to enhance a User’s productivity, i.e. screen popping a Business Application file based on the number calling in. Go integrator also enables the user to access some of their core WHC features directly from the application, such as Do Not Disturb and CommPilot Express.
This application is provided from a partner called Mondago and they provide two variants; Go Integrator Lite and Go Integrator DB.
This application is available on the following WHC technologies:
Centrex Users
- Functional – Desktop only
- Fixed - All
- Mobile - All
SIPT Users
- Functional – Desktop only
- Fixed - All
- Mobile - All
Note: For SIPT users, internal calls between PBX users that do not pass through the WHC platform will not go to the app. Customers are advised to complete additional testing when deploying the Go Integrator application for SIPT Users to ensure the required functionality works as expected with the PBX is use
Application Description- Go Integrator DB & Lite
Go Integrator provides the users with a desktop Computer Telephony Integration (CTI) tool that integrates some aspects of their WHC service into a Business system.
This application supports the following features and functions:
Automatically search Business systems whilst your phone is ringing so you know who is calling before you answer
Answer, hang-up, transfer or place a call on hold using your mouse
Click-to-dial from the Business system and web pages
View call history, including Missed Calls, and return calls
View the Presence status of other users on the WHC service
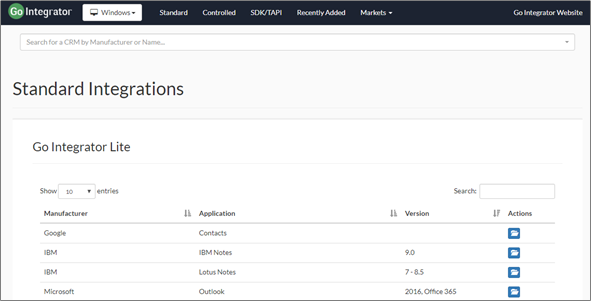
Go Integrator Lite and DB supports all of the functionality above and also integrates into the following Business systems as standard, all of which are available within the client:
- Windows - https://bt.gointegrator.com/crm-integrations/windows/standard
- Mac - https://bt.gointegrator.com/crm-integrations/mac
Please note we only support standard integrations listed with the firmware versions stated in the Hardware and Software section, stated further on in this document. Anything above this level is not currently supported.
Controlled (formerly Other) Integrations – DB Client Only
Controlled integrations are not available as standard in the application but can be made available on request, please contact us for more information.
New Integrations – DB Client Only
Where the CRM system does not exist as a listed tested item, then there are professional services available to allow you to request integration of a New CRM system. Please contact us for more information
Hardware & Software Description
In order to successfully install and use this application, the following installation and licensing requirements should be met:
We use the following firmware versions:
|
Operating System |
Version |
|
Windows |
3.0.13 |
|
Mac |
2.7 |
Operating System
This application can be deployed on a Microsoft Windows or Mac operating system.
The hardware requirements for the PC and Mac client can be viewed from the following link:
- https://gointegrator.com/page/10/291/uk
During installation of Go Integrator, as well as installing the CRM application, the following third-party software will be installed on the PC version:
- Microsoft .Net 4.5
Network and Firewall Requirements
You may need to allow outbound access for the following on your firewall:
|
Application |
Protocol |
Destination |
Destination Port |
|
Application Signalling |
SIP |
_sip_udp.ipcomms-btwbslnws09.bt.com 147.152.35.102/29 147.152.35.110/29 |
UDP/TCP 5060 to 5075
|
|
Application Media |
RTP |
147.152.35.100/29 147.152.35.108/29 |
UDP16384 to 32766 |
|
Go Integrator |
Proprietary |
applications.yourwhc.co.uk 193.113.10.12 193.113.11.12 |
TCP 443
|
|
Go Integrator Downloads |
HTTPS
|
downloads.yourwhc.co.uk 193.113.10.27 193.113.11.27 |
TCP 443 |
|
Go Integrator License Check |
HTTPS
|
ccusage.yourwhc.co.uk 193.113.10.13 193.113.11.13 |
TCP 443 |
Provisioning & Configuration
The Go Integrator application (called CRM Connect on our ordering portals) is an Add-On that is provided to a User already on the platform and assigned a Functional, Fixed or Mobile User license.
Place the order with us at sales@ic.co.uk
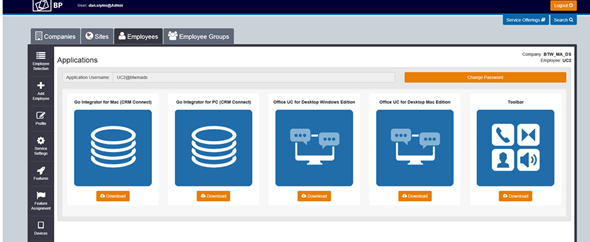
Once this license pack has been ordered from the us and configured, the application download will appear in the Application section of the Business Portal as per the image below.
Download and Installation - Windows
Once you have provisioned the Add-On and the User has received their welcome email, they can now download the application from the Business Portal.
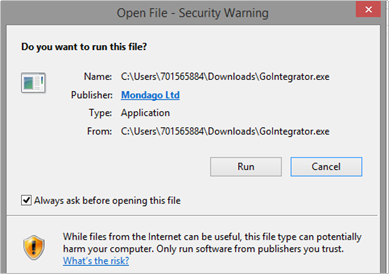
Log in to an administrator-level user account on the Windows workstation that Go Integrator needs to be installed onto. Double-click the ‘GoIntegrator.exe’ file and then click Run.
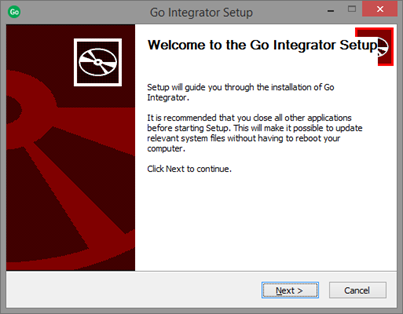
Once the Setup screen appears click on Next.
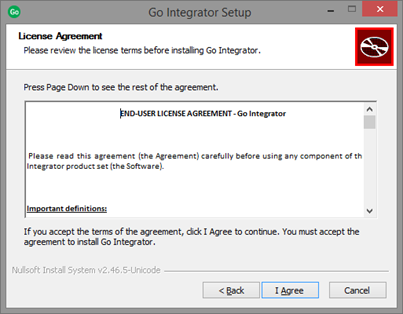
Review the License Agreement and then if happy to proceed, click on I Agree.
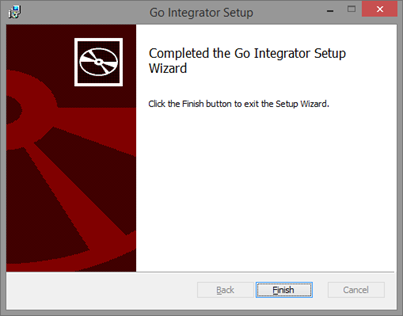
Once Go Integrator and any third-party software have finished installing, click the Finish button to close the installer.
Download and Installation - Mac
Once you have provisioned the Add-On and the User has received their welcome email, they can now download the application from the Business Portal.
The Go Integrator for Mac software is supplied as an Internet download. It is a self-contained installer that contains the files needed to install a copy of Go Integrator for Mac.

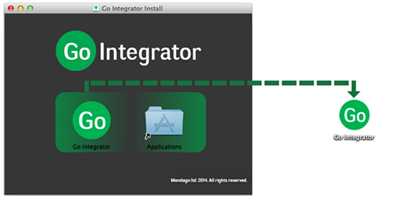
You then "insert," or "mount," the disk image onto the machine by double-clicking on the file. Having done this, the disk image will appear as another device in the Finder (see below).

Double-click on the Go Integrator device. Now you've got two options, you can either drag the file across to desktop or just move it to the Applications folder. To do this simply click and hold the Go Integrator icon and drop it on Applications folder or the Desktop.
The Welcome Email sent to End Users will guide them to navigate to the Business Portal to download the application and obtain their Username. Please note this Username is the same for all Applications, but is different to the Business Portal credentials. The username can be seen in the Applications tab as shown below and is also included in the users welcome email
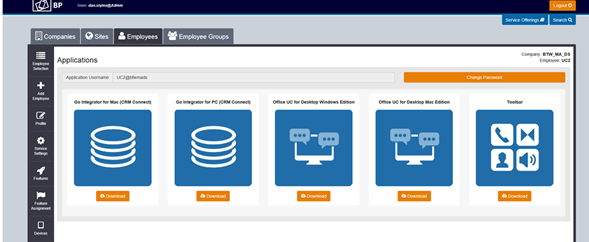
The password for all applications is not sent to the User and needs to be set in the Business Portal by navigating to My Account.

Select Password to Change box, then click on Application, enter password and then select Save.

General – Telephony for Windows
Once the installation has finished, Go Integrator presents you with the Configuration screen where you need to provide your application user account information to log in.
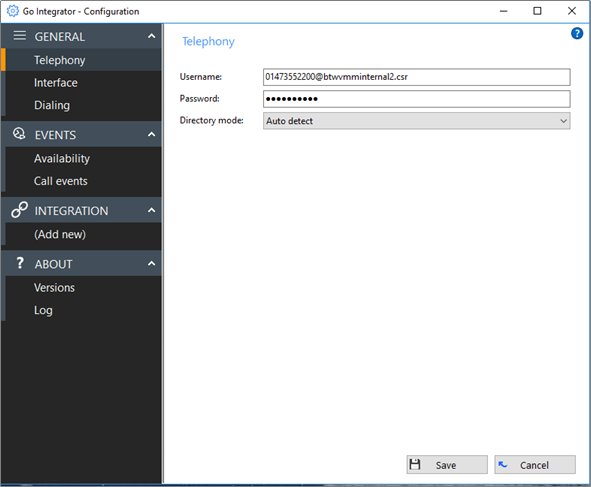
To login, follow these steps:
- Enter the username and password into the appropriate text boxes.
- Select the preferred directory mode. Selecting Group means that only company contacts in your Site will be visible, selecting Enterprise means that all contacts in your company will be visible.
- Click the Save button to store your settings and close the window.
General – Interface for Windows
The Interface page allows you to change settings relating to the look and feel of the software, including actions that happen when calls take place. To have the software start automatically when you log on to Windows, put a tick in the tick box. The setting will take effect next time you log on to Windows.
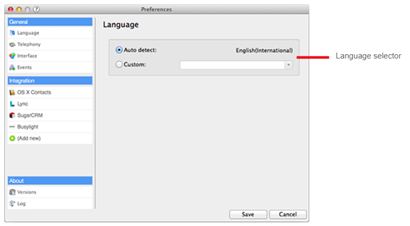
Language packs are available for the software to change the language of the user interface. By default, the software will attempt to automatically select the language to use based on the language setting of your operating system. However, you can change the language used by selecting from the Language dropdown list. If your language is not in the list, contact your reseller to find out when it will be available. Any changes you make to the language will take effect next time you start the software.
By default, many of the software’s windows have a “skin” to make them look nice. If you find that you don’t like the “skinned” windows, perhaps for accessibility reasons, you can turn them off by selecting “No skin” from the Phone window dropdown. The next time you load the software, the windows will all be standard Windows-style windows using the theme from your operating system.
You can also turn on or off the unobtrusive Preview window for all calls by ticking or clearing the box. The last section of the Interface page has buttons you can press to quickly and securely clear the history of contact history, recent numbers (as shown in the Recent list), and which hints the software has shown you (clearing hint history allows the software to show you the hints again).
General – Dialling for Windows
This page allows you to turn on and off dialling from all the different types of application that the software supports. As a review, the different methods of dialling are
- Clipboard Dialling - Each time you copy a valid telephone number a small bubble will appear from the tray icon that will ask you if you want to call that number.
- Application Dialling - Once Go Integrator Client has learned your application, you will see one of two options. Either a dial button appear on the right hand side of a textbox, or you will have to hover with your mouse above that textbox in which case the Dial and Hang up buttons will appear also on the right hand side of the textbox.
- Focus Dialling - It will highlight any valid telephone number within a textbox you have clicked on (based on the criteria you’ve set) and provide you with three options: Dial, Hung up and Dismiss buttons.
- Dialling Handlers – This section manages other dialling techniques including web page and TAPI dialling. Web page dialling is where the software automatically scans web pages in a rage of browsers and converts anything that looks like a telephone number into a clickable hyperlink. Simply enable these against the relevant browser and, where required, download any add-ins.
Please note that Microsoft Word and Excel dialling via SmartTags are not available in Office 2010.
The last section on this page allows you to define what telephone numbers look like, to help the software more accurately determine whether a string of numbers it sees in a webpage or on the clipboard is really a telephone number or not. You can tell the software the minimum and maximum length of telephone numbers (anything outside the range will be disregarded as not a real telephone number), and you can also specify that telephone numbers must begin with a certain string of characters.
Events – Availability and Call Events for Windows
You can make the software either show the Phone window or pop the contact when certain events happen. Just select the relevant action from the relevant dropdown list: On ringing, On answer, or On outbound. You can also choose a sound to have your computer play when your phone is ringing and/or you have a call waiting. This can help you to uniquely identify that it is your phone that is ringing and not a colleague’s. You can also tick the box to have your computer’s sound automatically muted whenever a call is in progress, which is useful if you listen to music or Internet radio while you work, giving you a more professional appearance.
The software can also be configured to run one or more custom executable on selected events. To configure this, press the Add button and configure the following information: The Event list is used to select the event on which to run the program. The Program box allows you to select which executable to run. This box should be left blank to load an internet browser.
Integration – Add new for Windows
Click the (Add new) item, select the type of CRM Integration from the dropdown list, and click Set (the first time you enter this screen you may have to wait a few seconds as the software scans to find out what integrations are available).
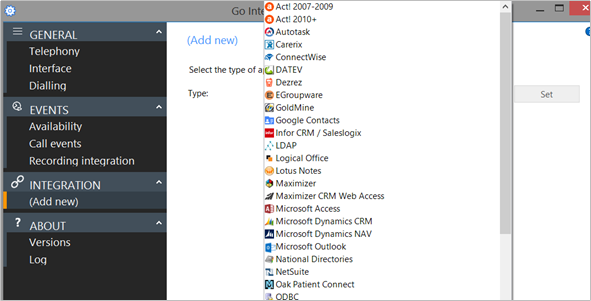
If you click on the ? it will bring up the integration guide showing you how to configure:
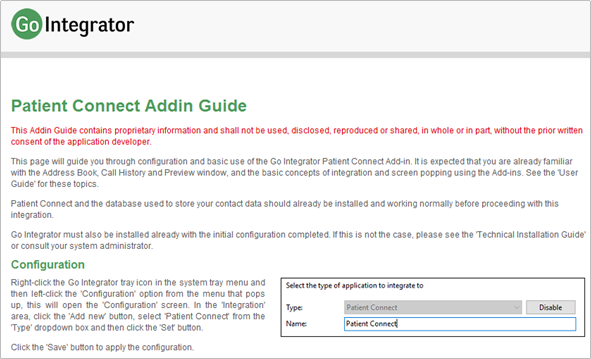
To modify an existing integration that you have set up, click its name in the list. You can also click its name and then click Delete if you no longer want integration to that CRM software.
For applications like Outlook, the software attempts to find and use default settings that will “just work” for you so you won’t need to do anything more. For more complicated integrations, the software will do as much as it can for you, but you may need to help it by for example entering your password, or telling it where the CRM software files are, etc.
The Integration test area allows you to test the settings you have entered by entering a telephone number and seeing if the software can find it. If the number is found, you can click the Show contact button to make sure that “popping” works. When you are done, click Save. The new integration will be available immediately.
Once the installation has finished, Go Integrator presents you with the Configuration screen where you need to provide your application user account information to log in.
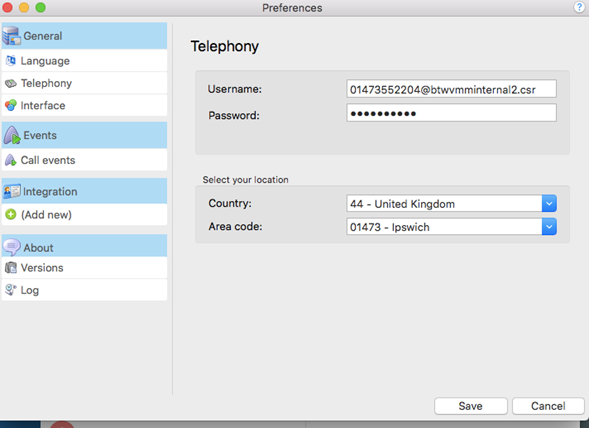
To login, follow these steps:
- Enter the username and password into the appropriate text boxes.
- Select your country and area code which are used to recognize local phone numbers.
- Click the Save button to store your settings and close the window.
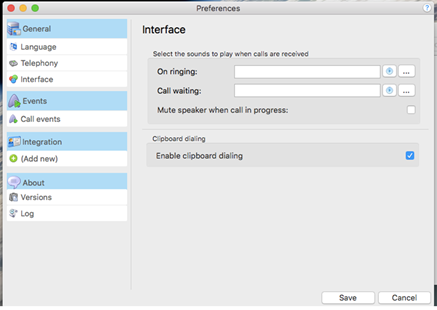
The Interface page allows you to change settings relating to the look and feel of the software, including actions that happen when calls take place:
- Sound selection button: The next section on the Interface page allows you to choose a sound to have your computer play when your phone is ringing and/or you have a call waiting. This can help you to uniquely identify that it is your phone that is ringing and not a co-worker's. You can also tick the box to have your computer's sound automatically muted whenever a call is in progress, which is useful if you listen to music or Internet radio while you work, giving you a more professional appearance.
- Enable clipboard dialing: Each time you copy a valid telephone number a small bubble will appear that will ask you if you want to call that number.
Click the Save button to store any new/edited information or click the Cancel button to discard any new/edited information.
This page allows you to turn on and off dialling from all the different types of application that the software supports. As a review, the different methods of dialling are:
- Type-in dialing: Enter in a telephone number to dial.
- Clipboard dialing: Copy a telephone number to the clipboard so the client can dial it automatically.
- Web page dialling: The software client can automatically scan web pages and convert anything that looks like a telephone number into a clickable hyperlink (Safari and Chrome only).
- OS X Contacts plug-in: Allows user to dial directly from the OS X Contacts.
Events – Availability and Call Events for Mac
You can make the software either show the Phone window or pop the contact when certain events happen. Just select the relevant action from the relevant dropdown list: On ringing, On answer, or On outbound. You can also choose a sound to have your computer play when your phone is ringing and/or you have a call waiting. This can help you to uniquely identify that it is your phone that is ringing and not a colleague’s. You can also tick the box to have your computer’s sound automatically muted whenever a call is in progress, which is useful if you listen to music or Internet radio while you work, giving you a more professional appearance.
The software can also be configured to run one or more custom executable on selected events. To configure this, press the Add button and configure the following information: The Event list is used to select the event on which to run the program. The Program box allows you to select which executable to run. This box should be left blank to load an internet browser.
Click the (Add new) item, select the type of CRM Integration from the dropdown list, and click Set (the first time you enter this screen you may have to wait a few seconds as the software scans to find out what integrations are available).
Operating the Feature - Windows
In addition to this guide, there are individual Quick Reference Guides for each of the Go Integrator applications that can be used for guidance on how to get the best out the integration. These are available with the application by clicking the ? from with the Add New Integration/{Application]. However please be aware the WHC variant is slightly different from the vanilla application, which these guides refer to. Please be aware of the following main, but not exhaustive, differences when consulting these guides
Call Logs – taken from the Call Logs displayed on the Business Portal and Toolbar
Call Director – Diversion inhibit and Call Control are not enabled from with this feature
Go Integrator integrates with a whole host of calling features, all of which are covered off in the relevant section headings below.
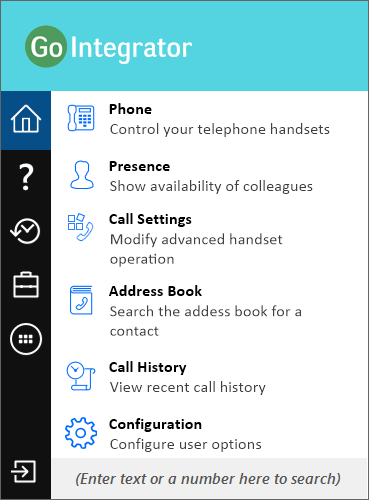
The tray menu is accessed by right-clicking on the Go Integrator Client icon which is a green square (or red if you're on a call or yellow if a call is on hold).

Note: In Windows 7 and above, some tray icons become hidden and expressly have to be shown. These settings are stored in the "Notification Area Icons" part of the Windows Control Panel.
At the bottom of the tray menu is a text box where users can enter text or numbers to search for in all of the integrated applications.

Results are displayed directly in the tray menu as text is typed into the text box. Calls can be made to any contacts that are found by clicking on the number displayed in the results.
Clicking on the icons down the left-hand side of the tray menu displays the various sections of the tray menu.
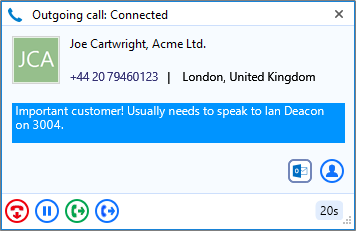
The Preview window appears when a call is made or received. It contains much of the information from the main Phone window but in a much more compact format and it disappears shortly after a call connects.

Use this to make the Preview window disappear immediately.
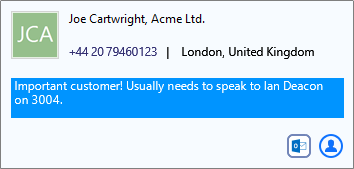
The telephone number and name of the other party.
If notes are contained in the contact's record, they will also be displayed.
Click on a contact record icon to open the contact record in the corresponding software.


Use these to interact with the call. Using some of these will display the main Phone window.
Like the Phone window, the actions at the bottom of the preview window adapt to the state of the call. The example picture shows the actions that are available when a connected call is in progress.
When a call is ringing, you can choose to answer the call by clicking the "Answer" button or deflecting it (transfer it without answering it) to another extension.

Deflecting a call is done in a manner similar to transferring calls. If you are already on the phone and someone else calls you, then you can use deflect productively to move the call to a co-worker.
It is also common to use this screen to perform a transfer of the current call to another extension or user. To do this you must be connected to the call (as opposed to it being on hold or ringing). To transfer a call you do NOT press the Hold button - it has a different purpose (more about this later). Instead you either press the Consult button or the Transfer button.

You choose the button according to whether you want to speak to the other person (Consult) or not (Transfer).
You can also put calls on hold.

Depending on your telephone system configuration, this means that the other person should hear music. When you are ready to talk to the caller again, use the Unhold button.

Remember, the Hold button is not for transferring calls. It is purely to pause the call. If you want to transfer a call that is on hold, then first you will have to take the call off hold first.
When you are done talking, click the Hangup button to terminate the call.

When more than one call is in progress at the same extension, the Preview windows are now stacked with the active call always at the front.
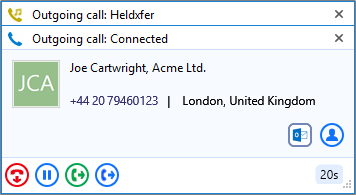
The hidden call is simply selected by clicking its header box (behind the active call).
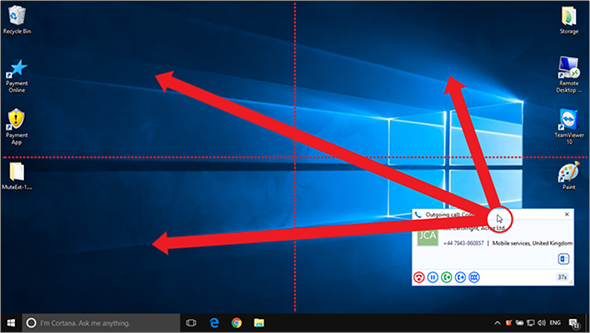
The Preview window can be re-positioned in any screen quarter and this position will be retained. Please note this is a fixed position in each quarter. To do this, click and hold anywhere along the Preview window's header bar then drag and drop the mouse cursor into the screen quarter where the window should appear. The Preview window will initially sit exactly where it was dropped until it fades out but will reappear in the appropriate corner of the given screen quarter from thereon.
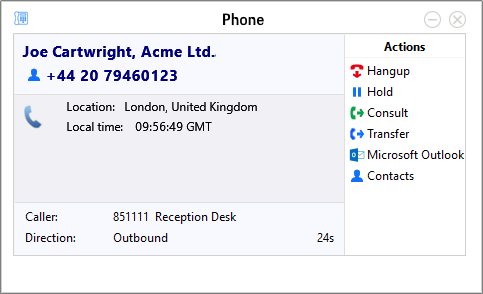
When the Phone window is open, you can simply start typing a telephone number on your keyboard. Go Integrator Client will understand that you want to make a call and switch to the Make Call screen.
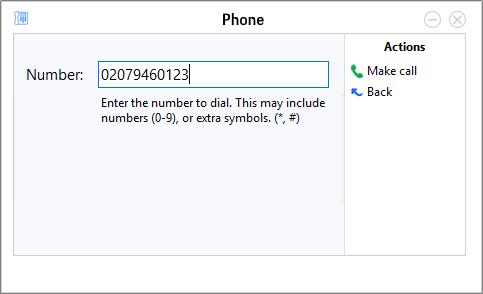
The Phone window allows you to interact with the current call in a number of ways.
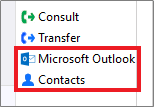
Users can also click any buttons showing integrated application names to open the caller's record in those applications.
01212327897
When a call is ringing, you can choose to answer the call by clicking the "Answer" button or deflecting it (transfer it without answering it) to another extension.

Deflecting a call is done in a manner similar to transferring calls. If you are already on the phone and someone else calls you, then you can use deflect productively to move the call to a co-worker.
It is also common to use this screen to perform a transfer of the current call to another extension or user. To do this you must be connected to the call (as opposed to it being on hold or ringing). To transfer a call you do NOT press the Hold button - it has a different purpose (more about this later). Instead you either press the Consult button or the Transfer button.

You choose the button according to whether you want to speak to the other person (Consult) or not (Transfer).
You can also put calls on hold.

Depending on your telephone system configuration, this means that the other person should hear music. When you are ready to talk to the caller again, use the Unhold button.

Remember, the Hold button is not for transferring calls. It is purely to pause the call. If you want to transfer a call that is on hold, then first you will have to take the call off hold first.
When you are done talking, click the Hangup button to terminate the call.


The name and telephone number of the remote person.
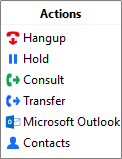
Use these buttons to interact with the current call and contact.

Other information about the current call.
In its most basic form, the Presence window provides a quick way to check the availability of your co-workers. The Presence window is accessible from the tray menu and contains a list of all the extensions, unless your administrator has chosen a different arrangement.
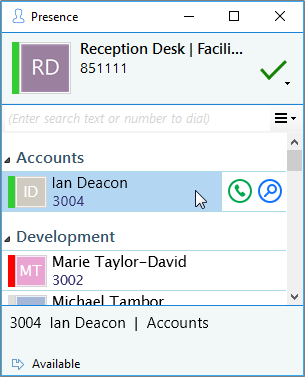
Windows 8 and above users can dock the Presence screen to the right hand side of their primary monitor. When other applications are maximized they will fill the screen up to the left edge of the Presence window.
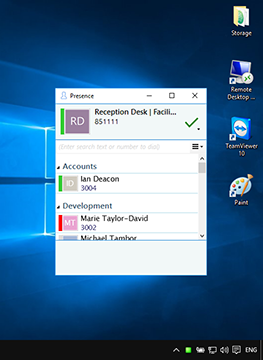
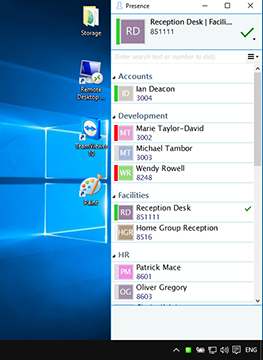
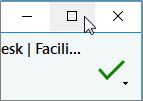
This is controlled by setting the desired width of the Presence window when "normalized" and then clicking the "maximize" button.

The current call status is indicated here by the icon.

To filter the list of users/extensions, text can be typed into this box and the list will update to only show items containing that text.
These icons indicate the current call status of each user/extension.
Available
Busy
Offline
Held
Do Not Disturb
Forward

If you hover over one of the entries in the list, then a context menu should appear.
Assuming that you are not already on a call, then the menu should contain the Make Call item.

By choosing this action, you can dial the number directly.
You should also see the Show Detail item.

Clicking this will open the user detail window.
If you are already on a call, different items will appear in the menu.

The Consult button places the current call on hold pending transfer and also makes a concurrent call to the selected number. (Click the Complete button in the Phone window to complete the transfer).

The Transfer button transfers the call immediately (remember to say goodbye first).

If you see an extension that is flashing red then it means that the extension has a call ringing at it.


If you want to personalize your Presence window to include just the contacts that you need, then you can do this using these options.

When an extension is clicked on, other information about that extension can be seen here including the current call (if there is one).
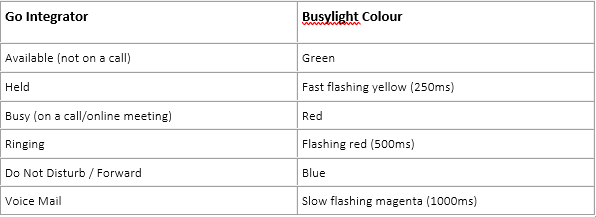
Go Integrator has plug and play compatibility with Busylight so everyone in the office can see whether a colleague is available for a conversation, busy on the phone, or simply does not want to be disturbed.
Call settings provides an alternate way to configure certain user settings. It is an alternative to using the portal provided by the service provider.
The Call settings page consists of multiple tabs, each one with its own set of options. Click on a tab to see the options. Users with smaller screens can click on the arrow buttons to see tabs which do not fit.
Note: Call Settings is not available with all versions of the software and the tabs shown will be dependent upon the version of Go Integrator Client and the user's assigned services.

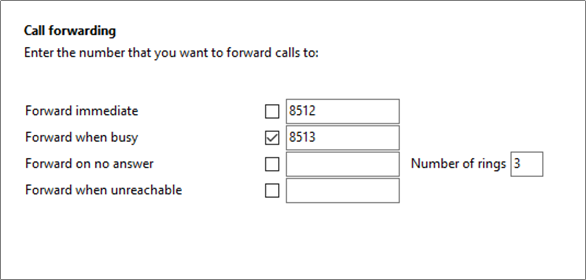
This tab will allow you to configure the Call Forwarding service.
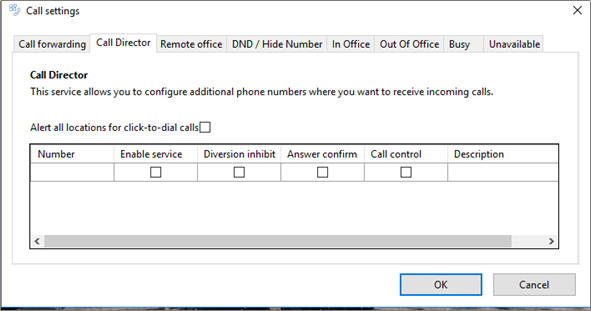
This tab will allow you to configure the Call Director service.
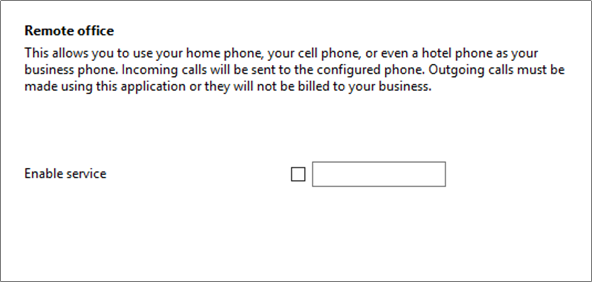
This tab will allow you to configure the Remote Office service.
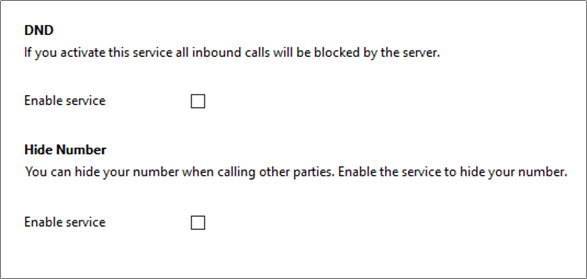
This tab will allow you to configure the DND and Hide Number services.
Allows you to configure the behaviour of your phone when the CommPilot Express profile is selected.
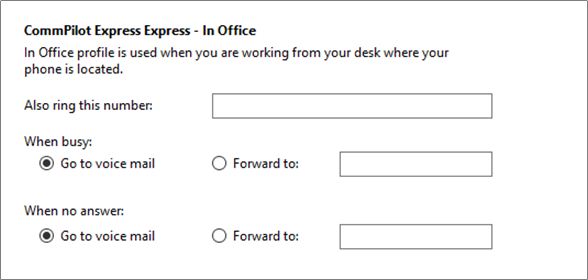
Allows you to configure the behaviour of your phone when the CommPilot Express profile is selected.
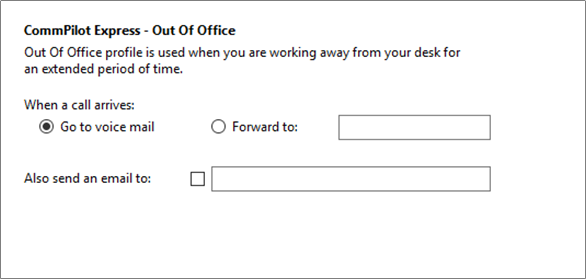
Allows you to configure the behaviour of your phone when the CommPilot Express profile is selected.
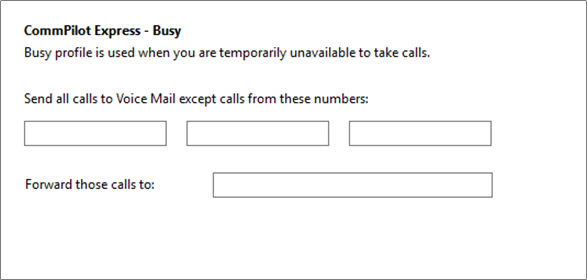
Allows you to configure the behaviour of your phone when the CommPilot Express profile is selected.
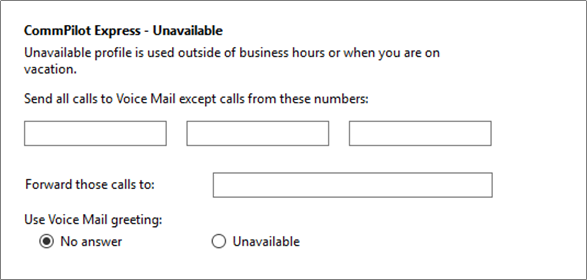
The Address book window is accessed from the Address book item on the main menu or tray menu icon. It provides access to a local address book included with the client.
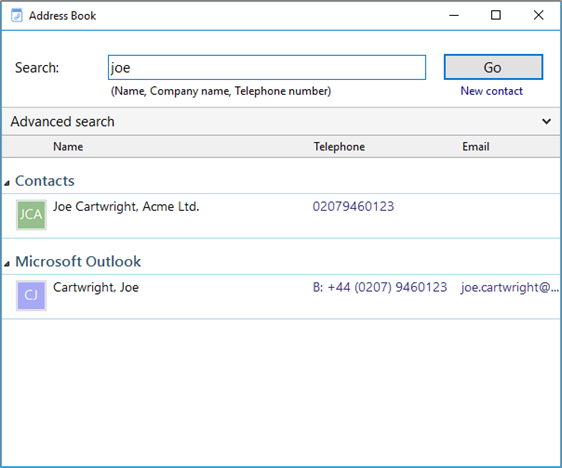
Enter the text to search for within the contacts.

Click on this button to begin the search.

Click this button to add a new contact record to the local Address Book.

Click this button to show advanced options for further filtering of the search results.

If you get too many results back, you may want to consider further restricting your search by using the Advanced options. Users can filter by address fields such as town or postal code (Where), other fields (What) and the specific database where you think the contact might be currently stored (Source).

Click on the telephone number of a contact to dial them.

All of the boxes from the Contact window, including the Notes box at the bottom, can be searched. You can also interact with some of the boxes to make a call, send an email, etc.
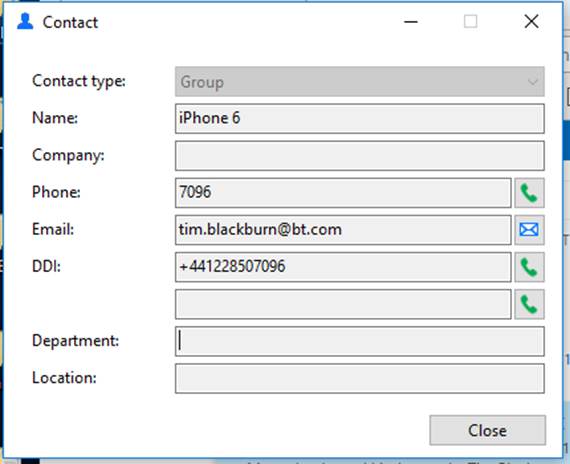
This is used to change the format of the Contact window. Different "types" have different templates. Pick the one that best represents the contact entry that you are creating.

Enter the contact's details into these boxes.
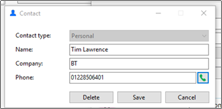
Click this button to dial the telephone stored alongside.


Click this button to compose an email to the stored email address in your default email client.

Click this button to permanently delete this record and close the window.

Click this button to discard any new information that has been entered or edits that have been made and close the window.

Click this button to save any new information that has been entered or edits that have been made and close the window.
The Call History window is accessed from the Call History item on the main menu or from the tray icon menu. As well as reviewing recent activity, you can dial someone from here by clicking on their telephone number.
By default, the Call History screen returns the fifty most recent calls.
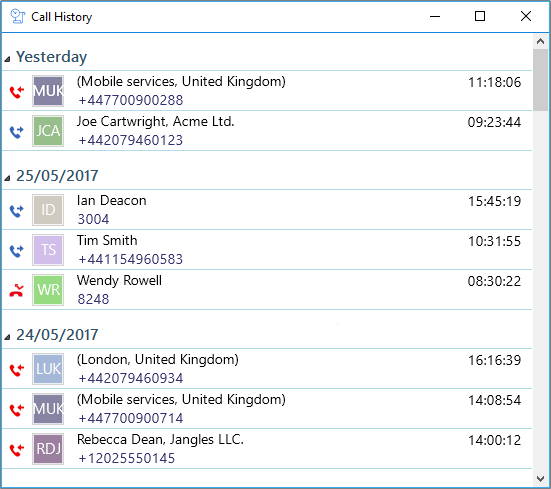
You can add a new contact record to the Personal Phone List from your Call History by clicking on where the name would appear (it will be a location name in brackets instead). When you do this, the Create contact window will appear.

If you hover over one of the entries in the list, then a context menu should appear.

Assuming that you are not already on a call, then the menu should contain the Make Call item.

By choosing this action, you can dial the number directly.
You should also see the Show Contact item for known contacts or the Add Contact item for unknown numbers.

Clicking either will open the Contact Record window.
If you are already on a call, different items will appear in the menu.

The Consult button places the current call on hold pending transfer and also makes a concurrent call to the selected number.

The Transfer button transfers the call immediately (remember to say goodbye first).

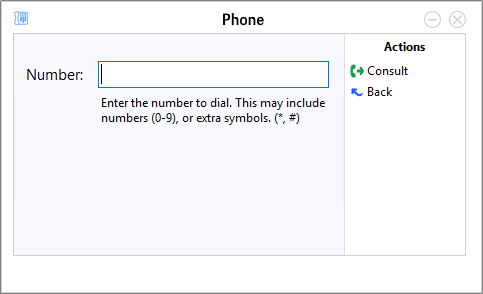
To transfer a call or consult a co-worker you do not press the Hold button. The Hold button has a different purpose (more about this later). Instead you either press the Consult button or the Transfer button.
You choose the button according to whether you want to speak to the other person (Consult) or not (Transfer).
You are then presented with a screen like the Make Call screen, but with the word Consult or Transfer at the top. Your call is not on hold at this stage yet. When you are ready, type the number to dial and click the Transfer/Consult button according to the required action.
If you are consulting then the original call will be put on hold pending transfer (the pending transfer bit is important).
If you are transferring then the call will be put straight through (remember to say goodbye first).
When consulting and you have finished talking to the other caller, you can either click Cancel to return to the original call or click Complete to transfer the original call to your co-worker.
You can also transfer calls by using the Presence window.
The Telephony page allows you to change settings relating to the telephony connection settings.

To login, follow these steps:
- Enter the username and password into the appropriate text boxes, this is the application username and password set in the Business Portal as identified above.
- Select the preferred directory mode. Selecting Group means that only company contacts in your Site will be visible, selecting Enterprise means that all contacts in your company will be visible.
- Click the Save button to store your settings and close the window.
The Interface page allows you to change settings relating to the look and feel of the software, including actions that happen when calls take place.
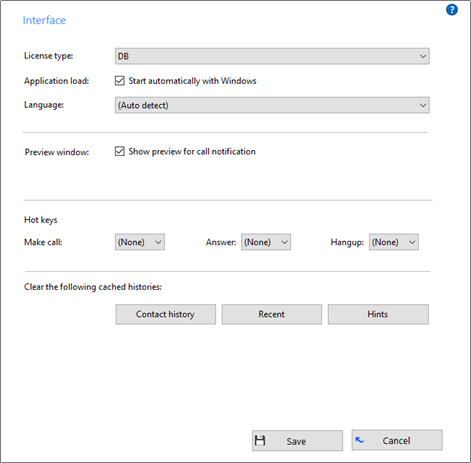
Displays a license type the Go Integrator Client uses.

To have the software start automatically when you log on to your computer, put a tick in the "Application load" tickbox. The setting will take effect next time you log on to your computer.

Language packs are available for the software to change the language of the user interface. By default, the software will attempt to automatically select the language to use based on the language setting of your operating system. However, you can change the language used by selecting from the Language dropdown list. If your language is not in the list, contact your reseller to find out when it will be available. Any changes you make to the language will take effect next time you start the software.

You can turn on or off the unobtrusive Preview window for all calls by ticking or clearing the appropriate box.

The "Hot keys" section allows you to setup keys on your keyboard and associate them with the following actions: Call (number must be highlighted in order to dial), Answer and Hangup.

The last section of the Interface page has buttons you can press to quickly and securely perform certain actions: clear the history of all CRM contacts from your call history, recent numbers (as shown in the Recent list), and which hints the software has shown you (clearing hint history allows the software to show you the hints again).
Click the Save button to store any new/edited information or click the Cancel button to discard any new/edited information.

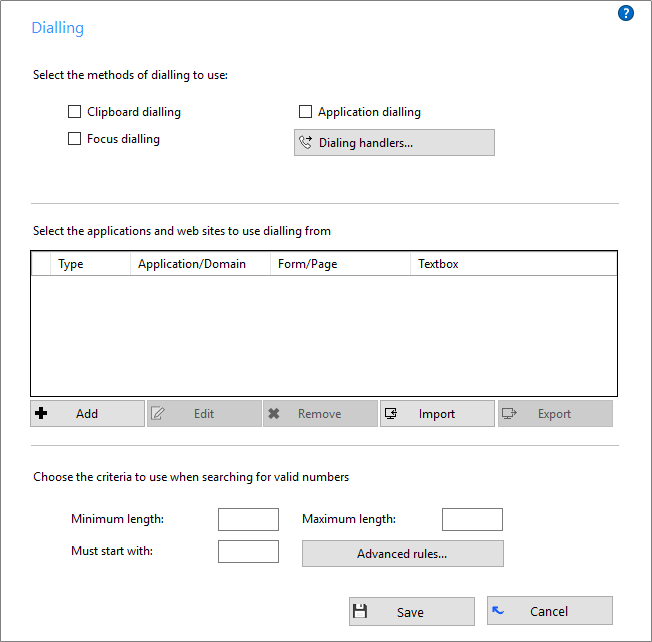
This page allows you to turn dialing on and off from all the different types of application that the software supports.
|
Description |
Expected behaviour |
Typical use |
|
|
Clipboard dialing |
When copying a valid telephone number to clipboard. |
Each time you copy a valid telephone number a small bubble will appear that will ask you if you want to call that number. |
If you want to dial a telephone number contained within an email (e.g. Microsoft Outlook) or a spreadsheet (e.g. Microsoft Excel) copy that number and Go Integrator Client will make this call. For more information on valid telephone numbers see Criteria section. |
|
Application dialling |
Most CRM applications store telephone numbers in textboxes. Application dialing can be trained to recognise these fields and place a dial button alongside them. |
Once Go Integrator Client has learned your application, you will see one of two options. Either a dial button appears on the right hand side of a textbox, or you will have to hover with your mouse above that textbox in which case the Dial and Hang up buttons will appear also on the right hand side of the textbox. |
If you want to dial from Windows PC applications (e.g. Microsoft Outlook's Contacts) our software will provide a dial button for textboxes where the telephone number is held. For more information on valid telephone numbers see Criteria section. |
|
Focus dialling |
Dynamically scans and recognizes any numbers in textboxes that look like telephone numbers. |
It will highlight any valid telephone number within a textbox you have clicked on (based on the criteria you've set) and provide you with three options: Dial, Hung up and Dismiss buttons. |
Recommended to use only if the Application dialing option is not appropriate. Focus dialing can be used for any type of Windows-based application that stores telephone numbers within a textbox. For more information on valid telephone numbers see Criteria section. |
|
Internet Explorer (native) |
To dial a telephone number directly from Internet Explorer. |
It turns valid telephone numbers into dialable hyperlinks. |
If you use a web-based CRM or visiting websites with contact details that include a telephone number that you want to dial. For more information on valid telephone numbers see Criteria section. |
|
Internet Explorer (add-on) |
To dial a telephone number directly from Internet Explorer. |
After enabling the add-on, you will be able to control (via IE Toolbar) whether or not you want the extension to turn valid telephone numbers into dialable hyperlinks. |
If you use a web-based CRM or visiting websites with contact details that include telephone numbers that you want to dial. For more information on valid telephone numbers see Criteria section. |
|
Google Chrome (extension) |
To dial a telephone number directly from Google Chrome browser. |
After installing and enabling the extension you will be able to control (via Chrome Toolbar) whether or not you want the extension to turn valid telephone numbers into dialable hyperlinks. |
If you use a web-based CRM or visiting websites with contact details that include telephone numbers that you want to dial. |
|
Mozilla Firefox (add-on) |
To dial a telephone number directly from Mozilla Firefox. |
After enabling the add-on, you will be able to control whether or not you want the extension to turn valid telephone numbers into dialable hyperlinks. |
If you use a web-based CRM or visiting websites with contact details that include telephone numbers that you want to dial. |
|
TAPI driver (dial only) |
This option refers to any application that supports/allows TAPI dialing. |
Once you have enabled TAPI and configured your CRM application, you will be able to dial out telephone numbers directly from your CRM application. Please note that when Skype for Business or Lync is installed, it can take over the Call function within Outlook causing the TAPI option to be disabled in Outlook. |
For TAPI-enabled programs like GoldMine, our software provides a TAPI (dial only) driver to handle call requests from such CRMs to the telephone system. |
|
TAPI request handler |
Certain types of TAPI applications don't specify a device to use. They simply hand-over the command to Go Integrator Client to handle the TAPI request. |
Once you have enabled TAPI, turned on this option and configured your CRM application, Go Integrator Client will handle the TAPI requests and allow you to dial telephone numbers directly from your CRM application. |
If you happen to use one of this type of CRMs (e.g. Sage Line 50), our software will capture and handle the TAPI request sent by this application. |
|
CallTo protocol handler |
CallTo is a protocol used for marking up telephone numbers. |
By enabling this option Go Integrator Client will identify the CallTo protocol and use the marked parameters (e.g. CallTo:[0123456789]) to handle the "Dial" request via our in-built PhoneHelper.exe application. |
Our software can work with any type of application (e.g. Maximizer) that supports CallTo protocol to handle call requests. |
|
Call from Skype for Business |
To dial a telephone number directly from Skype for Business. |
Enabling this will modify the Lync / Skype for Business menu to include the option "Call using desk phone". When clicked, this option will interrogate the Lync / Skype for Business Contact Card (last option in Lync / Skype for Business) and display the numbers held in it. Click one of the numbers to make your handset go off hook and dial the number. |
If you use Skype for Business with contact details that include telephone numbers that you want to dial. |
Tick the appropriate boxes to turn the required dialing methods on. The different methods of dialing are:
Clipboard dialing: Copy a telephone number to the clipboard so Go Integrator Client can dial it automatically.
Web page dialling: Go Integrator Client can automatically scans web pages in supported web browsers and convert anything that looks like a telephone number into a clickable hyperlink.
Application dialling: Go Integrator Client dynamically adds new Dial buttons to applications that you have trained it for.
TAPI Dialling: Provides a Windows TAPI Driver to allow third-party applications to dial through Go Integrator Client.
Focus dialling: Dynamically recognize any telephone numbers in the textbox where the cursor is located and allows to dial that number to be dialed.

Any applications or webpages that you have told Go Integrator Client to add Dial buttons to appear in the table. To add a new application or webpage to the list, click the Add button to launch the dialing wizard. You can use the Edit and Remove buttons to correct any mistakes you have made. If you have set up some applications that you dial from and are now moving PC, you can use the Export button to export the dialing settings of the applications and webpages that you have set up and save them in a single file named "dial.settings". If you have a "dial.settings" file and want to add the settings from it to your software, you use the Import button.
The last section on this page allows you to define what telephone numbers look like, to help the software more accurately determine whether a string of numbers it sees in a webpage or on the clipboard is really a telephone number or not. You can tell the software the minimum and maximum length of telephone numbers (anything outside the range will be disregarded as a real telephone number), and you can also specify that telephone numbers must begin with a certain string of characters. The "Advanced rules" allows "regular expressions" to be used to more accurately control whether a number should be considered as a valid telephone number or not.
Click the Save button to store any new/edited information or click the Cancel button to discard any new/edited information.
The Availability page allows you to change settings relating to the look and feel of the software, including actions that happen when calls take place.
If you use Microsoft Skype for Business, Go Integrator Client can automatically update the Microsoft Skype for Business state accordingly. Tick this option to enable the feature.
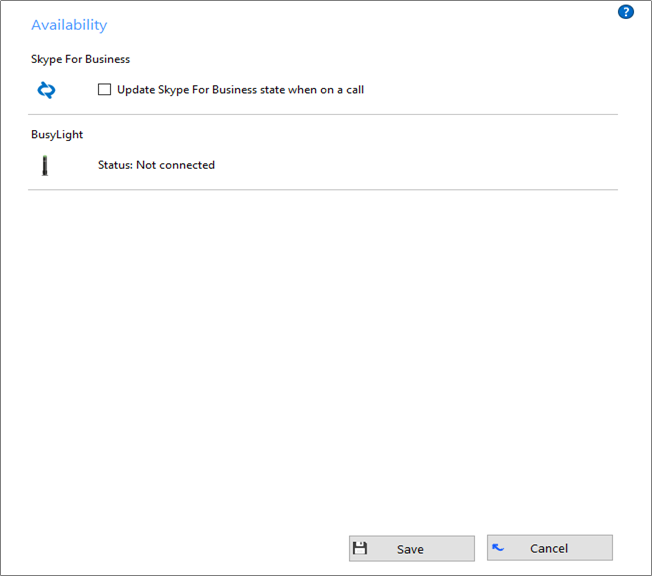
Go Integrator Client has plug and play compatibility with Busylight so everyone in the office can see whether a colleague is available for a conversation, busy on the phone, or simply does not want to be disturbed.
The Call Events page allows you to change settings relating to actions taken when a call is ringing or is in progress.
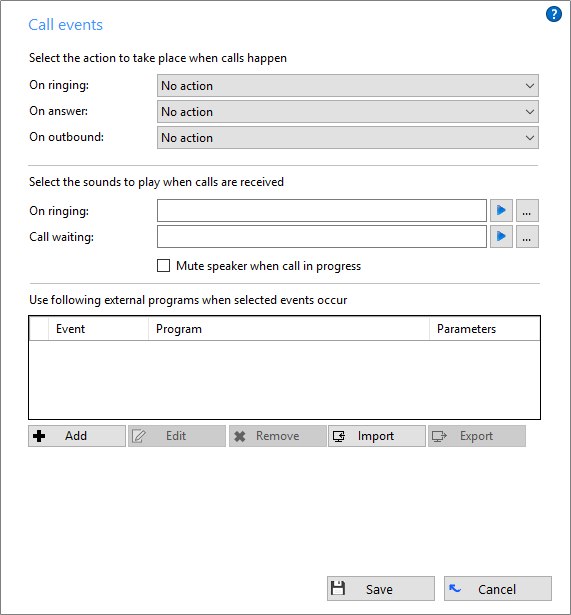
You can make the software either show the Phone window or pop the contact when certain events happen. Just select the relevant action from the relevant dropdown list: On ringing, On answer, or On outbound.

The next section allows you to choose a sound to have your computer play when your phone is ringing and/or you have a call waiting. This can help you to uniquely identify that it is your phone that is ringing and not a co-worker's. Please note that only audio files in WAV format are supported.


You can also tick the box to have your computer's sound automatically muted whenever a call is in progress, which is useful if you listen to music or Internet radio while you work, giving you a more professional appearance.
The software can also be configured to run one or more custom executable on selected events. To configure this, press the Add button and configure the following information: The Event list is used to select the event on which to run the program/application. The Direction list is used to select when it is either an incoming or an outgoing call. The Calls lists can be used to restrict events for internal/external or both.
The Program box allows you to select which executable to run. This box should be left blank to load an internet browser.

The Parameters box allows you to either choose the "command line arguments" for the program, or in the case of a browser, the URL to load. When using a URL, make sure that you include the URI scheme (ie http://). Then you can include in the Parameters any number of values from the call. For instance, to output the caller's telephone number you can include %Call\CallerContact\Tel%. To use the telephone number of the remote party (as opposed to the caller, who may be the local user), you can use the syntax %Call\Contact\Tel%, or you can use %Call\Contact\DisplayTel% to get the formatted number.
To help testing, you can use the word Message Box in the Program entry, if you want to show a message box with the translated Parameter output. Finally a "custom" button can be added to the preview window allowing a user to control application popping in the same way as for standard integrated applications.
Click the Save button to store any new/edited information or click the Cancel button to discard any new/edited information.
Custom events and buttons can be used to pass call information from Go Integrator Client to other software using command line parameters under conditions specified by you.
For example, your custom event could create a new call record in a database that automatically includes the telephone number when a call is connected.
Windows account username and password
For those who aren't sure what a "command line parameter" is, let's break it down with a brief run-through.
"Command line" refers to the "Command Line Interface" (CLI) which is a method of giving instructions to your computer by typing commands one line at a time to perform specific tasks like starting an application.
In very basic terms, a "parameter" is simply a definition of something e.g. name = Joe or telephone = 6329603210.
A "command line parameter" is just a parameter that is specified and used when a program is started by adding it to the end of the command line instruction that starts the program.
Another type of command line parameter called a "switch" can be used to start the associated program in a certain mode or affect it in some other way e.g. '–editmode' or '/AddNewContact'.
Let's take a look at an example of a typical command line instruction you would type manually and how it is made up:
- C:\Program Files\YourCRM\YourCRM.exe /AddNewContact /Phone=6329603210
- C:\Program Files\YourCRM\YourCRM.exe
- This section is the full filepath to the app that is being started. If the command line was just this section on its own, the app would start normally.
- /AddNewContact
- This section is a switch-type command line parameter that causes the application to automatically add a new contact record when the app starts.
- /Phone=6329603210
- This section is a command line parameter that is passing information to the application which in this case is a telephone number.
When the above example is run, it would open YourCRM which would then immediately create a new contact record by itself and enter "6329603210" into the "Phone" field.
When you set up your custom event parameters in Go Integrator Client, what you are effectively doing is using your chosen app's normal syntax except you substitute real call information with the name of the call information as in the example below. You can find the call information names and descriptions in the "Passable Call Information" section below.
- C:\Program Files\YourCRM\YourCRM.exe /AddNewContact /Phone=%Call\Contact\Tel%
- C:\Program Files\YourCRM\YourCRM.exe
- This section is the same as before.
- /AddNewContact
- This section is the same as before.
- /Phone=%Call\Contact\Tel%
- The phone number that was here has been replaced with the name of the specific piece of call information. Note that "/Phone=" is still present.
Then, when Go Integrator Client runs your custom event, it inserts the current call information into the parameters where you have specified.
Please note that command line instructions and parameters are usually entered manually using the "Run" window but you won't be doing that. Once your custom event has been set up, Go Integrator Client takes care of everything. We will get to setting up your own custom event shortly. Also note that the structure of a command line instruction (also called "the syntax") can vary a lot from app-to-app. For example, some apps' parameters start with a hyphen character (-) like "-Phone" but other apps use a forward slash (/) instead like "/Phone" etc. Whatever syntax your app uses, the principle is generally the same.
The call information that can be passed to other software is listed below (note that some are quite similar):
|
Description |
Name |
|
The number of the person making the call (this can be you if you are making the call) |
%Call\CallerContact\Tel% |
|
The number of the person call is to (this can be you if you are receiving the call) |
%Call\CalledContact\Tel% |
|
The number of the other person you are speaking/spoke to, as given by the phone system |
%Call\Contact\Tel% |
|
The number of the local extension involved in the call |
%Contact\Tel% |
|
The number of the other person you are speaking to, with the area code formatted for readability |
%Call\Contact\DisplayTel% |
|
The duration of the call (can only be used on events at the end of a call e.g. those using "Call Completed" triggers) |
%Call\DurationTotal% |
|
The unique ID of the call |
%Call\Id% |
Remember, the call information name must always be enclosed in '%' signs to properly identify it, otherwise the information will not be passed correctly. When Go Integrator Client runs your custom event, it inserts the call information into the parameter in place of the call info name e.g. if the other person's phone number is "6329603210", telephone = %Call\Contact\Tel% becomes telephone = 6329603210.
Chosen Application Parameters
Unfortunately, we can't help out that much with the parameters supported by your chosen app as you could be passing the call info to more or less any piece of software and each will have differing capabilities in this area. We suggest starting out with any help files or support documentation supplied with the software to find out what can be done using command line parameters. You could also search online using your chosen app's name and "command line parameters" as keywords
Before we get started with the actual configuration, it's important to know exactly what you want the custom event or button to do and under what conditions it should do it. If you haven't already done so, we recommend that you sit down with the relevant colleagues and decide exactly what you need.
There are four areas for consideration:
When to trigger the event – There are two options here. 1.Choose a series of combinations between one of four events, one of the two call directions and one of the two types of calls triggers which automatically initiate your custom event at a particular point during a call. 2.Create a custom button that is clicked at the appropriate moment during a call to trigger the custom event manually. The automatic triggers are:
When the call is:
Ringing
Connected
Completed
Missed
When the call direction is:
In
Out
When the call is:
Internal
External
The program that gets triggered – This could be a CRM app or any other software. Please note that the passing of information between Go Integrator Client and your chosen app will only work if the app is capable of receiving command line parameters.
The information that will be passed – There are several different pieces of information that can be passed from Go Integrator Client. These are listed in the "Passable Call Information" section along with further guidance on their use. This info can be passed to the triggered software along with any other parameters that are supported.
What is done with the passed information – You may only be able to achieve a limited number of actions depending on the command line functionality of your chosen app so you should be aware of its limitations.
The quickest way to confusion during the actual configuration stage is by going into it without having these four areas sufficiently thought through.
Right-click the Go Integrator Client tray icon in the system tray menu and then left-click the "Configuration" option from the menu that pops up. In the "Events" area, click the "Call Events" button to display the "Call Events" settings screen.

You can set default actions for certain conditions using the three dropdown boxes at the top but the section we are particularly interested in is the lower half.
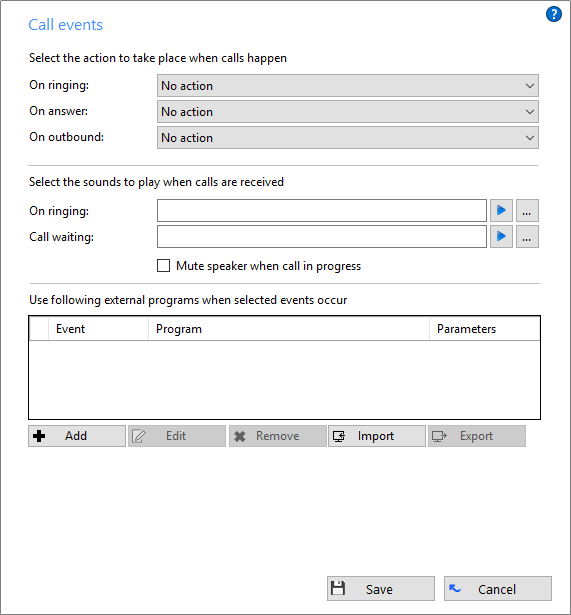
To begin with, the box containing custom events and buttons is empty but we can remedy this by clicking the "Add" button. The event details screen will be displayed.

Select the required event trigger from the "Event", "Direction" and "Calls" dropdown boxes.
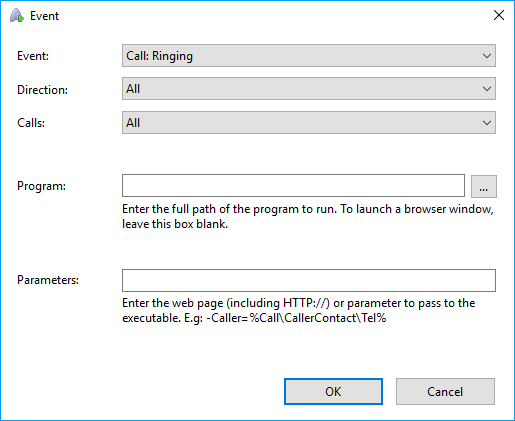
If you need to use a button rather than a trigger, you can select the "Custom: Button" option from the "Event" dropdown box instead and an extra textbox labelled "Text" appears between "Calls" and "Program". Enter the text you want to appear on the button.
The command line instruction that you will use to start your chosen app is broken into two parts: the program and the parameters.
The full file path to the program you are triggering (including the executable name) needs to go in the "Program" textbox. If you know the path you can type it directly into the textbox or you can click the "…" button to navigate to and select the program. Do not enter any of the command line parameters into this textbox. If you were entering our example from before, you would just enter:
C:\Program Files\YourCRM\YourCRM.exe

If you need to launch a web page instead of a specific piece of software, leave the "Program" textbox empty. All of the internet browser-related work is done in the "Parameters" textbox.
The "Parameter" textbox is where most of the magic happens as it is here that you will enter the required program parameters and call information to be passed to the triggered program. Any text that makes up the parameters other than the call information names will be passed to the triggered program "as is". If you were entering our example from before, you would enter:
/AddNewContact /Phone=%Call\Contact\Tel%

If you are launching a web page, enter the full URL and any required parameters, remembering to include the "http://" before the "www".
Once all of your custom event details have been entered, click the "OK" button to add your event to the list.

You can add as many custom events as you like but remember to click "Save" to store and apply them.
If you need to make any changes to a custom event, highlight it in the list and click the "Edit" button to display the event details screen. When your changes have been made, click "OK" and then "Save".
To delete a custom event, highlight it in the list, click the "Remove" button and then click the "Save" button.
To load a previously saved custom event, click the "Import" button, navigate to and select the saved settings file and then click the "Open" button. Click "Save" to finish.
You can save a custom event by highlighting it in the list and clicking the "Export" button. Enter a filename and location to store the file then click "Save".
The Integration pages allow you to see and modify the databases that you have set up integration with.
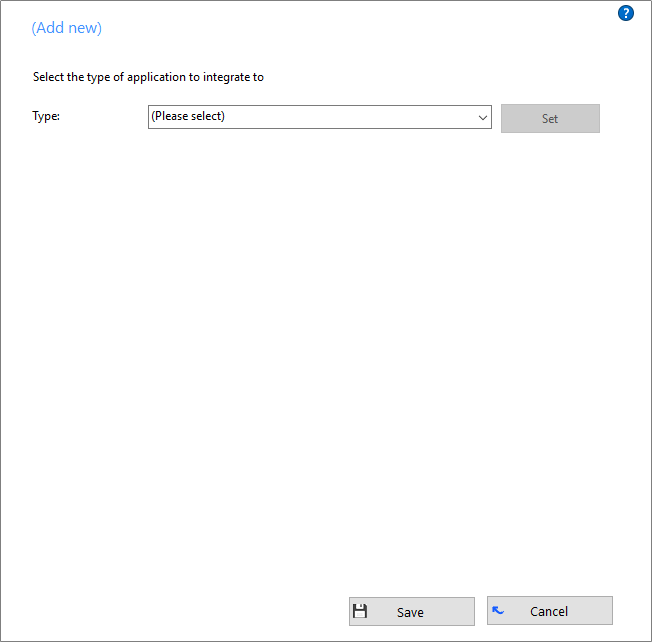
Integration means the database will be searched when calls happen to convert telephone numbers into names; and the database will be searchable manually from the Address Book window; and contacts that are found in the database can be "popped".
To make a new integration, click the (Add new) item and select the type of database from the dropdown list. The first time you enter this screen you may have to wait a few seconds as the software scans to find out what integrations are available.
To modify an existing database that you have set up, click its name in the list. You can also click its name and then click Delete if you no longer want integration to that database.
For applications like Outlook, the software attempts to find and use default settings that will "just work" for you, so you won't need to do anything more. For more complicated databases, the software will do as much as it can for you, but you may need to help it by for example entering your password, or telling it where the database files are, etc.
The Integration test area allows you to test the settings you have entered by entering a telephone number and seeing if the software can find it. If the number is found, you can click the Show contact button to make sure that "popping" works.
Click the Save button to store any new/edited information or click the Cancel button to discard any new/edited information.

The Versions page lists the version used for each component part that makes up Go Integrator.
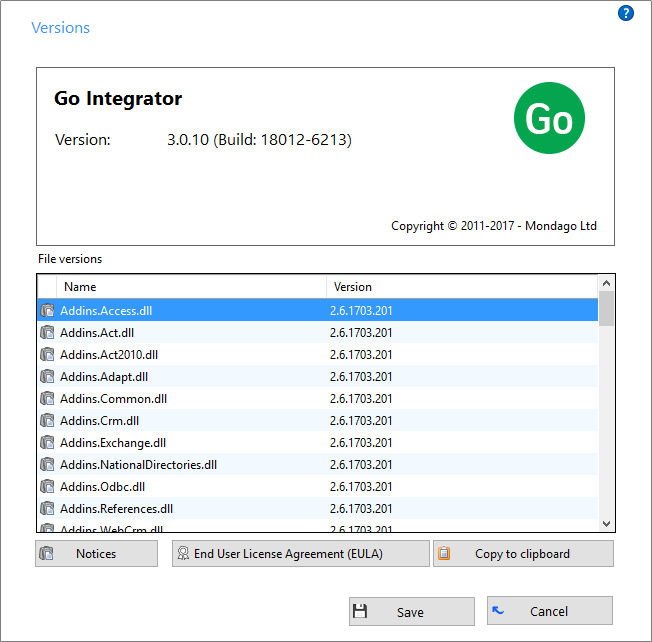
Most software these days consists of several small programs and libraries that form a whole and Go Integrator is no different. This information can be used to track down any rogue element that perhaps hasn't updated correctly or to provide clues to a problem's cause. Should something like that happen you could click the Copy to clipboard button and then paste the info straight into a document or email.
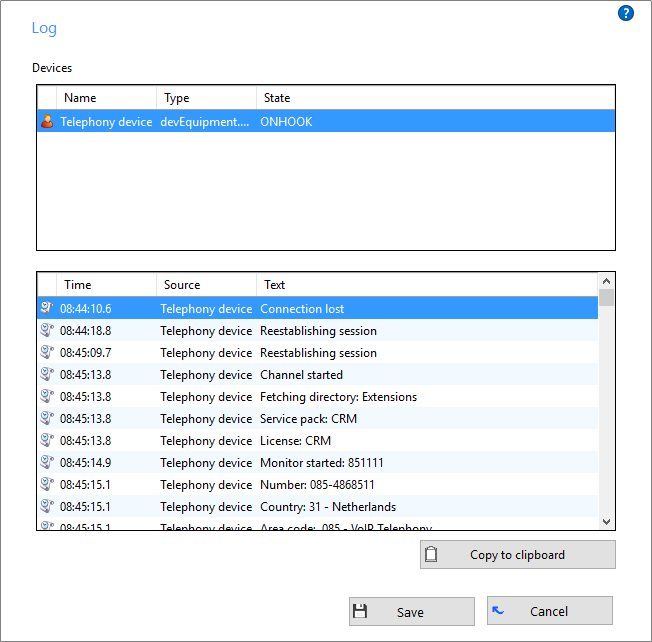
The Log page performs a similar function to the Versions screen in that it displays information that is useful in the event of a problem.
The Devices list shows the devices that are being used; this could include hardware and any apps that you have integrated with Go Integrator.
The panel below shows the Log entries. The log keeps a record of what Go Integrator attempts to do and whether it was successful or not. This information can be very useful when troubleshooting an issue; click the Copy to clipboard button and paste the info into a document.
The dialing wizard is used to configure Go Integrator to dial from webpages that use text boxes and from within applications that the software doesn't already know how to dial from.
In the Configuration screen, on the Dialing page, press the Add button to load the dialing wizard and then follow the appropriate set of instructions below.
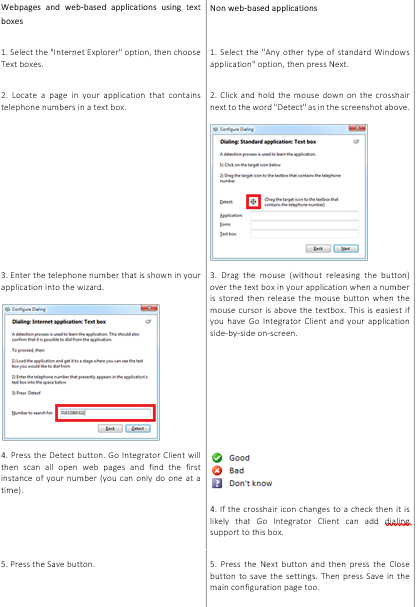
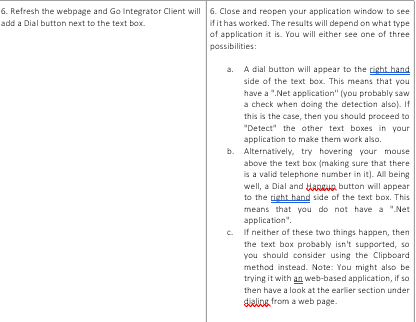
This content will guide you through the process of configuring web page dialing for Microsoft Internet Explorer, Google Chrome, Mozilla Firefox and Opera web browsers.
Configuring Microsoft Internet Explorer for dialing telephone numbers
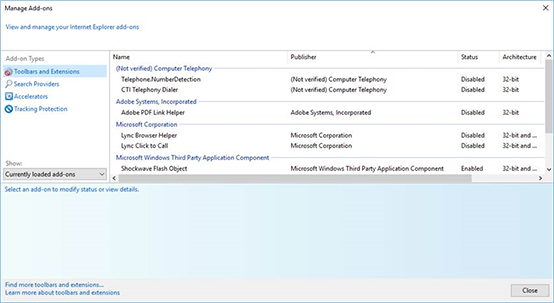
Go Integrator Client automatically installs two add-ons within the Internet Explorer browser: (1) "CTI Telephony Dialer" and (2) "Telephone Number Detection" which can be viewed and managed from the "Manage Add-ons" menu.
1. "CTI Telephony Dialer" is a browser extension that scans through web pages to find telephone numbers and converts them to clickable hyperlinks that you can dial. Please note that opening a web page (URL) from a browser shortcut pinned to the Windows Taskbar will disable web page dialing on any page opened in this way.

2. "Telephone Number Detection" is a Browser Helper Object designed to enhance user experience by providing a clickable button which allows user to control (On/Off) the extension's actions specified above, from within the browser's "Command bar". (Note: To display the Command bar, right click on the Internet Explorer navigation bar and choose "Command bar" from the dropdown list).
You can enable/disable these two add-ons by:
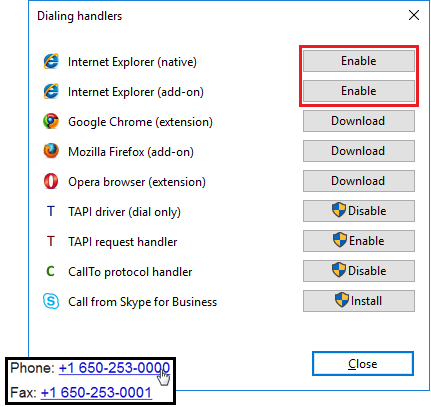
(1) Using Dialing handlers options within the Go Integrator Client client
(2) Changing its status in the "Manage Add-ons" menu within Internet Explorer
(3) By clicking on the "Phone Number Detection" button within Internet Explorer's "Command bar"
Configuring Google Chrome for dialing telephone numbers
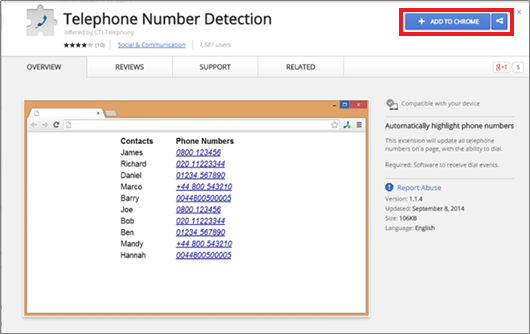
Dialing handlers provides option to download 'Telephone Number Detection' extension for Google Chrome. This extension turns valid telephone numbers into dialable hyperlinks. Installing the extension via the Chrome Web Store will cause the extension to automatically update whenever a new version is published (unless Chrome browser is configured differently).
To download this extension, simply click on "Download" button and Google Chrome will open Chrome Web Store to provide you with the option to add "Telephone Number Detection" extension to your browser. Click on "ADD TO CHROME" button.
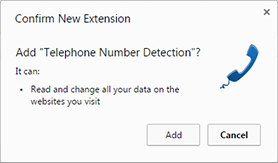
You will then be prompted with the confirmation message if you definitely want to have this extension in your browser. Click on "Add".
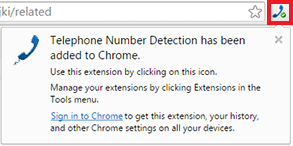
Once the extension has been added, a small blue telephone icon will be added to the Chrome toolbar.

After installing and enabling this extension you will be able to control it by the "On/Off" (green/red) telephone button.
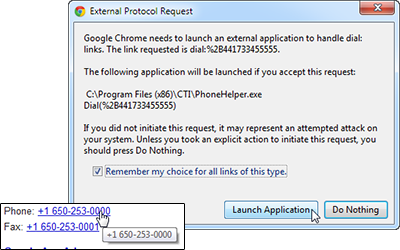
Chrome will now be able to identify numbers and convert them into hyperlinks that you can click and dial. The first time you use web page dialing in Chrome, a window may pop up with a message about external protocols. Click the "Remember my choice for all links of this type" check box to prevent the message from reappearing and then click "Launch Application" to dial the number.

An options screen can be accessed by right-clicking on the small blue telephone icon and then clicking on the "Options" menu item.
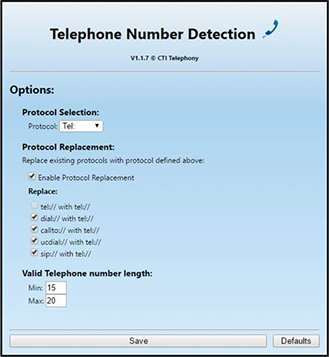
Protocol Selection: Select the telephony protocol for the extension to use.
Protocol Replacement: If conflicts occur, you can check the "Enable Protocol Replacement" option to replace existing protocols with the one selected in the "Protocol Selection" box. The individual protocols to replace can be selected by checking the appropriate boxes in the "Replace" section.
Valid Telephone Number Length: Enter the minimum and maximum for the amount of numbers a telephone number can contain in order to be recognized as a telephone number by the extension.
Click the "Save" button to store any changes or click "Defaults" to restore the settings to their default values.
Well done! That is the end of the Chrome configuration process.
Configuring Mozilla Firefox for dialing telephone numbers
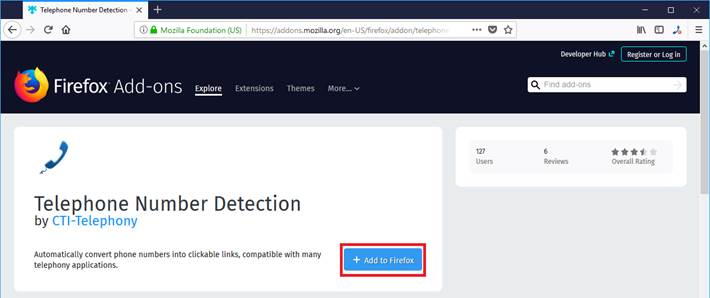
Dialing in Mozilla Firefox is achieved with the assistance of CTI-Telephony's "Telephone Number Detection" add-on which can be downloaded from the Dialing Handlers window. Click on the download button and Mozilla Firefox will launch Telephone Number Detection's "ADD-ONS" page. Click on "Add to Firefox".
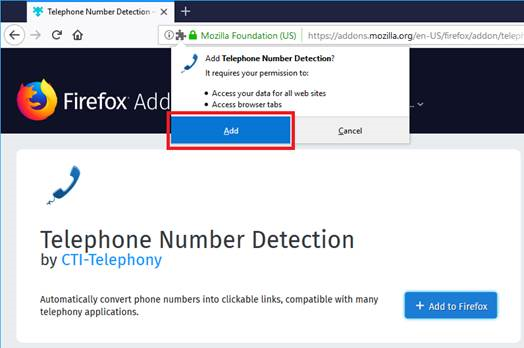
Firefox will prompt you with a permission request to enable the Add-on. Click "Add" if you agree to the permissions (this is required to use the Add-on).
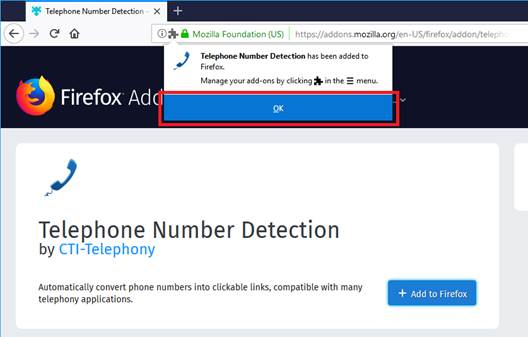
A small balloon message will pop from the top-left corner of the browser telling you that the add-on has been added to Firefox. Click "OK".
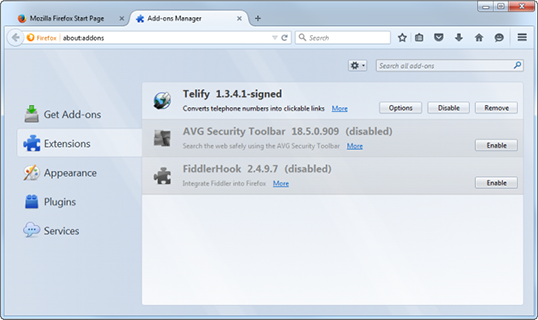
Click on the button in the top-right corner to reveal the main menu, then select the "Add-ons" option. A new tab will be opened that gives you access to the various extensions and plugins that have been installed. The files that make up the Telephone Number Detection add-on are already installed in the correct location so you don't need to install it but it may need enabling (which is what we are checking now). Click the "Extensions" option in the menu on the left-hand side of the "Add-on Manager" tab to display the list where Telephone Number Detection resides. Telephone Number Detection should be enabled by default. If the add-on's row is greyed out with an "Enable" button, then it is disabled. Just click the "Enable" button and then the "Restart now" button when prompted. Firefox will restart and dialing is almost ready to go.
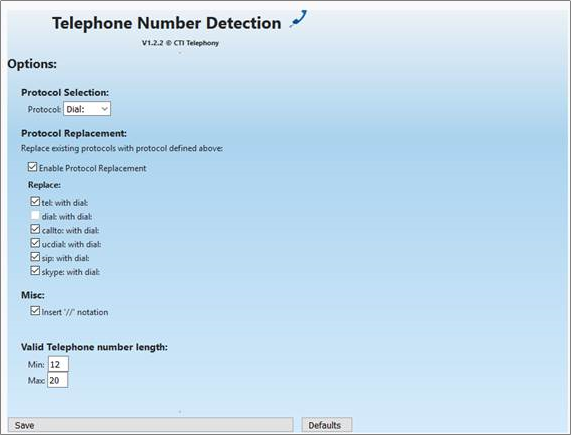
Once enabled, you can modify Telephone Number Detection's behavior and the appearance of the converted numbers by clicking the "Options" button which appears on Telephone Number Detection's entry on the "Add-on Manager" tab. Make sure that "callto:" is selected in the "User protocol" dropdown box.
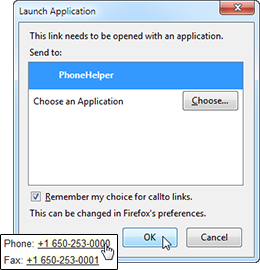
The first time you use dialing in Firefox, a message window will pop up informing you that the link you have clicked on needs to be opened with an application.
Click the "PhoneHelper" option in the "Send to" box and make sure the "Remember my choice for CallTo links" check box is checked as in the picture opposite. This is to prevent the message window appearing in future. Click the "OK" button to save the settings and dial the first number.
To enable the Telephone Number Detection quickly, you will now see a "shortcut" icon on the task tray menu.
When the icon shows a green "tick", this means the add-on is running and will detect numbers and convert them to links – which will dial when clicked. To disable the add-on the user should click this icon.

When the icon shows a red "cross", this means the add-on is not running and will not detect numbers or convert them to links. To enable the add-on the user should click this icon.

Congratulations! You've completed the Firefox configuration.
Configuring Opera for dialing telephone numbers
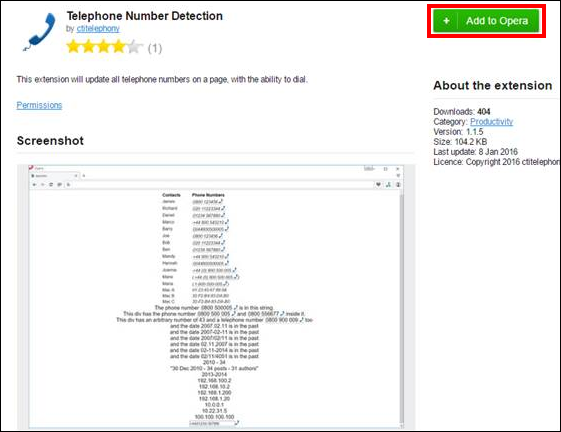
Dialing handlers provides option to download 'Telephone Number Detection' extension for Opera. This extension turns valid telephone numbers into dialable hyperlinks. Installing the extension via the Opera add-ons will cause the extension to automatically update whenever a new version is published (unless Opera browser is configured differently).
To download this extension, simply click on "Download" button and Opera will open Opera add-ons to provide you with the option to add "Telephone Number Detection" extension to your browser. Click on "Add to Opera" button.
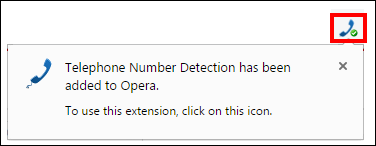
Once the extension has been added, a small blue telephone icon will be added to the Opera toolbar.

After installing and enabling this extension you will be able to control it by the "On/Off" (green/red) telephone button.
Skype for Business Integration
When Go Integrator is installed it will modify the Skype for Business menu to include the option "Call using desk phone".
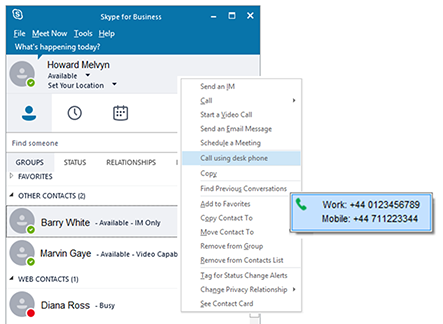
When clicked, this option will interrogate the Skype for Business Contact Card (last option in Skype for Business) and display the numbers held in it. Click one of the numbers to make your handset go off hook and dial the number.
In addition to this guide, there are individual Quick Reference Guides for each of the Go Integrator applications that can be used for guidance on how to get the best out the integration. These need to be requested separately, as explained further down in this document. However please be aware the WHC variant is slightly different from the vanilla application, which these guides refer to. Please be aware of the following main, but not exhaustive, differences when consulting these guides
- Call Logs – taken from the Call Logs displayed on the Business Portal and Toolbar
- Call Director – Diversion inhibit and Call Control are not enabled from with this feature
Go Integrator integrates with a whole host of calling features, all of which are covered off in the relevant section headings below.
The Preview window appears when a call is made or received. It contains much of the information from the main Phone window but in a much more compact format and it disappears shortly after a call connects.

- Close button - Use this to make the Preview window disappear immediately.
- Contact information - The telephone number and name of the other party.
- Call Duration – Shows the duration of the call.
- Call control actions - Use these to interact with the call. Using some of these will display the main Phone window.
Like the Phone window, the actions at the bottom of the preview window adapt to the state of the call. The example picture shows the actions that are available when a connected call is in progress. To conserve space, the text is only shown for the first action. The rest are depicted by their icons only.
When the Phone window is open, you can simply start typing a telephone number on your keyboard. Go Integrator for Mac will understand that you want to make a call and switch to the Make Call screen.
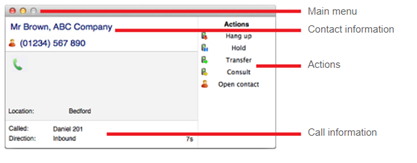
- Main menu: Click here to display the main menu.
- Contact information: The name and telephone number of the remote person.
- Actions: Use these buttons to interact with the current call and contact.
- Call information: Other information about the current call.
The Phone window allows you to interact with the current call in a number of ways.
Users can click any buttons showing integrated application names to open the caller's record in those applications.
When a call is ringing, you can choose to answer the call by clicking the "Answer" button or deflecting it (transfer it without answering it) to another extension. Deflecting a call is done in a manner similar to transferring calls. If you are already on the phone and someone else calls you, then you can use deflect productively to move the call to a co-worker.
It is also common to use this screen to perform a transfer of the current call to another extension or user. To do this you must be connected to the call (as opposed to it being on hold or ringing). To transfer a call you do NOT press the Hold button - it has a different purpose (more about this later). Instead you either press the Consult button or the Transfer button. You choose the button according to whether you want to speak to the other person (Consult) or not (Transfer).
You can also put calls on hold. Depending on your telephone system configuration, this means that the other person should hear music. When you are ready to talk to the caller again, use the Unhold button. Remember, the Hold button is not for transferring calls. It is purely to pause the call. If you want to transfer a call that is on hold, then first you will have to take the call off hold first.
To transfer a call or consult a co-worker you do not press the Hold button. The Hold button has a different purpose (more about this later). Instead you either press the Consult button or the Transfer button. You choose the button according to whether you want to speak to the other person (Consult) or not (Transfer).
You are then presented with a screen with either a Consult or Transfer button. Your call is not on hold at this stage yet. When you are ready, type the number to transfer to and if you are consulting then the original call will be put on hold pending transfer (the pending transfer bit is important).

When you have finished talking to your co-worker, you can either click Cancel to return to the original call or click Complete to transfer the original call to your co-worker. If you are transferring then the call will be put straight through (remember to say goodbye first). You can also transfer calls by using the Presence window.
The Address book window is accessed from the Address book item on the dock menu. It provides access to an a Company or Group Directory.

- Search text: Enter the text to search for within the contacts. Leave this blank to show every contact.
- Search button: Click on this button to begin the search.
- New contact button: Click this button to add a new contact record to the personal phone list.
- Search results: Click on the telephone number of a contact to dial them, or click on their name to edit or view their contact details
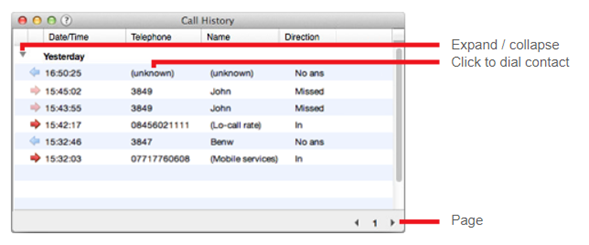
The Call History window is accessed from the Call History item on the main menu or from the tray icon menu. As well as reviewing recent activity, you can dial someone from here by clicking on their telephone number.
By default, the Call History screen returns the fifty most recent calls. The next fifty can be accessed by pressing the page right button in the bottom right of the window. Also, to aid readability you can hide and show individual days from your history by pressing the expand/collapse button to the left of the date.
In its most basic form, the Presence window provides a quick way to check the availability of your co-workers. The Presence window is accessible from the dock menu and contains a list of all the extensions, unless your administrator has chosen a different arrangement.
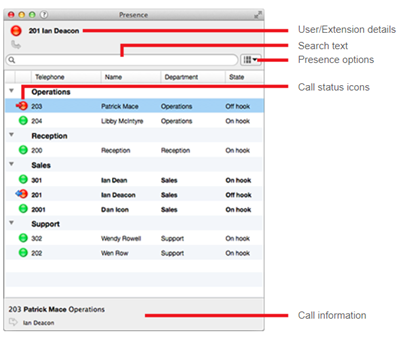
- User/Extension details: The current call status is indicated here by the icon.
- Search text: To filter the list of users/extensions, text can be typed into this box and the list will update to only show items containing that text.
- Call status icons: These icons indicate the current call status of each user/extension.

- Presence options: If you want to change default settings of your Presence window, you can select from "Group by" (Department, State and None) or "Sort by" (Telephone, Name, Department, State) menu, to personalize your contact list.
- Context menu: If you click on one of the entries in the Presence list, then a context menu should appear. Assuming that you are not already on a call, then the menu should contain the Make Call item. By choosing this action, you can dial the extension directly. If you had been on a call already, then the choices would have been Consult and Transfer in place of Make Call. This is appropriate because, if you are already on a call, then the expectation is that you are clicking on the extension with a view to transferring the call to them. If you see an extension that is flashing red then it means that the extension has a call ringing at it. Click on the extension and the context menu will include an option to pickup the ringing call.
- Call information: Other information about the current call.
The Integration pages allow you to see and modify the databases that you have set up integration with. Integration means the database will be searched when calls happen to convert telephone numbers into names. The database will be searchable manually from the Address Book window, and contacts that are found in the database can be "popped".
To make a new integration, click the (Add new) item and select the type of database from the dropdown list. The first time you enter this screen you may have to wait a few seconds as the software scans to find out what integrations are available.
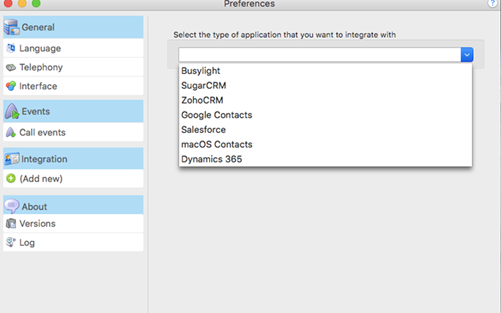
To modify an existing database that you have set up, click its name in the list. You can also click its name and then click Delete if you no longer want integration to that database. Click the Save button to store any new/edited information or click the Cancel button to discard any new/edited information.
We produce user guides which explains how to integrate and get the most out of your chosen application. To obtain these please follow the procedure below:
- Navigate to the following website
https://bt.gointegrator.com/help/login.php
- Select the Add-in you need to review and select view guide
- If you have not previously requested a username and password then please complete all fields
- For the field labelled “Reseller” enter BT Wholesale WHC Reseller
- Leave “Product Serial Number” blank
- Select Submit
- Once your ticket is reviewed and approved you will receive an email with a user name and password. This password is reset on the 1st Jan, 1st April, 1st July and 1st October. In the event you password does not work you will need to re-apply using the process above.
- The username and password is valid for all add-in guides.
- The username and password can be shared with colleagues in your organisation but not outside of your organisation.
You can make the software either show the Phone window or pop the contact when certain events happen. Just select the relevant action from the relevant dropdown list: On ringing, On answer, or On outbound. You can also turn on or off the unobtrusive Preview window for all calls by checking or clearing the appropriate box.
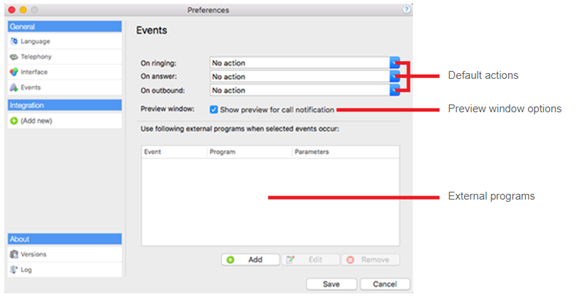
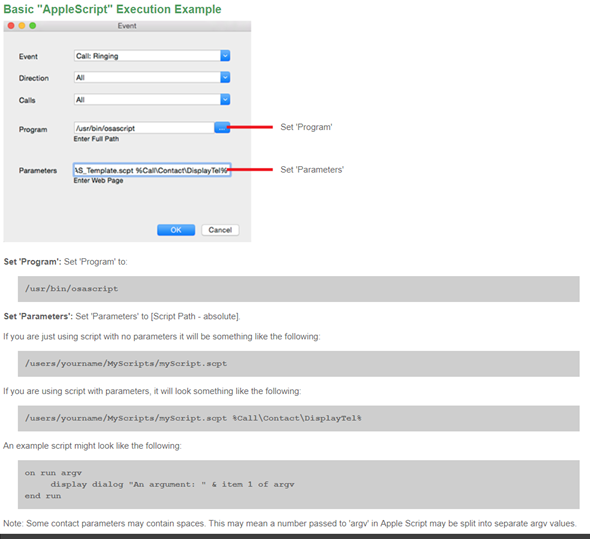
The software can also be configured to run one or more custom executable on selected events. To configure this, press the Add button and configure the following information: The Event list is used to select the event on which to run the program/application. The Direction list is used to select when it is either an incoming or an outgoing call. The Calls lists can be used to restrict events for internal/external or both.
The Program box allows you to select which executable to run. This box should be left blank to load an internet browser.
The Parameters box allows you to either choose the "command line arguments" for the program, or in the case of a browser, the URL to load. When using a URL, make sure that you include the URI scheme (ie HTTP://). Then you can include in the Parameters any number of values from the call. For instance, to output the caller's telephone number you can include %Call\CallerContact\Tel%. To use the telephone number of the remote party (as opposed to the caller, who may be the local user), you can use the syntax %Call\Contact\Tel%, or you can use %Call\Contact\DisplayTel% to get the formatted number.
To help testing, you can use the word Message Box in the Program entry, if you want to show a message box with the translated Parameter output. Finally a "custom" button can be added to the preview window allowing a user to control application popping in the same way as for standard integrated applications.
Click the Save button to store any new/edited information or click the Cancel button to discard any new/edited information.
The following dialling types are available to you:
- Type-in dialing: Double-click the green circle in the top right corner of the main menu bar and enter the telephone number in the "Make call" box. You can use the backspace key if you type it wrong. Hit enter or click on the "Call" button to make a call.

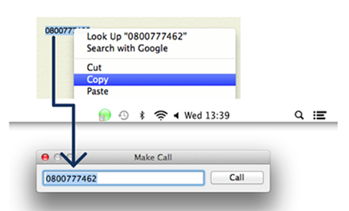
- Clipboard dialing: Our software client monitors the OS X clipboard so if you copy anything that looks like a telephone number, it will auto populate it and display a tiny clipboard next to the top green icon, showing that it is ready to make a call. Double-click on the icon and hit enter or click on the "Call" button to dial the number.
- Web page dialling: You can configure our client to search your web pages for telephone numbers to dial. It won't find all of them, unfortunately, but it is good at phone directory searches because it is optimized to understand this kind of page. To turn this functionality on, you need to install the Safari plug-in or Chrome extension.
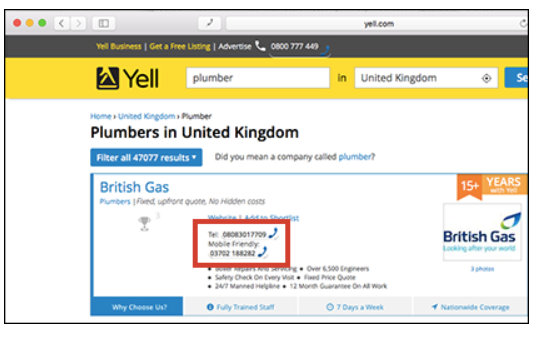
- Web page dialling: You can configure our client to search your web pages for telephone numbers to dial. It won't find all of them, unfortunately, but it is good at phone directory searches because it is optimized to understand this kind of page. To turn this functionality on, you need to install the Safari plug-in or Chrome extension.
- Safari: The first time you open a web browser after installing our software, you will be asked to install “Telephone Number Detection” so click ”Yes” to open the extension options as shown on the screenshot. This can also be manually opening by going to the Safari -> Preferences -> Extensions menu. You can then enable the extension by
selection “Enable Telephone Number Detection”.
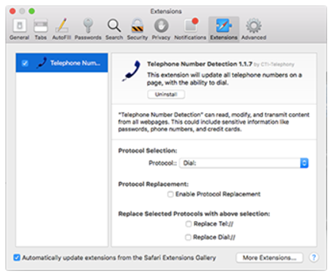
This action will create a telephone symbol in the top bar of the Safari Browser. If you are experiencing any problems or need to install/re-install the Safari plugin, please see "Version" section.

- Chrome:To dial a telephone number directly from Google Chrome browser, click here
- OS X Contacts dialing: The Address Book plugin is installed automatically with our client and it allows user to dial directly from the OS X Contacts. Simply click on the "field name" e.g. "mobile" (that has a valid telephone number) and from the drop-down menu dial the number. If you are experiencing any problems with this dialing method please go to "Version" section and re-install this plugin.
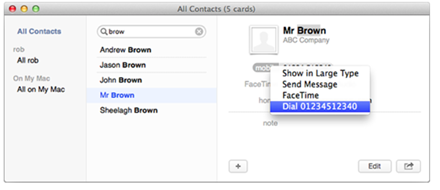
Most software these days consists of several small programs and libraries that form a whole and Go Integrator for Mac is no different. The Versions page lists the version used for each component part that makes up Go Integrator for Mac. This information can be used to track down any rogue element that perhaps hasn't updated correctly or to provide clues to a problem's cause. If you are experiencing any problems or need to install/re-install the Safari / Address Book plugin (necessary to dial from the web browser/necessary to dial from OS X Contacts), click on the Re-install Safari / Address Book Plugin button. For more information on how the Safari / Address Book plugin works please check Dialing Settings help page.
If the CTRL key is pressed at the same time as Versions is clicked, then an additional option will appear that allows all user settings to be cleared.
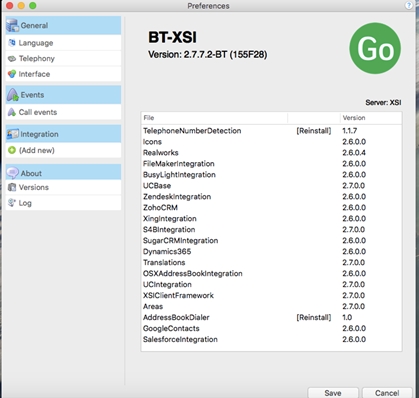
The Log page performs a similar function to the Versions screen in that it displays information that is useful in the event of a problem.
The Devices list shows the devices that are being used; this could include hardware and any apps that you have integrated with Go Integrator for Mac.
The panel below shows the Log entries. By default, logging is turned off but you can turn it on by ticking the Turn on logging tick box. Once enabled, the log keeps a record of what Go Integrator for Mac attempts to do and whether it was successful or not. This information can be very useful when troubleshooting an issue; click the Copy to clipboard button and paste the info into a document.
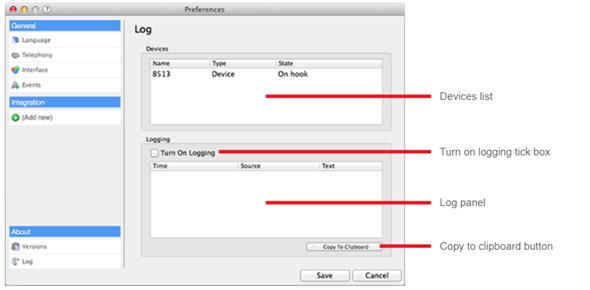
Language packs are available for the software to change the language of the user interface. By default, the software will attempt to automatically select the language to use based on the language setting of your operating system. However, you can change the language used by selecting from the Language dropdown list. If your language is not in the list, contact your reseller to find out when it will be available. Any changes you make to the language will take effect next time you start the software.
