Voice recording application user guide
Overview
Voice Recording provides a business with the ability to record their user’s calls for training and quality purposes and store them securely in the WHC cloud. Calls can be recorded upfront, or during a call a User can evoke the recording functionality. Calls are then stored by WHC for either 30 days, 180 days or 7 Years (2556 days) and at any time prior to expiration of these periods, these calls can be downloaded locally. If a User is ceased, then recordings will be deleted and no longer stored.
The application portal comes with standard branding and cannot be branded.
This application is available on the following WHC technologies:
Centrex Users
- Foundation
- Functional – Desktop only
- Fixed - All
- Mobile - All
SIPT Users
- Functional – Desktop only
- Fixed - All
- Mobile - All
Please note that for SIPT Users, local extension to extension calls between PBX users will not be recorded. This is because these calls are handled locally by the PBX and are not passed through the WHC platform and thus our Voice Recorder.
This document is intended for a WHC CP and their order entry and support personnel (CP Administrator), as it contains elements of provisioning, installation and configuration. If this document is to be used by a CP’s customer then it will need to be rebranded and altered to suit that audience.
Voice Recording provides a business with a user level recording function and allows calls to be recorded in real time either proactively or reactively.
Voice Recordings cannot be added to group functions such as Hunt Groups but should instead be added to all users behind the Hunt Group. A SIP Trunk should not have a Trunk Phone Number (pilot number) assigned that needs to have calls recorded. The Voice Recording application is directly integrated with WHC and works across all Hosted Centrex and Hosted SIPT User license types.
Voice Recording storage is set per Site built on WHC and this policy then applies to all users on that Site and to all other Sites. The available options for cloud storage are listed below and after the expiration of these periods calls will automatically be deleted:
- 30 Days – ideal for low level usage and non-business impacting usage
- 180 Days – ideal for compliance to FSA regulations and for training purposes
- 7 Years (2560 Days) – ideal for businesses operating in the financial sector
Voice Recording is integrated into the Feature Management Portal which is used to order Voice Recording for Users, as well as configure and manage the feature. The following functionality is available to the following user types:
- Reseller Administrator – Provide and Cease of Voice Recording Users. Configuration of recording policies.
- Company Administrator – Provide and Cease of Voice Recording Users where the Reseller has allowed this in the L2C Business Zone Ordering Portal for all Sites. Configuration of recording policies, recording playback, recording delete, recording archive and many other features.
- Site/Group Administrator – Provide and Cease of Voice Recording Users where the Reseller has allowed this in the L2C Business Zone Ordering Portal for own Site/s. Configuration of recording policies, recording playback, recording delete, recording archive and many other features.
- End User Administrator – Configuration of recording policies, click through to Voice Recording portal.
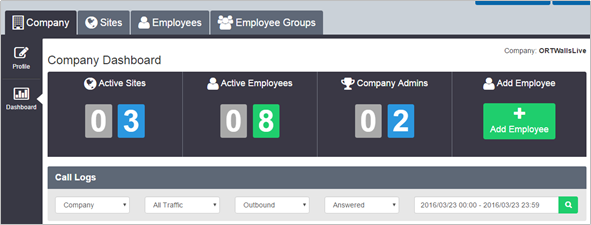
The Feature Management portal also adds the following to the dashboards:
- Site Dashboard – Last 10 Calls Recorded, total number of recorded calls, total number of users on that site with Voice Recording, View Details button for direct access to Voice Recording portal.
- End User Dashboard – Last 10 Calls Recorded, Calls in Progress, View Details button for direct access to Voice Recording portal.
Where a Company, Site and User administrator selects the View Details button from the Dashboard they will be signed into the Voice Recording Portal to access more advanced features as listed below:
- Dashboard - Summarised recorded calls are displayed on the landing page dashboard. This offers the Company/Site Administrator a useful overview of all their recorded call traffic as well as important system statistics such as Calls By Category, Frequent Callers, Call By Location, Agent Summary, Storage Stats etc. For the User, they can just see their own recorded calls and stats related to these.
- Near Real Time Monitoring – Company/Site Administrators have the ability to monitor and listen in on calls in progress (with a few seconds delay). This feature is particularly useful for training, order verification, client time-logging or when unusual usage has been detected. For the User, this capability is not available.
- Recorded Calls - Recorded calls are dynamically displayed and can be auto played from within the portal as well as offering other options such as, Download and Export features, Email Recordings and upload to certain CRM Integrations. For the User, they can just see their own recorded calls.
- Download Calls – Company/Site Administrators have the ability to download batches or multiple recorded calls as a zipped file from the Recorded Calls and Recycle Bin tabs. This is useful in instances where they need to send a batch of recorded calls to another person or want to save them for future reference. For the User, they can just see their own recorded calls.
- Archive Tool - The Archive Tool allows Company/Site Administrators to archive Voice Recordings to ISO images. These image files can be burned to a CD/DVD at the convenience of the administrator. For the User, they can only do this for their own calls.
- Annotation – The Company/Site Administrator has the ability to playback calls and place markers in the call with text comments as well as upload documents associated with a particular recorded call. When reviewing a call, Voice Recording allows ad administrator to go straight to the comments that they need to review. For the User, they can only do this for their own calls.
- CRM Integration - CRM allows the Company/Site Administrator to connect with a CRM application such as Sugar and Salesforce.com to upload recorded call files to specific contacts in the CRM application. For the User, they can only do this for their own calls.
- Comments - The Company/Site administrator has the ability to place text comments on specific calls. This is useful in situations where a reference number, case number or name must be associated with recorded calls. For the User, they can only do this for their own calls.
- Categories - Categories allow the Company/Site Administrator to create their own user-defined categories and associate them with recorded calls. For example calls can be categorized into ‘Sales’, ‘Marketing’ and ‘Support’ etc. Critical for associating marketing campaigns and in contact centre situations. For the User, they can only do this for their own calls.
PCI DSS requirement 3.2 stipulates that card validation codes and values must not be stored other than for transaction authorisation. The Voice Recorder therefore provides the facility to pause and restart recordings using DTMF codes entered by the agent during the call. When credit card data is about to be given the agent keys a code into their handset and the recording pauses. When the credit card details have been completed the agent re-enters the code to restart recording.
All recorded calls are encrypted and marked with a digital fingerprint. The encryption algorithm used is AES-256 (Rijndael). Encryption is applied at call termination prior to writing the call to online storage. The digital fingerprint uses a MD5 signature applied prior to encryption. The signature is used to verify the integrity of a call presented for playback. Tampering can therefore be identified and the use of MD5 is considered appropriate for allowing recordings to be used as legally admissible evidence.
30 days storage
Due to the amount of storage Voice Recording requires, BTW does operate a fair usage policy on 30 day storage options. The usage has been calculated on an average amount of call length time per user. 30 Day Storage Users are allowed 600 minutes (100MB) per 30 days. Storage is cumulative for a Site and shared across all users.
For 180 day retention of recorded calls, Voice Recording Storage is added to the customer Site and charged and is not subject to fair usage. This changes the service from free 30 days storage to a 180 day pay as you grow storage model. Storage is cumulative for a customer and shared across all users on the Site.
For 7 Year retention of recorded calls, Voice Recording Storage is added to the customer Site and charged and is not subject to fair usage. This changes the service from either a free 30 days storage or pay as you grow 180 day (6 months) to a longer term pay as you grow 7 years storage model. Storage is cumulative for a customer and shared across all users on the Site.
For both 180 Day and 7 Year storage options, storage is based on the accumulated recordings and is charged per GB. For clarity the following example demonstrations how those charges apply throughout the period selected for an End Customer whose agents are generating 0.6 GB of recordings each month.
|
|
New Recordings Generated |
Total Recordings Accumulated |
Chargeable Storage |
|
Month 1 |
0.6 GB |
0.6 GB |
1 GB |
|
Month 2 |
0.6 GB |
1.2 GB |
2 GB |
|
Month 3 |
0.6 GB |
1.8 GB |
2 GB |
|
Month 4 |
0.6 GB |
2.4 GB |
3 GB |
Hardware & Software Description
In order to successfully install and use this application, the following installation and licensing requirements should be met.
The web application has no operating system pre-requisites but the embedded archive tool is only supported on Windows XP, Windows 7, Windows 8.1 and Windows 10.
This application has cross-device support and will work on the following devices:
- Desktop (Windows/ MAC)
- Tablet
- Smartphone (Home Screen icon on IOS Tablets and Smartphone)
The Voice Recording portal has cross-browser support and will work on the following web applications:
- Internet Explorer 8.0 and higher
- Firefox
- Chrome
- Safari
The latest version and one version prior are supported for each browser.
Network and Firewall Requirements
You may need to allow access for the following on your firewall:
|
Protocol |
Destination |
Destination Port |
|
HTTPS |
callrecorder.yourwhc.co.uk 193.113.11.34 193.113.10.32 Note browser access is via a redirect from the Business Portal. |
TCP 443 |
UK Regulations on Voice Recording
The following is based on Ofcom information and should be used as guidance only. Businesses considering interception, recording or monitoring of telephone calls or e-mails are advised to seek their own independent legal advice and should not seek to rely on the general information provided below. The regulations governing the recording of calls in the UK are covered by different pieces of UK legislation. The main regulatory sources to consider are:
- Investigatory Powers Act 2016
http://www.legislation.gov.uk/ukpga/2016/25/contents - Telecommunications (Lawful Business Practice) (Interception of Communications) Regulations 2000 (“LBP Regulations”)
https://www.legislation.gov.uk/uksi/2000/2699/contents/made
- General Data Protection Regulations "GDPR"
- Telecommunications (Data Protection and Privacy) Regulations 1999 http://www.legislation.hmso.gov.uk/si/si1999/19992093.htm
- Human Rights Act 1998
http://www.hmso.gov.uk/acts/acts1998/19980042.htm
In addition to the above legislation some sectors have additional industry specific regulations that they need to operate within. The following list is not exhaustive:
- Markets in Financial Instruments Directive (MiFID) is a European Union legislative framework for governing the financial sector within Europe that came into force 3rd January 2018. The directive governs investment services provided by investment firms and banks as well as financial trading within stock exchanges and other trading vehicles. The regulations place increased responsibility on firms to record and securely store communications with their clients. Interactions with clients must be recorded and stored using the following guidelines:
- Conversations must be recorded when either instructions are confirmed with clients, or when advice is given to clients.
- The conversation must be recorded regardless of the medium used, i.e. whether it was a telephone or mobile phone call, an email instruction, some other electronic form of communication, or a verbal, face-to-face instruction.
- Records must be kept for a minimum of five years.
- Financial Conduct Authority (FCA). In the UK there are regulations from the FCA. The intention with MiFID II was to align these across Europe but in light of Brexit, FCA is included:
https://www.fca.org.uk/firms/recording-telephone-conversations-electronic-communications
- Payment Card Initiative Data Security Standard (PCI DSS). All firms who handle, transmit, store, or process information concerning credit or debit payment cards, or their related card data, are required to be compliant with PCI (Payment Card Initiative). This is a global standard.
- Independent Committee for the Supervision of Standards of Telephone Information Services (ICSTIS) Code of Practice. The ICSTIS is responsible for regulating premium rate services in the UK, which include content, promotion and overall operation.
- Direct Marketing Association (DMA). The DMA in the UK set out guidelines for members to ensure good practice for customer contact campaigns.
The following provides a set of questions and answers around Voice Recording legislation.
For what reasons can I record my customer’s calls?
The Lawful Business Practice (LBP) Regulations specify conditions upon which calls may be recorded. These are to:
- Provide evidence of a business transaction.
- Ensure that a business complies with regulatory procedures.
- See that quality standards or targets are being met in the interests of national security.
- Prevent or detect crime to investigate the unauthorised use of a telecom system.
- Secure the effective operation of the telecom system.
The above reasons can be broken down further under GDPR
- Participants have given consent to be recorded for one or more specific purposes;
- Recording is necessary to fulfil a contract to which the participant in the call is a party;
- Recording is necessary for fulfilling a legal obligation to which the recorder is subject;
- Recording is necessary to protect the vital interests of one or more participants;
- Recording is in the public interest or in the exercise of official authority vested in the recorder;
- Or, recording is in the legitimate interests of the recorder, unless those interests are overridden by the interests of the participants in the call which require protection of personal data
Do I need consent from my callers to record calls?
No, provided the recording is to meet one of the above conditions and you are not intending to make the recording available to a third party. If a company does not meet these cases, they should obtain consent.
How do I advise callers that they may be recorded?
The particular means by which you choose to do this are not specified. However consent should be opt-in if the above cases are not met. Consents must be freely given, specific, informed, and unambiguous; tacit consent is not enough.
Do I need to notify my employees that calls are recorded?
Yes, a company is obliged to inform employees their calls may be recorded. This is usually in the form of a paragraph in their employment contract.
What is the relevant legislation?
Regulation of Investigatory Powers Act 2000 ("RIPA")
An interception is only lawfully carried out if one of the following applies:
- The person intercepting the call has reasonable grounds for believing that it has the consent of both the caller and the intended recipient of the call to intercept; or
- The interception is carried out by a business in compliance with the Lawful Business Practice Regulations (see below.)
The Telecommunications (Lawful Business Practice) (Interception of Communications) Regulations 2000 (the "Regulations")
Interception is authorised if the business which is intercepting the call has made all reasonable effort to inform potential users that their communications may be intercepted, and the interception is then carried out:
- To establish the existence of facts (e.g. to evidence a business transaction);
- To assess or demonstrate that standards "which ought to be achieved" are achieved (e.g. quality control and training standards);
- To prevent or detect a crime, or for purposes of national security;
- To assess compliance with regulatory practices or procedures applicable to the business;
- To investigate or detect unauthorised use of the communications system; or
- To determine whether communications are relevant to the system controller’s business.
The Data Protection Act 1998 ("DPA")
Recording (and use of recordings) where you can determine the identity of either party to the call, either directly from the recording or from other information, would require you to first:
- Have informed that party how the recording would be used;
- Obtain consent for the recording to take place (This may be implied from the fact that the customer has been notified and not objected, but you should obtain explicit consent if the call reveals any information classified as sensitive by the DPA, i.e. details of race/ethnic background, political opinion, religion, trade union membership, physical/mental health, sexual life, offences committed or legal proceeding bought.)
- The obligations in relation to processing of that data also apply, so that the data must be kept for longer than necessary, under secure conditions and must be accessible to the customer at their request.
The Employment Practices, Data Protection Code
The code states that employees should be informed about any monitoring of their calls and that their consent should be obtained (as required under the DPA.)
Human Rights Act 1998
The Act provides that "everyone has the right to respect for his private life and family life, his home and his correspondence". To ensure that this right is protected employees whose calls are monitored should be given access to a private line over which personal calls can then be made, during their lunch break for example.
Telecoms License obligations – The Service Provision License
Private and business use of a telephone system is regulated by certain DTI licenses. These include a similar requirement to that set by the Regulations that "every reasonable effort" to inform parties to a telephone conversation that recording may take place should be made.
Do businesses have to advise if they are going to record or monitor my phone calls or e-mails?
- As long as the recording or monitoring is done for one of the above purposes the only obligation on businesses is to inform their own employees. Businesses wanting to record for any other purpose, such as market research will have to obtain your consent.
What do I do if my calls have been recorded unlawfully?
Under RIPA it is a tort to record or monitor a communication unlawfully. This means that if you think you have suffered from unlawful interception of your phone calls or emails you have the right to seek redress by taking civil action against the offender in the courts.
Will using the WHC Voice Recorder make me GDPR and MiFID II compliant?
It’s the end customer responsibility to comply with the MiFID II and GDPR regulations as it’s wider than just call recordings. The WHC Voice Recording solution does however include a number of compliance features designed to help End Customers meet their regulatory needs:
- The ability to define a minimum retention period of 5 years with the ability to create traceable archives.
- Recordings are encrypted using 256-bit AES encryption, an industry standard strong cryptographic protocol. An authorized account is required to decrypt and playback the calls.
- SSL sessions are used which means that user access to the interface is always encrypted, ensuring that data transmitted from the recorder to the user is secured when transmitted across networks.
- User access is both audited and controlled through a multi-tier account structure. System administrator account(s) provide a means to create and manage access policy for user accounts by allowing group policies to be defined and user accounts to inherit a group policy. System administrators can be prohibited from accessing call recordings if required.
- Other system tasks are also audited at a user level, for example playback, export of recordings, failed login and the addition of recorded endpoints.
- User authentication is linked to a single sign-on strategy.
- WHC has IVR options are available for the notification to users that a call is being recorded if not configured on the PBX or soft switch.
- Each recording has a digital watermark attached to demonstrate authenticity. MD5 is used to apply this.
- Mobile recording is supported for calls that utilise the UC Office app.
Is the WHC Voice Recorder PCI-DSS compliant?
No call recording system can claim to be regulatory compliant. There are no benchmark certifications available. For example, is it not possible for a call recording vendor to go to the PCI DSS regulatory body and request certification for their Voice Recorder. Instead, call recorders are developed with the features required to enable companies to demonstrate that their call recorder forms part of their compliance strategy and adheres to regulatory standards where needed. The WHC Voice Recorder provides the appropriate security standards and features that can enable organizations to comply with numerous regulations.
Provisioning starts by ordering the product from our sales team at sales@ic.co.uk
Once the order for the Site is completed and the Users have had Voice Recording turned on, the service is up and running. All subsequent configuration activity then takes places directly on the Business Portal/Voice Recording portal.
Basic Voice Recording information and configuration of recording policies is undertaken in the Business Portal. Where users need to listen to calls, manage calls or view advanced statistics, they simply click on the View Detail button on Business Portal Dashboard Tab.
Configuring Recording Policies
From with the Business Portal the administrator, and User, can also configure Voice Recording preferences. For an Administrator they should follow the steps below.
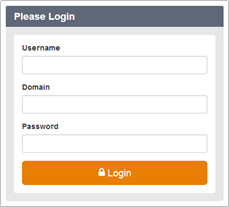
- Navigate to the Business Portal and enter your CP Administrator details followed by Login. If enabled by the CP, then the Company/Group admin will also be able to do this.

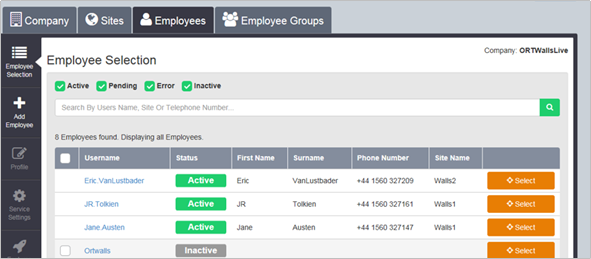
- Click on the Sites tab that the User belongs to.
- Select the magnifying button to return a list of all Sites followed by the Select button for the Site

- Select the Employees tab, followed by the magnifying button to return a list of all Users, followed by the Select button for the User you wish to configure.
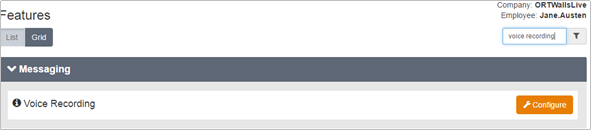
- Select the Features Settings button from the left-hand side tab.

- Scroll down to the Voice Recording feature or search for it in the search parameter. Select Configure.
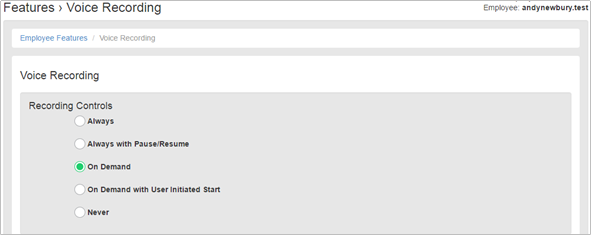
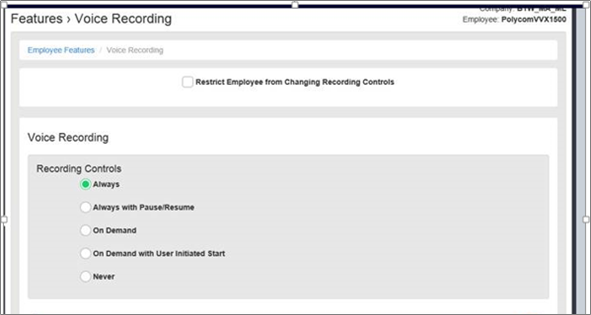
Select one of the following Recording Controls (policy):
- Always – records all calls. Please note that where SIPT Pause & Resume has been enabled by a CP Administrator for a Site, all Users at that Site gain the ability to pause call recordings when this recording control is set.
- Always with Pause/Resume – records all calls and user can use pause/resume multiple times from their Centrex handset or from the Business Portal. Where SIPT Pause & Resume has been enabled for a Site by a CP Administrator, Users are also able to pause call recordings from their PBX handset.
- On Demand – calls are not recorded unless you dial *44 (call needs to first be put on hold before dialling this code, then the call can be taken off hold) before the end of the call or select the Recording button from the Business Portal dashboard. Once you start recording it will record the entire call from start to finish, including the part of the call prior to the FAC being entered. Once recording has been activated, the option to pause/resume the call recording becomes available as well. This option is not supported for SIPT Users to control via their PBX Handset.
- On Demand with User Initiated Start – Calls are not recorded unless you dial *44 (call needs to first be put on hold before dialling this code, then the call can be taken off hold) before the end of the call or select the ‘start recording’ from the Business Portal dashboard. Once you start recording, it will only begin recording the call from point at which the FAC was entered. Once started, the options to pause/resume call recording become available along with the option to stop recording the call altogether. Once stopped, call recording can be started again within the same continuous voice call but this new phase of recording would appear as a separate call in the recorded calls list and will not be appended to any earlier recordings. This option is not supported for SIPT Users to control via their PBX Handset.
- Never – records no calls.
- Scroll down and clock on Save.
Hosted SIPT Users with the Voice Recording add-on are able to utilise all of the recording controls shown above using the Voice Recording buttons available in Business Portal. If the User needs the ability to pause and resume their call recordings from their PBX handset, a manual configuration can be requested that enables that functionality for a specific Site.
Ordering SIPT Pause & Resume
Raise a P4 support ticket using the following template:
- Title: Apply SIPT Pause & Resume
- Please enable SIPT Pause & Resume
- For Site: (provide the Site reference eg WHSTBTWxxxxxxx)
- Within Company: (provide the Company reference eg WHHCBTWxxxxxxx)
The configuration will be applied within 5 working days and you will be notified once completed via the ticketing system.
Restricting Recording Policies
Users can also configure these settings from their login, however an Administrator can restrict this by using the Voice Recording feature under the Site features page by navigating to:
- Sites > Features > Call Control > Voice Recording
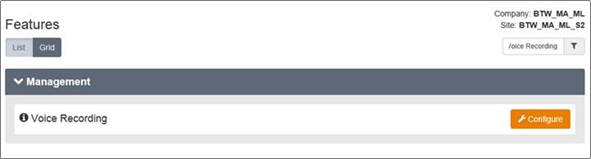
To configure, follow these steps:
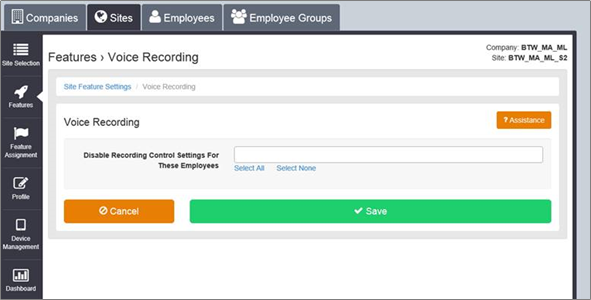
Select the Configure button.
In the Disable Recording Control Settings for These Employees box, select one of the following options:
- Select All will add all Users from the Site and allow you to restrict all users, likewise you can select all then remove any you don’t want included.
- Click into the field and it will display all users, click on one to add
- Click into the field and start typing the name of the user, then click on one to add
- To remove Users from the restriction, click into the users field and click x on the user to be removed.
- Click Select None to remove all users from the group
Alternatively if you just want to restrict one user whilst you are administering features against a User, navigate to:
- Employees > Features > Messaging > Voice Recording
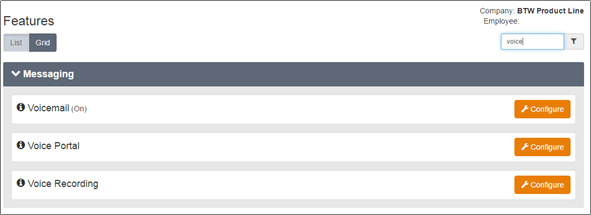
To configure, follow these steps:
- Select the Configure button.
- Select the Restrict Employee from Changing Recording Controls box
- Select Save.
More advanced configuration can be undertaken by clicking on the Details button from the Business Portal Dashboard of Voice Recording Feature page.

This will open up the Voice Recording portal in another window as per the screen below.
From this portal the Company and Group Administrator can:
- View the dashboard
- View, listen to, monitor, categorise, and add comments to calls in progress
- View, listen to, export, annotate, categorise, email, archive, export, download, upload to a CRM, delete, search, and add comments to recorded calls
- Recover, download, and delete calls from the Recycle Bin
- View, filter, and export reports
- Change time zones
Note: Company Administrators have access to calls in progress and recorded calls for all Users under each Site. Group/Site administrators only have this for their Site.
From here a User Administrator can:
- View the dashboard
- View, listen to, monitor, categorise, and add comments to their own calls
- View, listen to, export, annotate, categorise, email, archive, export, download, upload to a CRM, search, and add comments to their own recorded calls
- View, filter, and export reports
- Change time zones
The Business portal will display some key statistical information to the User that will allow them to see some high-level data on their recordings as well as allowing them to link straight through to the Voice Recorder. The Dashboard displays will only appear if the Sites and Users have Voice recording enabled.
When a Site Administrator logs in they will see the following information on their Dashboard:
- Total Subscribers - will display the total number or Users with a Voice recording license
- Details - clicking this will open up the Voice Recording in a new window

When a User Administrator logs in they will see the following information on their Dashboard:
Recorded Calls - will display the last 10 recorded calls for the User
Calls in Progress – will show any calls in progress.
- Where Always with Pause/Resume is being used, the User can select the Red pause button to pause/un-pause the recording.
- Where On Demand is being used, the User can select the Red Circle button to start the recording. They can also select the Red pause button to pause/un-pause the recording.
- Where On Demand with UI Start is being used, the User can select the Red Circle button to start the recording and the black square to stop the recording at any time. They can also select the Red pause button to pause/un-pause the recording.
Details - clicking this will open up the Voice Recording in a new window
On Demand Start/Stop Recording
If a User has any of the following polices selected then they will need to follow the steps outlined below to Start and Stop the recording.
- On Demand (once a call is started, it can’t be stopped)
- On Demand with User Initiated Start (once a call is started, it can be stopped)
Below are the steps the user can take when using Starting/Stopping functionality from either the portal or our supported Centrex phones. The behaviour on other Centrex handsets may be slightly different.
Start/Stop from the Business Portal
The simplest way to record a call, where Always is not set, is to use the Business Portal Dashboard as it allows a simple click of a button to turn the recording on, as opposed to using the Centrex handsets which first require you to put the call on hold.
- Log into Business Portal

- Navigate to the Dashboard and locate the Calls in Progress box which will show you any calls in progress, along with a Recording State of Not Started.
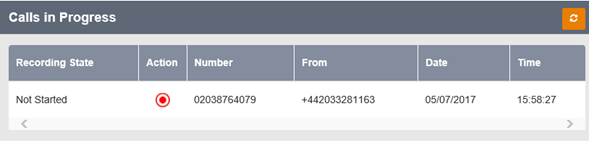
- Click on the Action red button to start the recording at any time during the call.

- The recording State will now update to show the call as Recording and will record the entire call, even the bit before the button was selected.

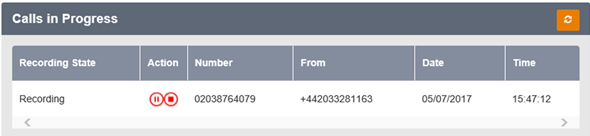
- If On Demand is set, then the user will now see a Pause button appear, allowing the call be paused/resumed.

- If On Demand with UI Start is set, then the user will now see a Stop button allowing the call to be stopped and a Pause button allowing the call be paused/resumed. With this setting it only records the call from the moment recording started.

Start/Stop from a Polycom VVX Handset
Option 1
- Press the Hold softkey on the IP Phone
- To Start the recording, key in *44 on the IP Phone dialpad, followed by the Dial softkey
- Message received “Your Call Recording service has been activated successfully, thankyou”
- Press the Resume softkey to continue with call.
- To stop the recording press the Hold softkey on the IP Phone, key in *45 on the IP Phone dialpad, followed by the Dial softkey
- Message received “Your Call Recording service has been stopped successfully, thankyou”
- Press the Resume softkey to continue with call.
Option 2
- Press the Transfer softkey on the IP Phone
- To Start the recording, key in *44 on the IP Phone dialpad, followed by the Dial softkey
- Message received “Your Call Recording service has been activated successfully, thankyou”
- Press the Resume softkey to continue with call.
- To stop the recording press the Hold softkey on the IP Phone, key in *45 on the IP Phone dialpad, followed by the Dial softkey
- Message received “Your Call Recording service has been stopped successfully, thankyou”
- Press the Resume softkey to continue with call.
Start/Stop from a Yealink T4x Handset
Option 1
- Press the Hold softkey on the IP Phone then the New Call softkey
- To Start the recording, key in *44 on the IP Phone dialpad, followed by the Dial softkey
- Message received “Your Call Recording service has been activated successfully, thankyou”
- Press the Resume softkey to continue with call.
- To stop the recording press the Hold softkey on the IP Phone, key in *45 on the IP Phone dialpad, followed by the Dial softkey
- Message received “Your Call Recording service has been stopped successfully, thankyou”
- Press the Resume softkey to continue with call.
Option 2
- Press the Transfer softkey on the IP Phone then the New Call softkey
- To Start the recording, key in *44 on the IP Phone dialpad, followed by the Dial softkey
- Message received “Your Call Recording service has been activated successfully, thankyou”
- Press the Resume softkey to continue with call.
- To stop the recording press the Hold softkey on the IP Phone, key in *45 on the IP Phone dialpad, followed by the Dial softkey
- Message received “Your Call Recording service has been stopped successfully, thankyou”
- Press the Resume softkey to continue with call.
Pausing Calls for PCI Compliancy
The Voice Recorder includes functionality to help users with PCI DSS compliance. PCI DSS requirement 3.2 stipulates that card validation codes and values must not be stored other than for transaction authorisation. The Voice Recorder therefore provides the facility to pause and restart recordings using DTMF codes entered by the agent during the call. To use Pause and Resume, the following policy needs to be set against the users Voice Recording feature:
- Always (SIPT Pause & Resume only)
- Always with Pause/Resume
- On Demand
- On Demand with UI Start
It is not supported on the following polices from Centrex phones or from Business Portal as the buttons will not be displayed:
- Always
- Never
When credit card data is about to be given the agent keys a code into their handset or uses the buttons available on the Calls in Progress screen on the Business Portal to pause the recording. When the credit card details have been completed the agent enters another code on the handset or uses the buttons available on the Calls in Progress screen on the Business Portal to restart recording. Both parties will hear the DTMF tones when the code is entered using the phone. This sequence is available as default, and does not need to be configured in the Voice Recording portal.
Note: It is the agent’s responsibility to ensure that the DTMF code is entered at the correct times to pause and resume recording. For further information on PCI Compliance visit:
www.pcisecuritystandards.org
Below are the steps the user can take when using Pause/ Resume function from Business Portal, when using our Polycom and Yealink phone range and from PBX handsets. The behaviour on other Centrex handsets may be slightly different.
Pausing Calls from the Business Portal
The simplest way to pause a call is to use the Business Portal Dashboard as it allows a simple click of a button to pause the recording, as opposed to using the handsets which first require you to put the call on hold.
- Log into Business Portal
- Navigate to the Dashboard and locate the Calls in Progress box which will show you any calls in progress that are being recorded.
- If On Demand is set, then the user will now see a Pause button appear, allowing the call be paused/resumed

- If On Demand with UI Start is set, then the user will see the pause button alongside the Stop button, allowing the call be paused/resumed.

- Once a call is recorded, the button will update and a red strikethrough will appear. To un-pause, simply click the button.

Pausing Calls from Polycom VVX Phones
Option 1
- Press the Hold softkey on the IP Phone
- To pause the recording, key in *48 on the IP Phone dialpad, followed by the Dial softkey
- Message received “Your Voice Recording has been Paused successfully”
- Press the Resume softkey to continue with call.
- To resume the recording, key in *49 on the IP Phone dialpad, followed by the Dial softkey
- Message received “Your Voice Recording has been Resumed successfully”
- Press the Resume softkey to continue with call.
Option 2
- Press the Transfer softkey on the IP Phone
- To pause the recording, key in *48 on the IP Phone dialpad, followed by the Send softkey
- Message received “Your Voice Recording has been Paused successfully”
- Press the Resume softkey to continue with call.
- To resume the recording, key in *49 on the IP Phone dialpad, followed by the Send softkey
- Message received “Your Voice Recording has been Resumed successfully”
- Press the Resume softkey to continue with call.
Pausing Calls from Yealink T4x Phones
Option 1
- Press the Hold softkey on the IP Phone then the New Call softkey
- To pause the recording, key in *48 on the IP Phone dialpad, followed by the Ok softkey
- Message received “Your Voice Recording has been Paused successfully”
- Press the Resume softkey to continue with call.
- To resume the recording, key in *49 on the IP Phone dialpad, followed by the Ok softkey
- Message received “Your Voice Recording has been Resumed successfully”
- Press the Resume softkey to continue with call.
Option 2
- Press the Transfer softkey on the IP Phone then the New Call softkey
- To pause the recording, key in *48 on the IP Phone dialpad, followed by the Ok softkey
- Message received “Your Voice Recording has been Paused successfully”
- Press the Resume softkey to continue with call.
- To resume the recording, key in *49 on the IP Phone dialpad, followed by the Ok softkey
- Message received “Your Voice Recording has been Resumed successfully”
- Press the Resume softkey to continue with call.
Pausing Calls from a PBX Handset
Ensure an Always or Always with Pause/Resume voice recording policy is applied to the Site in Business Portal and that the additional manual SIPT Pause & Resume configuration has been applied to the Site.
Note that any Centrex Users with the Voice Recording add-on provisioned on Sites where SIPT Pause & Resume has been configured will also gain this functionality.
Using SIPT Pause & Resume from the PBX handset:
- To pause the recording, key in *48 on the PBX Handset
- To resume the recording, key in *49 on the PBX Handset
Business Portal Display
For calls that are paused or resumed using the SIPT Pause & Resume method, these changes will not be reflected in the call status in the Calls in Progress section of the dashboard and using refresh will not update the status. Users should therefore not attempt to use the SIPT Pause & Resume method in conjunction with pausing calls via the Business Portal or with the existing method recommended for pausing calls from their Centrex Handset outlined in the section above.
Voice Recorder Login & Dashboard
To access the Voice Recorder application you simply need to click on the Details button from either the Business Portal Dashboard or from within the Feature.

This will then sign the user directly into the Voice Recorder and will provide admin privileges based on their profile. Please be aware, CP Administrators will not be able to sign into the Voice Recorder for Data Protection reasons

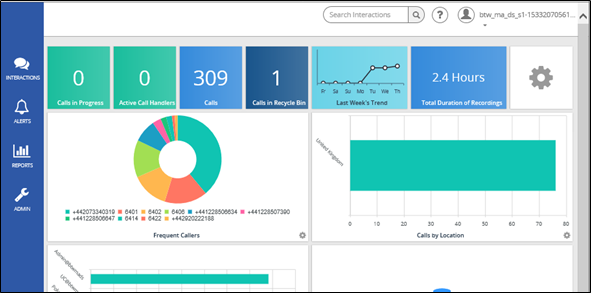
The Home screen Dashboard provides you with a real-time view of the Voice Recorder data including information about the number of calls in progress, active agents, trends etc.
On the left is a navigation menu with access to the following screens:
- Interactions
- Alerts
- Reports
- Admin
- Home (Not shown on the main Dashboard page itself)
At the top of the Dashboard is row of First Look tiles that provide a quick overview of live and recorded calls. Clicking on the following tiles provides direct access to the appropriate screen within the Interactions section for more information:
- Calls in Progress
- Calls
- Call in Recycle Bin
The final tile in the First Look row is Dashboard Options. Click the tile to flip the pane and reveal the available settings. Here the auto refresh rate can be set for the Dashboard, the options are every 15/30 seconds or 1/2/4 minutes. A Pause Button is also included that can be used when refreshes need to be paused.
The main Dashboard is divided into seven distinctive panes that give you a pictorial and data overview of the Company's current call usage: Frequent Callers, Calls by Location, Call Handler Summary, Active Call Handlers, Recent Calls, Calls by Category and Storage. Panes that can be customised have an Options button in the bottom right of the pane which when clicked flips the pane to reveal the available settings.
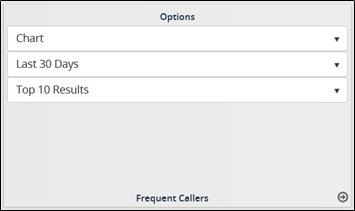
- Chart - toggles between displaying the information in chart or table form. This option is available for all customizable panes except Recent Calls.
- Last 30 Days - select the timeline for the information displayed in the pane. This option is available for all customizable panes except Recent Calls.
- Top 10 Results - select the number of results displayed within the pane.
Once changes have been made, click the Return button in the bottom right of the pane to return to exit the panel settings.
The Dashboard is set up to automatically adjust the view when the screen size is minimised, ensuring the most efficient use of screen space for the user. When the screen is minimised, the information tabs move from the left side of the screen to the bottom.
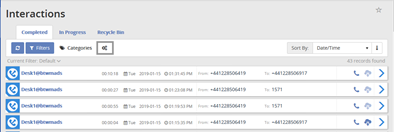
On the left side menu of the Dashboard, the first option is Interactions. Clicking this will take you to the Interactions page where you can access Completed, In Progress and the Recycle Bin call recordings.
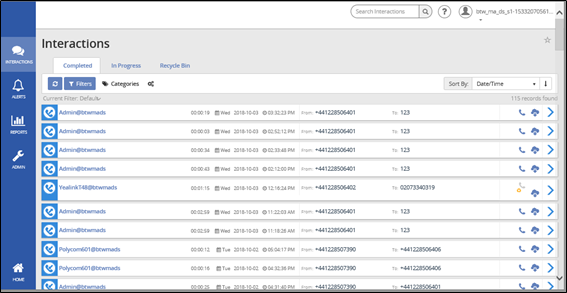
The page opens with all Completed calls displayed which provides a quick glimpse of vital information regarding the completed calls. The following information is displayed for recorded calls in the list:
- User – the number or description associated with the call.
- Duration – the length of the call.
- Day – the day of the week the call took place.
- Date – the actual date the call took place.
- Time – the time the call originated.
- From Number – the originating number.
- To Number – the terminating number.
- Play Recorded Call button – identifies whether or not there is a recording associated with the call. Click this button to open the Recorded Call and begin playing the audio. If the recorded call has already been sent to the recycle bin, the icon will be modified with a Recycle symbol.
- Download button - downloads the audio file of the recorded call as a zip file.
- View Details button - opens the recorded calls window.
Use the filter option in the top menu to create and save different customised views. Clicking on the User of any call will apply a filter to show all of that Users calls.
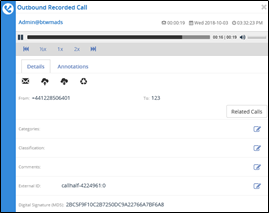
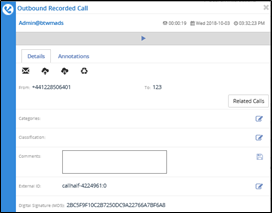
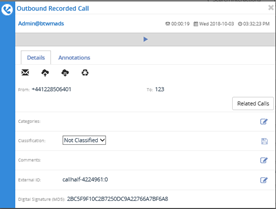
- Select a call from the Interactions page
- Click the Play Recorded Call icon to open the Call Details window.
- The recording will automatically play.
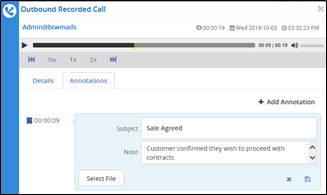
Annotations allow you to add comments and markers to specific parts of calls to indicate where in the call a notable event might have occurred. For example: a contact centre manager (or any other user) can find a notable event in a call and to mark it for future review with a comment. Additionally, you are able to upload pertinent documents to Annotations and download them for future reference.
- Select a call from the Interactions page
- Click View Details to open the Call Details window.
- Select the Play button to begin playing the recorded call.
- Pause the call at any point to add a note and click the Add Annotation button.
- Enter a subject and notes as needed, which will be time stamped at that point.
- Attach a file if appropriate and save the annotation.
- Continue playing the call adding further annotations if necessary.
- Click the Save button when finished
SIPT Pause & Resume Annotations
Voice Recordings that have been paused using the SIPT Pause & Resume method will automatically have an annotation added to the call which will contain the details of the pause and/or resume events in the Recorded Calls listing. Playback of these calls will have a silent gap in the call recording that corresponds to the pause/resume activations.
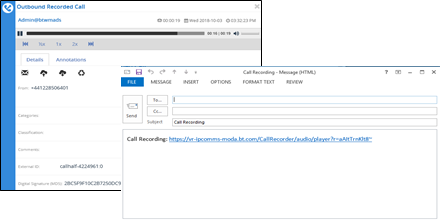
Situations will occur where you need to send a specific Voice Recording to a person that may not have access to the application or just for emphasis. In these instances, you have the ability to email the recorded call to that recipient. Although, there will not be an email option for any calls that have been deleted. You will still see the call detail but there will not be any audio associated with it.
- Select a call from the Interactions page
- Click View Details to open the Call Details window.
- Click the Email icon to trigger an email to open with a link to the call recording.
- Enter the email address(es) of the recipients
- Click send
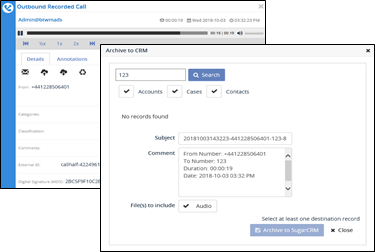
CRM allows you to connect the recording system with a CRM application such as Sugar and Salesforce.com to upload recorded call files to specific contacts in the CRM application. However, you can only have one active connection to a CRM application at a time. If you want to log into another CRM application, the credentials can be added from the User Settings menu.
- Select a call from the Interactions page
- Click View Details to open the Call Details window.
- Click the Archive to CRM
- Search for a destination record in the CRM system to add the recording.
- The Subject and Notes will be prepopulated, amend as appropriate.
- Click the Archive button to send the record.
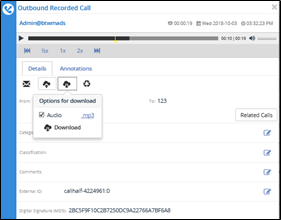
Download a Single Recorded Call
Individual calls can be downloaded from the main Interactions page or from the View Details window. Files are downloaded as a zip file that contains the audio file in MP3 format.
To download voice recordings, follow the steps below:
- Select a call from the Interactions page
- Click View Details to open the Call Details window.
- Click the Options for Download icon.
- Click the Download
- You have the option to either Save the files or Open and view them.
Download Multiple Recorded Calls
Up to 20 calls can be downloaded from the main Interactions page in one transaction. Calls are downloaded as a single zip file that contains all the audio files individually in MP3 format. Calls can be downloaded in bulk from either the Completed or Recycle Bin areas of the Interactions pane.
To bulk download voice recordings, follow the steps below:
- Navigate to the Interactions page, either the Completed or Recycle Bin tabs.
- Select up to 20 calls you wish to download by clicking in the corresponding option box to the left of the item. Selected items will turn grey.

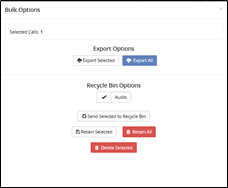
- Click the Bulk Options icon in the top panel to open the Bulk Options window.
- Under Download Options click the Download Selected
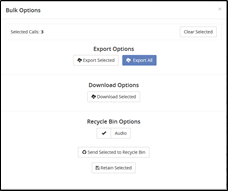
- You will have the option to either Save or Open the file
- If further calls are to be downloaded from an existing list, use the Clear Selected button in the Bulk Options window to deselect the previously downloaded calls before closing the Bulk Options window
As long as the original Interactions page is not refreshed, previously selected calls will show the bottom left corner of the icon to the left of each recording in white and the Download cloud icon will lighten in colour to signify calls that have been downloaded. This will help highlight where call lists of greater than 20 calls are required to be downloaded in multiple transactions.
If a call recording is not needed, it can be sent to the recycle bin.
- Select a call from the Interactions page.
- Click View Details to open the Call Details window.
- Click the Recycle Media Options icon.
- Click Send Audio to Recycle Bin.
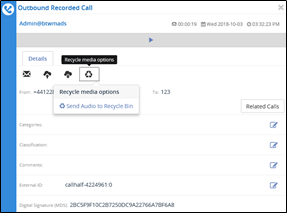
A record of the recording will however remain in the Completed Calls list which now includes a recycle icon as an indication that it has been sent to the Recycle Bin.
Delete Multiple Recorded Calls
If a number of call recordings are not needed, they can be sent in bulk to the Recycle Bin.
- Navigate to the Interactions page
- Select the calls you wish to delete by clicking in the corresponding option box to the left of the item. Selected items will turn grey.
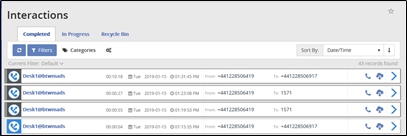
- Click the Bulk Options icon in the top panel to open the Bulk Options window.
- Under Recycle Bin Options click the Send Selected to Recycle Bin

- If further calls are to be deleted from an existing list, use the Clear Selected button in the Bulk Options window to deselect the previously deleted calls before closing the Bulk Options window
As long as the original Interactions page is not refreshed, previously selected calls will show in the bottom left corner of the icon to the left of each recording in white and the Playback icon will include a recycle symbol to signify calls that have been moved to the Recycle Bin for deletion.
- Select a call from the Interactions page
- Click View Details to open the Call Details window.
- Click the Edit link in the Comments
- Enter a comment.
- Click Save.
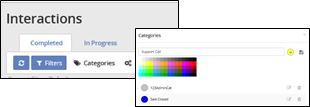
The ability to create categories for calls is beneficial to agents and managers because it allows them to categorise calls into areas unique to their business (for example: geographic region or customer satisfaction). You are then able to filter calls or run reports based upon these call categories.
- From the Interactions page, click the Categories button in the top menu.
- This will open the Categories window, which displays all available categories.
- In the text box, enter a new category name.
- Click the down arrow to the right and select a colour.
- Click Save to add the new category to the list.
Note: categories are specific to the User that created them. Other Users (including Admins) are not able to see what category a user has assigned to a particular call.
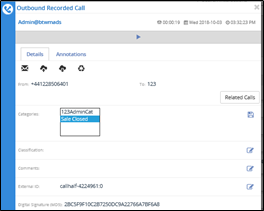
Category assignment of recorded calls is permitted after the creation of categories. When assigning a category to a call:
- Select a call from the Interactions page
- Click View Details to open the Call Details window.
- Click the Edit link in the Category
- Select the category from the drop-down list.
- Click Save.
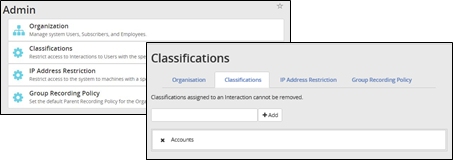
Classifications allow the user to set access permissions on a call. Calls can be assigned a classification, and cannot be accessed by users without explicit classification permissions.
Note: Classifications assigned to an Interaction CANNOT be removed.
- Click the Admin tab on the side menu to open the Admin page.
- Select the Classifications option to open up the Classifications
- Existing Classifications are listed.
- Enter a new Classification name in the text box.
- Click
- The new classification will be added to the list below.
Assign Classifications to Calls
- Select a call from the Interactions page
- Click View Details to open the Call Details window.
- Click the Edit link in the Classification
- Select the classification from the list
- Click Save.
Note: Classifications assigned to an Interaction CANNOT be removed.
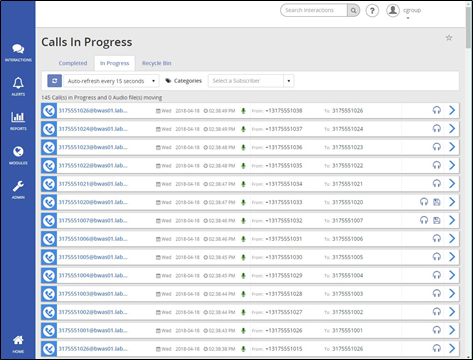
The Calls in Progress screen displays all calls that are currently being recorded. From the Calls in Progress screen you can monitor a call in progress allowing you to listen in on a call without the other call participants hearing you. You are also able to save a recording “on the fly” from this screen if a particular Number has been set as Do Not Record by the Group Administrator. And as with the Recorded Calls tab, you can add notes or categorise calls in progress. In order to better manage this screen, all column headers can be sorted by clicking on the applicable column header. Click once to sort the column in ascending order and click one more time to sort the column in descending order. The following information is displayed on the Calls in Progress screen:
- User – the Number or description associated to the call
- Day – the day of the week that the call originated
- Date – the date the call originated
- Time – the time the call originated
- From Number – the originating number
- To Number – the terminating number
- Recording Status – will always show a green microphone symbol for active recorded calls
- Monitor button – provides a monitoring button that corresponds the that particular call in progress
- Save Recording button – identifies whether or not the call is to be saved when it is complete. If all calls are set to be saved, the option box will appear disabled. If calls are not set to be saved, the option box will be enabled and the user can save a call on the fly by clicking in the option box while the call is still in progress.
- View Details button – where Comments, Categories and Classification can be assigned to the call.
By default, all calls to and from a Number are recorded and saved. The Group Administrator does have the option to override this default by applying the Do Not Record feature. For calls that aren’t set up to be saved, you can, on a one-time-basis, save them on the fly by clicking the Save button while the call is in progress.
- Click in the Save icon to record this call only. It will not record all calls going forward for this Number.

Note: Pausing or resuming a recording will automatically create an annotation for the call.
Monitoring a call is easy and can occur at any point in the call. Monitoring is used in situations such as: training, behaviour issues, or legal reasons. The other participants in the call are never aware that it is being monitored.
- Click on a call from the In-Progress screen.
- Click on the headset icon.

Please be aware that there is a slight delay due to the signal reaching the GUI but it is only a slight delay (>1 sec). If monitoring calls is a permanent required business function, the customer should be using the WHC ‘Call Barge In’ feature and not the monitoring function within the Voice Recorder.
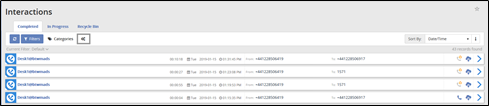
The Recycle Bin is intended to be a "checks and balance" system when deleting recorded call files. When you delete a recorded call file, it is placed into the Recycle Bin. The recorded call files in the Recycle Bin will remain there until you permanently delete them from the application or until the System removes them as per normal storage criteria. There will be times that you accidentally delete a recorded call file, or have deleted a recorded call file that actually must remain in the Recorded Calls tab. In these instances, you are able to recover a particular call or calls to the Completed calls tab as long as they have not been deleted from the Recycle Bin.
You also have the ability to download batches or multiple recorded calls as a zipped file from the Recycle Bin tab. This is useful in instances where you need to send a batch of recorded calls to another person or want to save them for future reference.
When it comes to deleting files permanently from the Recycle Bin, you have two options: delete selected files or empty the Recycle Bin in its entirety. While the recorded call file (or recording) is deleted from the system, a copy of the actual call detail record remains in the Recorded Calls tab but cannot be seen unless you have the Show Calls without Recordings filter turned on. Since all calls with a recording count against your allocated storage limit, it is good practice to empty your Recycle Bin from time-to-time. Before doing so, it would be reasonable to verify that all calls in the Recycle Bin can be permanently deleted. Once they have been deleted from the Recycle Bin, they can no longer be recovered.
Please note, we run a weekly exercise on a Sunday which removes all items from the Recycle Bin. Any calls you do not want permanently deleted should be downloaded before this runs.
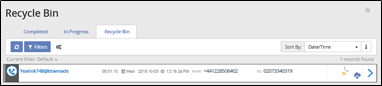
To recover deleted voice recordings, follow the steps below:
- Navigate to the Recycle Bin screen.
- Select one or more calls you wish to recover by clicking in the corresponding option box to the left of the item. Selected items will turn grey.
- Click the Bulk Options icon in the top panel to open the Bulk Options window.

- Click the Retain Selected

- You will receive a confirmation message, click Continue.
- Those file will then be displayed back in the Recorded Calls tab.
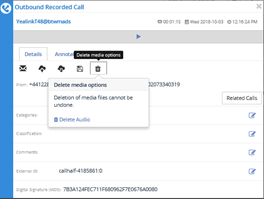
Delete Individual Recorded Calls - Permanently
To permanently delete an individual voice recording, follow the steps below:
- Navigate to the Recycle Bin screen.
- Click View Details to open the Call Details window.
- Select the Delete Media Options icon.
- Select Delete Audio (you will not be asked for further confirmation)
Delete Multiple Recorded Calls - Permanently
To permanently delete multiple voice recordings, follow the steps below:
- Navigate to the Recycle Bin screen.
- Select one or more calls you wish to delete by clicking in the corresponding option box to the left of the item. Selected items will turn grey.
- Click the Bulk Options icon in the top panel to open the Bulk Options window.
- Click the Delete Selected
- You will receive a confirmation message, click Continue.
- Those file will be permanently deleted and can no longer be recovered.
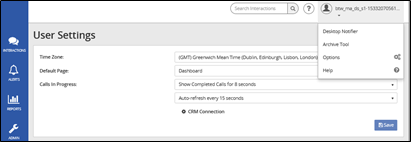
In the top right of the browser window, click on username to reveal a drop down menu. Here the users can download the Desktop Notifier and Archive Tool applications as well as access help pages.
To access the User Settings menu, select Options. Here the User can configure their time zone and set an alternative default page when they login. They can also configure a CRM connection.
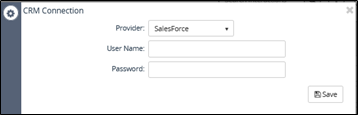
- From the User Setting screen, click CRM Connection
- Select a CRM provider (Salesforce or SugarCRM)
- Enter the Username
- Enter the Password
- Click Save
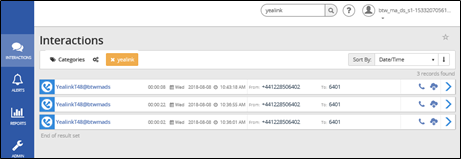
The Search feature allows you to search any part of the call record (Number, Duration, Time, Comments, etc.) on the Recorded Calls screen in order to find a specific call record. For example: if there are 10 pages of recorded call files on the Recorded Calls screen and you need to find a specific call record that you know has a comment associated with it that has the word test in it, you can search for that word to find that call record.
- Type the desired search term in the Search Interactions field in the upper right of the screen.
- Click enter
- The Interactions page will be opened, displaying all call records with the search word(s).
Alerts can be created based on specific call conditions. When those conditions are met, you will be notified either on screen using the Desktop Notifier application or via email with the pertinent details; so that you can address any issues or make any necessary changes to current policies or procedures.
Navigate to the Alerts tab via the left menu of the Home Page Dashboard to view to display a list of alerts that have occurred. You have the ability to clear alert(s) by clicking the Dismiss button.
- Click Manage Alerts to display existing Alert Definitions.
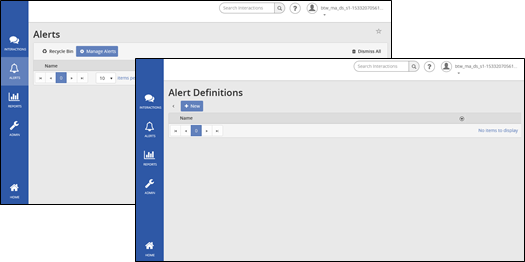
- Navigate to the Alert Definitions page.
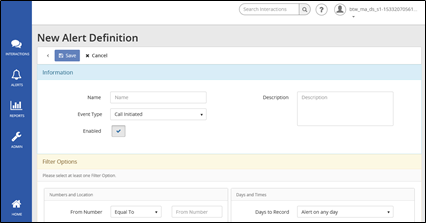
- Click the New button
- Complete the form with an alert Name, Description, Filter Options and Action etc.
- Click Save.
Note: Alerts will be temporarily disabled if they begin to cause excessive logging/emailing resulting in possible network congestion. In such cases, an email will be sent to the owner of the alert.
The obvious reason that an alert is disabled is that it is no longer being used. Another less obvious reason, an alert is temporarily disabled by an Administrator because it was causing too many emails to be sent out, potentially causing congestion on the email server. Since alerts can be reused, they should not always be deleted. If an alert was temporarily inactivated because too many emails were being generated, the alert should be edited before it is reactivated.
- Navigate to the Alert Definitions page.
- Click on an Alert to see the expanded view. By default alerts are set to Active.
- Click the Active/Inactive status button to toggle status.
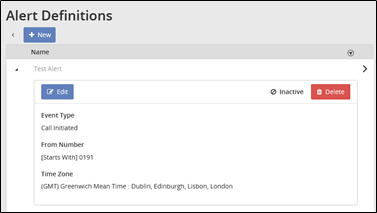
- Navigate to the Alert Definitions page.
- Click the Delete

Navigate to the Reports tab via the left menu of the Home Page Dashboard.
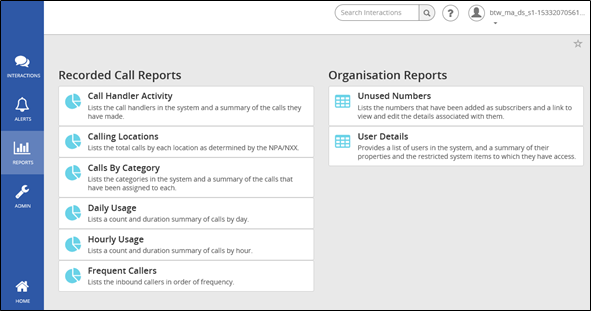
There are eight reports included in the application that assist the user with administration activities. The reports identify information that can be found on the Dashboard, or Interactions tabs, but in more detail. Reports can be exported and saved to your own PC. Additionally, you can filter on information in the reports such as number, date, and time.
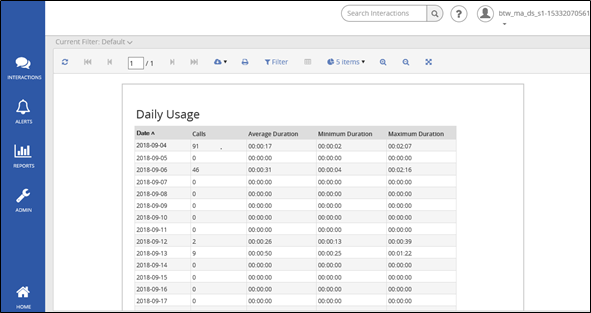
Please note some of these images are taken from the previous 4.8 version and may look slightly different on the 5.0 version, however the steps described below are still correct.
This document describes the applications that perform the task of archiving SmartRecord audio and video recordings to ISO images. The content of these images is accessible via the Viewer. The Viewer allows you a way to search for content as well as playback the available audio and/or video file. For safe keeping, these image files may be burned to CD/DVD at the convenience of the user.
Two options are provided for archiving files: a command line application, SRIPArchiveClientConsole.exe, and a window form application, SRIPArchiveClientForm.exe. The user provides information that these applications use to query the database for records that fit the given search criteria. The search is based on date range and user authorization. With SRIPArchiveClientForm, the date range is fixed; with
SRIPArchiveClientConsole, it can be either fixed or rolling. Fixed date is simply a search for recordings that fall between the given start/end date. Rolling date is a dynamic date calculation driven by the content of the lastnDays parameter; this is important for creating scheduled archive tasks and will be discussed later.
The data retrieval between the client applications and the provider web servers is performed via web services
In order to access the archive tool, you will need a username and Password for each Site that requires access. To request this please follow the procedure outlined below:
Raise a P4 Fault Ticket against any existing Inventory item
Title the ticket as ‘Voice Recording Archive Tool’
Within the ticket please provide:
- Resellers Name (only required if request is by a Super Reseller)
- Company Name (name of the Company that requires access to the tool, as built on Business Zone)
- Site Name (name of the Site that requires access to the tool, as built on Business Zone)
- Company Email address (this is where the Username and password emails will be sent)
Our back office team will then process this request. Once completed the named emailed contact will receive 2 emails for the archive tool, one with the Username and one with the password
Archive to ISO Image - Win Form
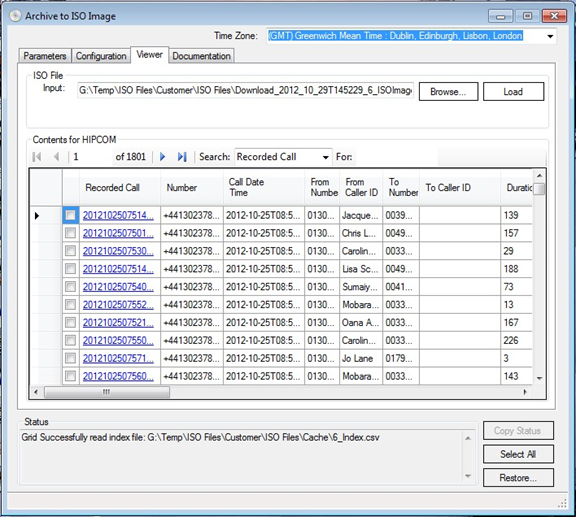
The GUI provides the easiest way to create an ISO image. Images can be created by simply entering the required search data and clicking a button. Once the request has been filled, the winform saves your selections; when you open the tool the next time, everything except your password will be restored. The winform also includes an ISO Viewer that gives you access to the content downloaded. The winform application consists of 4 sections: Parameters, Configuration, Viewer and Documentation.
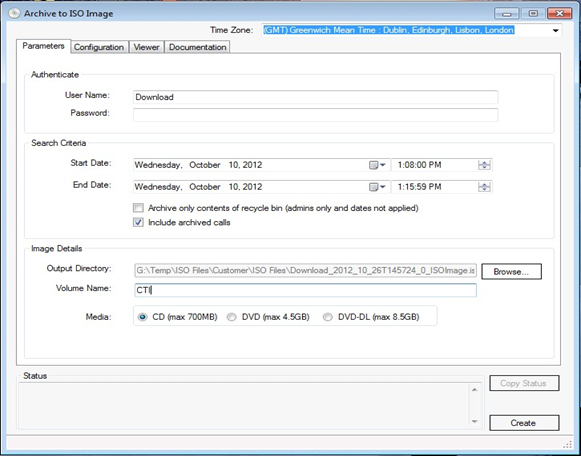
Parameter Page Control Definitions:
- Time Zone - This is the timezone you wish the search to be based on, e.g. “search for calls that were made from 8-5, EST”
- User Name - Authorized user
- Password - User password
- Start Date - Date to begin search, includes start time
- End Date - Date to end search, includes end time- Date range limited to max 90 days.
- Archive Recycle Bin - When checked, only calls in recycle bin will be archived; the date option is ignored and disabled
- Include Archived Calls - When checked, downloaded records will include calls that have been previously archived
- Output Directory - The directory where the completed ISO file will be stored in; note that the file name will be created automatically using the following format: o username_yyyy_mm_ddThhmmss_[custom name].iso
- Volume Name - The name that will be seen when the image is opened on a CD/DVD drive.
- Media - Output type; choose between CD, DVD and DVD-DL formats
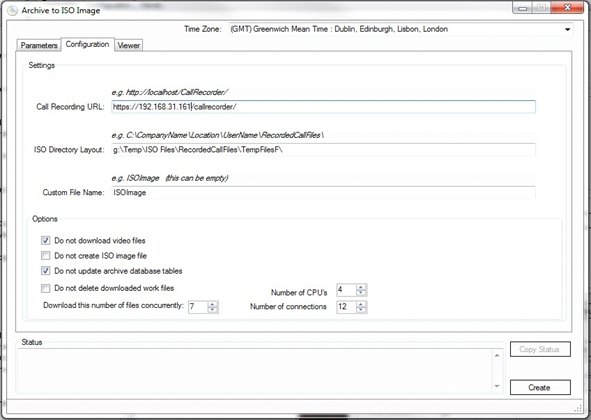
- Configuration Page Control Definitions:
- Voice Recording URL - The location of the archive web service; typically the service provider address
- ISO Directory Layout - Describes the directory structure that will be applied to the ISO image - note that this directory description is also be used as the work directory for storing the audio\video files during processing
- Custom File Name - This is an optional value that will be added to the ISO filename created by the application.
- Do not download video files - Select this to ignore downloading video files
- Do not create ISO image file - Select this to ignore creating an ISO image
- Do not update archive database tables - Select this to ignore updating the service provider system database; always choose this when are testing
- Do not delete downloaded work files - Select this to ignore deleting files downloaded in work directory
- Download this number of files concurrently - The number of files to download concurrently
- Number of CPUs - The number of CPUs on the local computer
- Number of connections - The number of concurrent connections to the web server
Here is an example of an ISO whose volume name is CHICAGO and the image directory layout is CTIGROUP\Chicago\Download\RecordedCallFiles
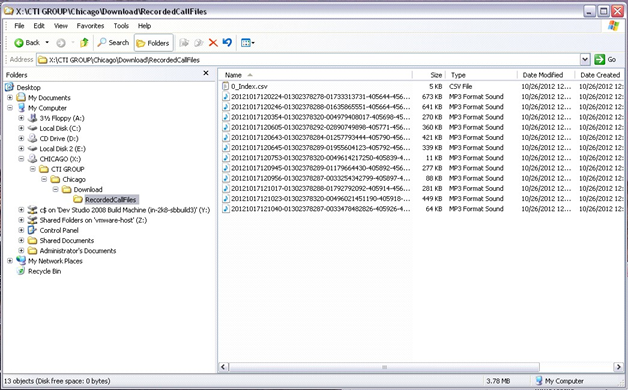
Audio Link
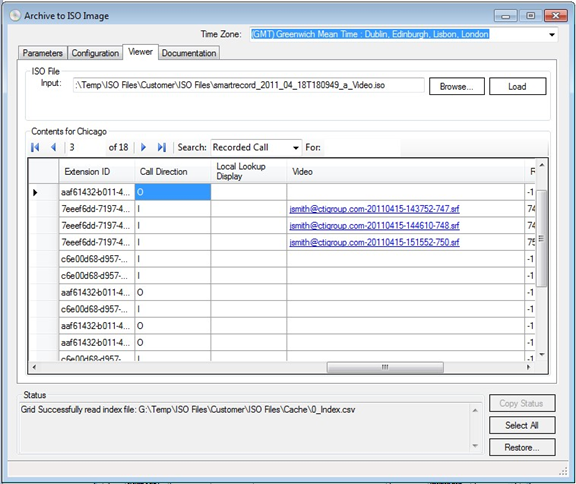
Video Link
Double-click a hyperlink item in the viewer to playback the content. Viewer Page Control Definitions.
- Input - This is the location of the ISO file (created by this tool) that you wish to view. When you create an ISO, the last one created will be rendered in Viewer.
- Load - Select this to manually load an ISO in the viewer.
- Search - Select the field you wish to search
- For - Enter the data you wish to find
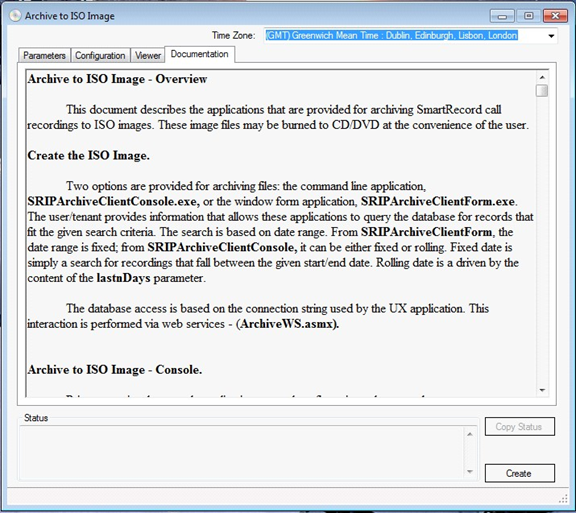
The documentation tab renders the content you are reading now.
Perform Several Test Runs First
Try the following initially to help you get familiar with the process:
Set search criteria to some brief period of time, say 10 minutes, e.g. 2012-10-10-0800hrs 2012-10-10- 0810hrs
Set configuration options:
- Select “Do not update archive database tables” - you are just running tests
- Play with “Download this number of files concurrently”
Click Create
Here are several items that can happen and what actions you can take.
Server timeout during download - this is an issue that is out of our control but we have noticed this may happen during times when the service provider is performing maintenance on their system. When timeout occurs you will see this message:
- “ARC file download (audio) timed out; ending session. File download timed out - please retry later...”
Downloaded less files than expected - if this happens you will be see this message listing.
The file(s) and the action to take:
- “File:c:\CTIGROUP\Chicago\Download\RecordedCallFiles\2012101709533101302378295-00353449395721-399648-4554046.mp3 was not found in ISO package content list...”
- “Downloaded 1 less file(s) than expected; you can perform another search attempt using the datetime shown in the first 14 characters of the file name(s).”
Download encountered a transport problem that creates file(s) that can't be used or removed; this problem will require that the ARC application be closed and reopened. Prior to exiting, note the datetime information found in the first 14 characters - use this information to set the search criteria to filter the search to the records that failed. Here is the error message:
- "File:c:\CTIGROUP\Chicago\Download\RecordedCallFiles\2012101709533101302378295-00353449395721-399648-4554046. mp3 did not download successfully; close application and retry later..."
Download Speed - This is an important but misunderstood part of the download process. Here are some things to consider:
- Your internet speed
- Internet traffic on your network
- Internet connection speed of the site you are downloading from
- What your computer is doing at the time you’re downloading.
- What the remote computer is doing at the time you’re downloading
- How many others are trying to download at the same time
As an example if your internet connection speed is 6MB download and you are trying to download 48MB, but the remote site has an upload speed of 1MB, your effective download speed is at best 1MB assuming no other user of the download source is downloading at the same time.
- Test your download/upload speed: <http://www.speedtest.net/>
- MFile Download Calculators:
<http://www.numion.com/Calculators/Time.html>
<http://martindalecenter.com/AATimeCalc.html>
Archive to ISO Image - Console
The console application is primarily intended for use as a scheduled task; outside of that scenario, there is no true utility for using the console application. Later in this document we will explain how to create a scheduled task. Prior to running the console application, several configuration values must be set. First, open this file:
- \CTI Group\ArchiveClientTools\v1-0-0\SRIPArchiveClientConsole.exe.config
Look for the following keys:
- <add key="ARCURL" value="https://ValidDomainNameRequiredHere/CallRecorder/" />
- <add key="ISODirectoryLayout" value="C:\Temp\RecordedCallFiles\ISO\TempFilesC\" />
- <add key="TimeZone" value="(GMT-05:00) Eastern Time (US & Canada)" />
ARCURL - This is the location of the provider web server. It should be the SmartRecord URL.
The files will be retrieved from this server. By default the scheme is “https”, change if necessary. Replace “ValidDomainNameRequiredHere” with the correct domain name.
ISODirectoryLayout - This is the layout that will be applied to the ISO image so be sure to update this to the value you want. This will also be used as the download work directory! Suggest providing something like “C:\CompanyName\Location\UserName\Backups”.
TIMEZONE - This is the timezone you wish the search to be based on, e.g. “search for calls that were made from 8-5, EST”. To find the correct timezone name to use, enter the following:
SRIPArchiveClientConsole /tz >> TimeZoneList.txt
This command will output a list of the available timezones - just open TimeZoneList.txt.
Once the configuration file has been saved the console application is ready to use:
Start application by entering the program name and setting the desired keyword parameters:
SRIPArchiveClientConsole:
- An application that provides a means for archiving
- SmartRecord IP recorded calls into an ISO image.
Usage: SRIPArchiveClientConsole /startDate:2009-2-17 [other options]
/startDate:yyyy-mm-dd
- select files created on or after this date
- -required if lastnDays set to 0
/endDate:yyyy-mm-dd
- select files created before or on this date
- -required if lastnDays set to 0
/lastnDays:0
- select files that were created during the last "n" days. Default 0.
/userName:tenant name
- -required
/password:tenant password
-required
/isAdmin:false
If the user is a tenant admin, set this value to "true". Default false
/archiveRecyleBin:false
- If flag set to true, all calls in recycle bin will be archived - doesn’t filter on date. Default false
/includeArchivedCalls:false
- Set to true to search for calls that has been archived. Default false
/updateArchiveDbTables:true
- Set to false to ignore updating ARC database tables. Default true
/volumeName:
- Specifies name for the ISO image.
- -required
/imageOutputDirectory:"C:\CompanyName\Location\UserName\ImageFolder"
- Specifies the directory to write the ISO file into.
- -required
/timezone:"(GMT) Greenwich Mean Time : Dublin, Edinburgh, Lisbon, London"
- Specify time zone to apply - must be enclosed in quotes.
- Default:"(GMT-05:00) Eastern Time (US & Canada)"
- To see list of timezone names enter the following:
SRIPArchiveClientConsole /tz >> TimeZoneList.txt
- /?:
- Help
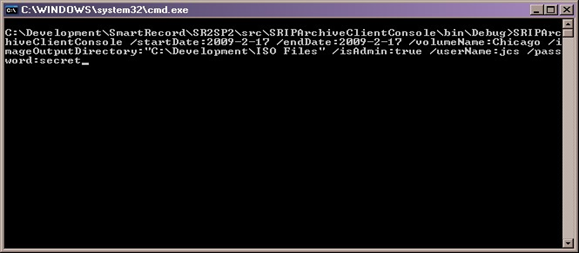
Examples:
SRIPArchiveClientConsole /startDate:2009-2-17 /endDate:2009-2-17
- /volumeName:Chicago /imageOutputDirectory:"C:\RecordedCalls\ISO Output" /isAdmin:true /userName:space /password:ghost@
SRIPArchiveClientConsole /volumeName:Chicago
- /imageOutputDirectory:"C:\RecordedCalls\ISO Output" /isAdmin:true /userName:space /password:ghost@ /lastnDays:2
Console Session Example.
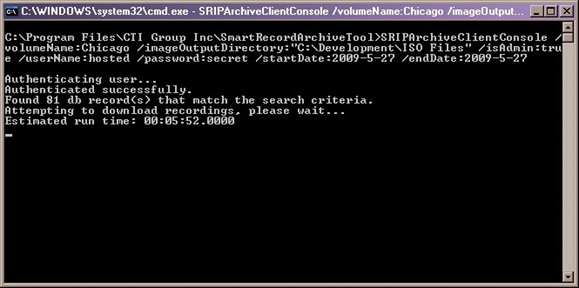
Program starting…
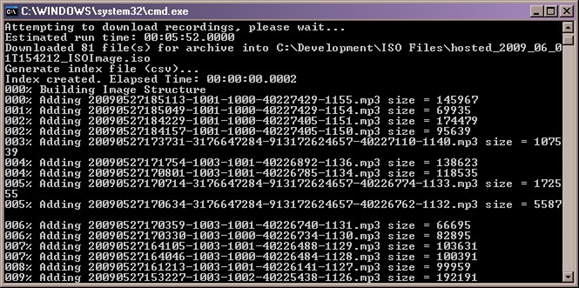
File downloaded completed, begin creating the ISO image.
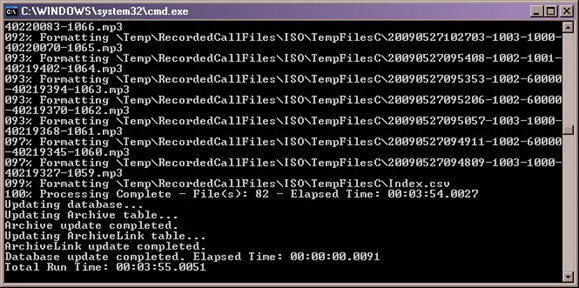
ISO image created - database updated - task completed.
Run Archive Console Client as a Windows Scheduled Task
Prior to running the archive client application as a scheduled task, you will need to modify ARCClient.bat. In this file you will find usage comments along with the command that will be executed by the scheduler. Make the applicable modifications to this command by setting the desired archive parameters. Once this file is ready, a scheduled task can be created that will execute it.
How to Create a Windows Scheduled Task. To open Scheduled Tasks, click Start, click All Programs, Accessories, System Tools, and Task Scheduler.
To schedule a new task:
- Double-click Add Scheduled Task to start the Scheduled Task Wizard, and then click Next in the first dialog box.
- The next dialog box displays a list of programs that are installed on your computer, either as part of the Windows XP operating system, or as a result of software installation.
- Click Browse, and, if the default destination was used, go to \CTI Group Inc\SmartRecordArchiveTool and select ARCClient.bat, and then click Open.
Type a name for the task, and then choose one of the following options:
- Daily
- Weekly
- Monthly
- One time only
- When my computer starts (before a user logs on)
- When I log on (only after the current user logs on)
Click Next, specify the information about the day and time to run the task, and then click Next. Note that the information about the day and time to run the task vary depending on the selection that you made in the previous wizard dialog box. For example, if you chose Weekly, you must indicate the day of the week, the time, and if the task should run every week, every 2 weeks, every 3 weeks, and so on.
Type the name and password of the user who is associated with this task. Make sure that you choose a user with sufficient permissions to run the program. By default, the wizard selects the name of the user who is currently logged on.
Click Next, and then click Finish after you verify the choices that you have made.
For more details go to <http://support.microsoft.com/kb/308569>
Console Known Issues
The singular issue of the console application is it is very slow - and this must be taken into consideration when setting up scheduled tasks. You must plan your schedules to insure a task will finish before the next task starts. A reasonable rule of thumb to help estimate how long a session might run is the console version runs x times slower than the winform where x is the number of files downloaded concurrently.
As an example, run a test archive based on a search criteria of 1 day. Set the configuration concurrent file download to 7. At conclusion, note the total elapsed time; the console version for that same time period will take approximately 7 times as long.
Voice Recording Usage Frequently Asked Questions
Question 1: How much data does a 1 minute call consume?
Answer: Around 178KB (Average of 5.6mins per Mb)
Question 2: What CODECS are supported?
Answer: G.711, G.729, G.722 (HD)
Question 3: What file format are the recordings in?
Answer: MP3
Question 4: Can I download my own Voice Recordings?
Answer: Yes – Calls can be download either via the web interface, (download button), or the archive
utility, (ISO Image).
Question 5: Can I email my Voice Recordings from within the Portal?
Answer: Yes – A link to the Voice Recording can be emailed externally from the Voice Recording Portal (email button).
Question 6: What happens if I go over my storage limit?
Answer: WHC Voice Recording contains an automatic deletion process that removes recordings older than the specified time period, 30 Days, 180 days or 7 Years. If the storage limit is exceeded, (Fair usage policy for 30 days), recordings will also be automatically deleted from the system. Before files are removed an email notification is sent notifying either to archive or delete old recordings or they will be automatically deleted.
Question 7: Can I record inbound mobile phone calls? (E.g.: Remote Office, etc.)
Answer: Yes – When using features such as remote office, call forward always, etc. calls can be recorded.
Question 8: Can I record outboundmobile phone calls? (E.g.: Remote Office)
Answer: Yes – When using click to dial features, calls can be recorded. That is, if the outbound call is initiated from the Toolbar when Remote Office is ‘on’, the call established to the remote office destination will be recorded.
Question 9: Can I recover a Voice Recording if I’ve deleted it?
Answer: If a recording is deleted from the “Call Recorded” tab, then they have been moved to the recycle bin. Calls can be recovered from the recycle bin. If the recycle bin is emptied calls are permanently deleted.
Question 10: Are DTMF tones recorded?
Answer: No – DTMF tones aren’t recorded
Question 11: What kind of DDIs can I record?
Answer: You can only record end users with DDIs. Site feature will not be recorded. Example: Auto Attendant, Hunt Group, Voice Portal, Trunk Phone Number.
Question 12: Can a Reseller have ‘admin’ access to a Customer’s Recordings?
Answer: Unfortunately due to privacy and data protection policies this is not possible.
Question 13: Can I record Trunk Phone Number calls?
Answer: This is not currently possible. Any numbers used on a SIP Trunk that need to be recorded should be assigned to a SIPT User and another phone number used as the Trunk Phone Number. Please consider the fair usage policy when using the 30 day storage option in this scenario.
Question 14: Can I change the Feature Access Code (FAC) for Voice Recording Pause & Resume?
Answer: The ability to customise Feature Access Codes on the Business Portal is available for but changing defaults should be considered carefully where voice recording is needed for SIPT Users. If the FAC for Pause and/or Resume are changed from the standard allocations (*48 and *49 respectively) this will not be reflected when using the SIPT Pause & Resume method.
