UC office Desktop user guide
Overview
Office UC provides Users with an application and series of features to enable Unified Communications across one or many devices. The Desktop application will work across computers running Windows and MAC iOS. This application is available through the following add-ons:
- UC Office Desktop
- UC Business added to a Fixed or Mobile User License
- UC Team added to a Fixed or Mobile User License
The application comes with standard branding.
This application is available on the following WHC technologies:
- Centrex Users
- Functional – Desktop only
- Fixed - All
- Mobile - All
- SIPT Users
- Functional – Desktop only
- Fixed - All
- Mobile - All
Application Description – Office UC Desktop
This application when taken standalone as the Office UC Desktop add-on provides Users with the following:
- Desktop softphone application enabling:
- Voice and Video Calling – using inbuilt softphone or via hard- phone
- Call Centre Agent Login – when agent is assigned to an ACD
If a User is provided with a Mobile User License, alongside the UC Desktop Add-on, then the following additional functionality is provided:
- Smartphone application enabling:
- Voice and Video Calling – using inbuilt softphone or native dialler
If a User is provided UC Business, either on the Fixed or Mobile User licenses, then the following additional functionality is provided:
- Instant Messaging and Presence (IM&P) from the provided applications
- Microsoft Skype for Business Plug-In
If a User is provided UC Team, either on the Fixed or Mobile User licenses, then the following additional functionality is provided:
- Personal Audio Conferencing for up to 8 people
- Desktop Sharing
Hardware & Software Description
In order to successfully install and use this application, the following installation and licensing requirements should be met:
These applications are running on the following firmware versions. If you are running on a later version we recommend you update to the latest.
|
Device |
Version |
|
Desktop PC |
21.6.4 22.6.4 from 21 July 2017 |
|
Desktop MAC |
21.6.4 22.6.4 from 21 July 2017 |
The application supports devices with:
- Windows 7
- Windows 8/8.1
- Windows 10 (classical view only)
The installation footprint is approximately 215 megabytes (MB) on Windows.
The application supports devices with:
- MAC OS 10.11 El Capitan
- MAC OS 10.12 Sierra
- MAC OS 10.13 High Sierra
- MAC OS 10.14 Mojave
The installation footprint is approximately 125 megabytes (MB) on OS X.
The hardware requirements for the Desktop application include:
- Minimum of 1.5 GHz is recommended, dual core CPU is recommended for video calls at a minimum.
- Minimum: 4 GB RAM.
- 125 MB on OSX and 215 MB on Windows.
- Open Graphics Library (OpenGL) 1.5 or higher is recommended
- Minimum: IP network connection (broadband, LAN, wireless) Recommended: A 2.0 Mbps connection.
- Full-duplex, 16-bit or use USB headset
The software requirements include:
- Local admin rights are required to carry out the installation so you must use a Windows user account with administrator-level access.
- Some anti-virus software can cause problems when installing other software so consider temporarily disabling your anti-virus application for the duration of this installation; remember to enable it again as soon as the installation is complete.
Office UC requires both speakers and a microphone to make calls. Any of the following are acceptable:
- External speakers and microphone
- Built-in speakers and microphone
- Dual-jack multimedia headset
- Bluetooth® multimedia headset
- USB multimedia headset
- USB phone.
- Calls made with Office UC will work without a video camera, but a video camera is necessary to allow other parties to see your image. Office UC will work with most built in and USB video cameras.
Network and Firewall Requirements
You may need to allow outbound access for the following on your firewall:
|
Application |
Protocol |
Destination |
Destination Port |
|
Application Signaling |
SIP |
centrex-bslnws09.yourwhc.co.uk 62.7.201.128/27 62.7.201.160/27 Please be aware that it would be advisable to add these addresses as they may be used for future expansion uc-bs12lnws14.yourwhc.co.uk - 213.120.60.172 - 213.120.60.236
uc-bs11lnws13.yourwhc.co.uk - 213.120.60.140 - 213.120.60.204
|
UDP/TCP 8933 Note: Port 5060 and Port 5075 also available
|
|
Application Media |
RTP |
62.7.201.128/27 62.7.201.160/27 |
UDP 32767 to 65535 |
|
Office UC Desktop & Skype for Business Plug-In Downloads |
HTTPS |
193.113.10.27 193.113.11.27
|
TCP 443
|
|
Office UC Smartphone and Tablet Downloads |
n/a |
Apple Store Google Play Store
|
n/a |
|
Office UC Operation |
XSI
|
193.113.10.11 193.113.11.11 |
TCP 443
|
|
Office UC Presence |
XMPP
|
193.113.10.7 193.113.11.7 |
TCP 5222 TCP 1081 TCP 5281 TCP 5269 |
|
Office UC Screenshare |
Proprietary |
193.113.10.8 193.113.11.8 |
TCP 8443 |
Download & Installation Instructions
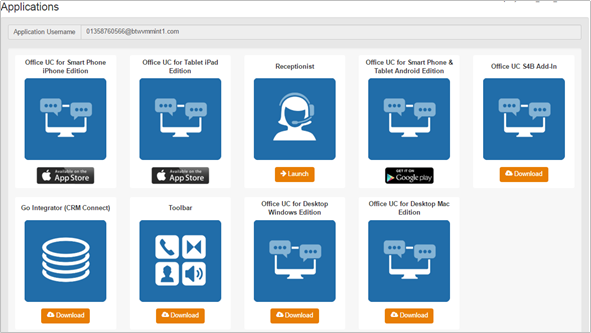
Once you have ordered the UC office Desktop from us, sign into the business portal and go to employees, applications. You will see the below.
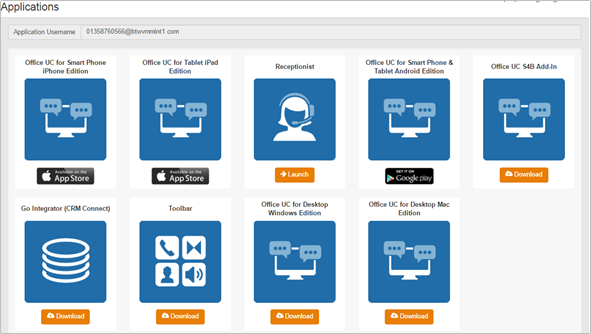
Once you have received, or is in possession of their welcome email, they can now download the application from the business portal as per the above.
Windows Installation
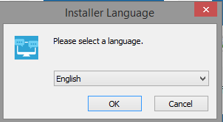
Log in to an administrator-level user account on the Windows workstation that the application needs to be installed onto. To begin installing, run the ‘ucoffice.exe’ file, select a language and click on Ok.
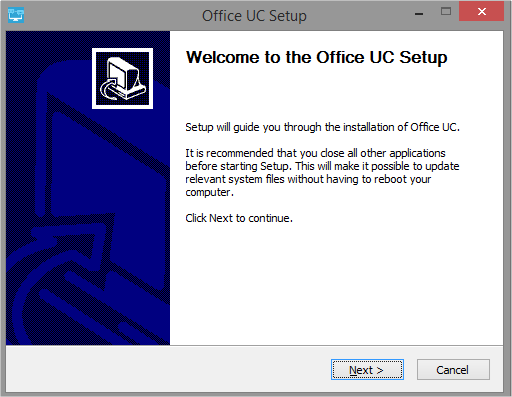
Once the initial welcome screen comes up, click Next to proceed.
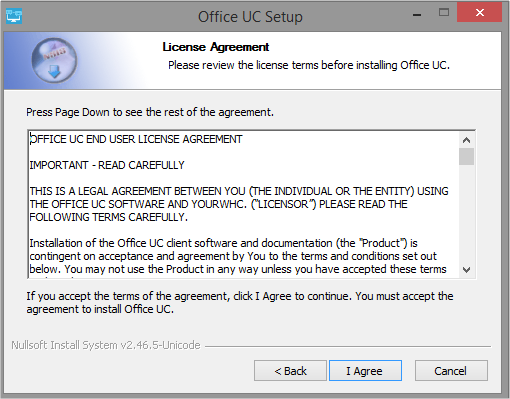
Accept the License Agreements and click Next to proceed.
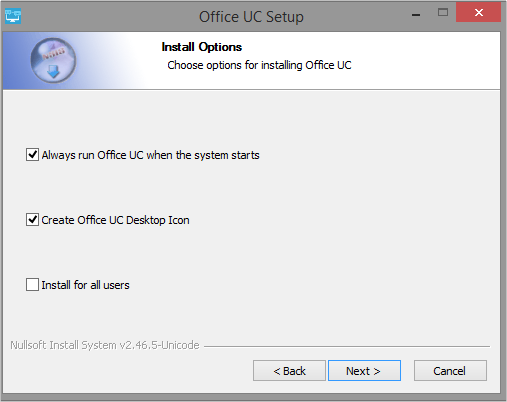
Select the necessary install options then click Next to continue.
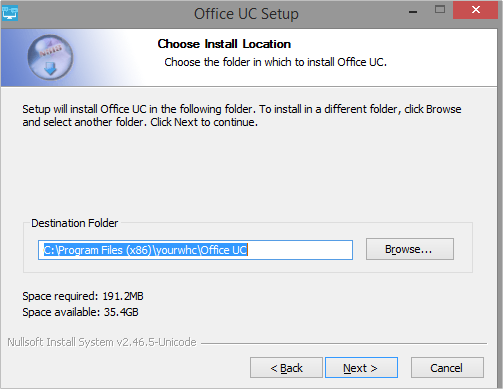
Select the install location then click Next to continue
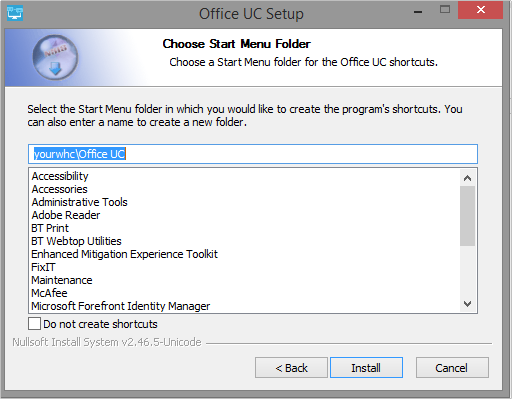
Select where you want the start menu to be installed then click Install
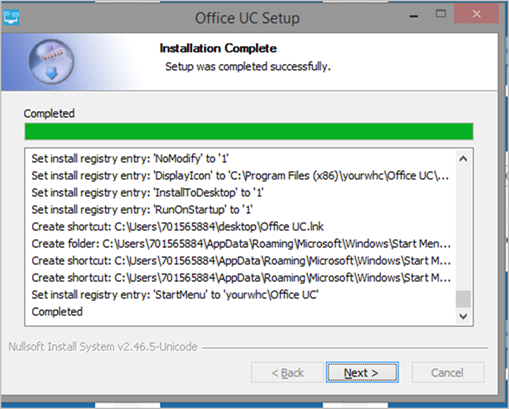
Once the install is complete click Next.
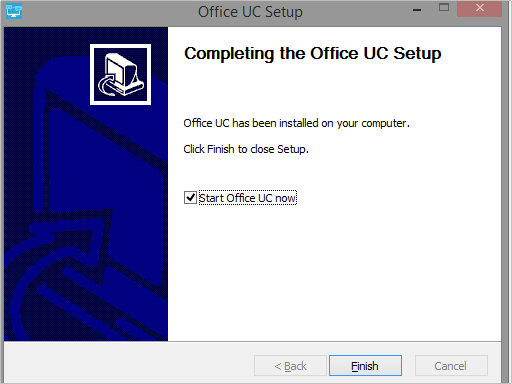
Click the Finish button to close the installer.
MAC Installation
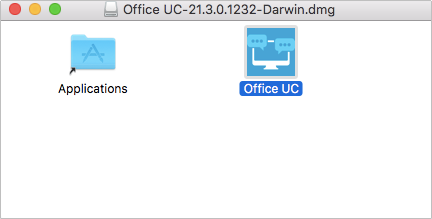
Firstly you will need to log in to an administrator-level user account on the Mac workstation, then begin installing UC the application, double-click the ucoffice.dmg file, and Drag the Application Icon to the Applications Folder to install.
The Welcome Email sent toyou will guide you to navigate to the Business Portal to download the application and obtain their Username. Please note this Username is the same for all Applications, but is different to the Business Portal credentials. The username can be seen in the Applications tab as shown below:
The password for all applications is not sent to the User and needs to be set in the Business Portal by navigating to My Account,

Select Password to Change box, then click on Application, enter password and then select Save.

My Room Integration Configuration (UC Team Only)
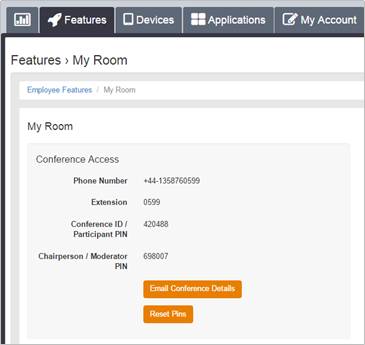
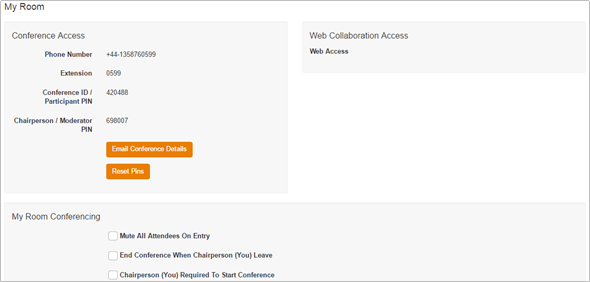
If you have been assigned the UC Team add-on then the system will automatically update the Desktop client with the user’s audio conferencing details. These will be included in End User welcome or modification emails, providing a bridge number has been assigned, and can be set/changed in the Business Portal by navigating to the User’s Feature Settings page and selecting My Room:
- Search for and select the Employee account you wish to amend
- From the sidebar select Features
- Scroll down Apps and select My Room and click Configure

From here you can email your conference details to any participant and reset your pins. Only an Administrator can change the Bridge dial-in number.
Operating the Feature – PC & MAC
Tap the application icon on the device to launch the application.

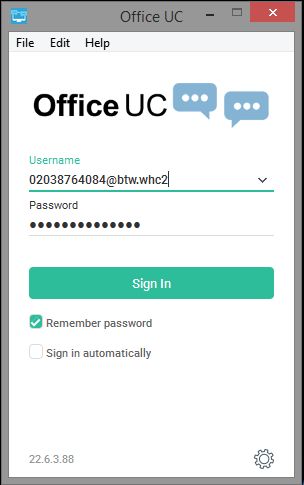
Once the application has launched, the application presents you with the login screen where you need to provide your user account information. Enter your username and password into the appropriate boxes. Select whether you would like the app to remember your password, and also if you want it to sign you in automatically on subsequent launches. Click Sign-in.
Username and Password Management
You must login to the application with your Application Username and Password, which can be obtained from the Business Portal. The password can also be modified via the Business Portal.
To quit, right click the icon on the top left-hand corner and click on Exit.
When you start the application for the first time, you will land in the Contacts section and your Contacts list will be empty. To add contacts please refer to the Contacts section of this guide.
Within this start-up window view there are a number of tabs, located on the left-hand bar:
- My Status
- Contacts
- My Room
- History
- Call
- Dialpad
- Enterprise Directory
On the top right bar you can also see:
- Call
- Video Call
- Call from Desktop application
- Call from IP Phone
- Video Call
You can set your own presence status by selecting presence status from the top green bar followed by the drop-down.
Your avatar is the picture that represents you in your friends’ Contacts lists and in chat screens. Right-clicking the circle that shows your initials opens a dialog with options to select an existing image. You can also chose to clear your avatar.
You can enter a status message into the area next to the avatar. This status text is shown in your friends’ Contacts lists.
If you see the error message “Chat Unavailable” under any tab, it means that XMPP connectivity has been lost for chat and presence; however, you can still make calls. In this case, you should contact your service provider.
Location in presence is done based on the IP address that the machine is using. The IP address is mapped to a physical location. Change the location manually by clicking the avatar and then the location icon to go to the manual location and change the view.
The application will also automatically update your presence to the following:
- Busy – In Call
- Busy – In Meeting (Windows only)
- Available (desk phone)
- Available (mobile)
The Contacts list in the Contacts tab can contain different types of contacts as follows:
- Favorites - Presence-enabled contacts
- All Contact - Non-presence-enabled contacts
- First you need to add a contact using one of the methods described below.
Add Contact from Local or Contact Management Directories
To add contacts from either your local address book or from the Business Portal contact directories you will need to use either of the following methods:
- Search Enterprise Directory – search Business Portal directory
- Search Outlook Contacts – search outlook contacts providing the settings in
Once you locate a contact, right-click the contact and click-on Add Contact.
Contacts can also be added by typing the name in the search box. As you type suggestions will be shown
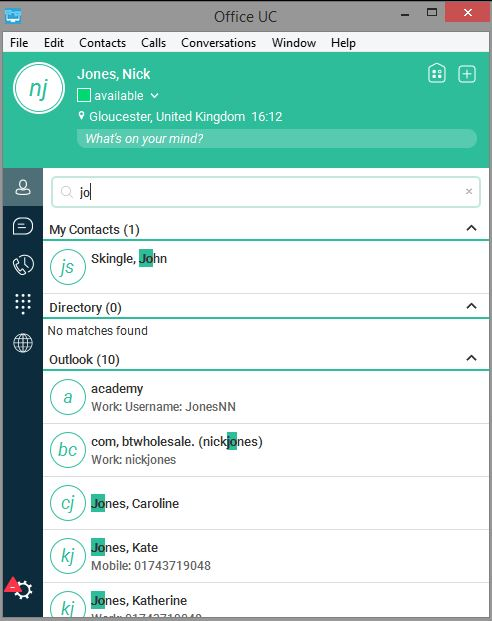
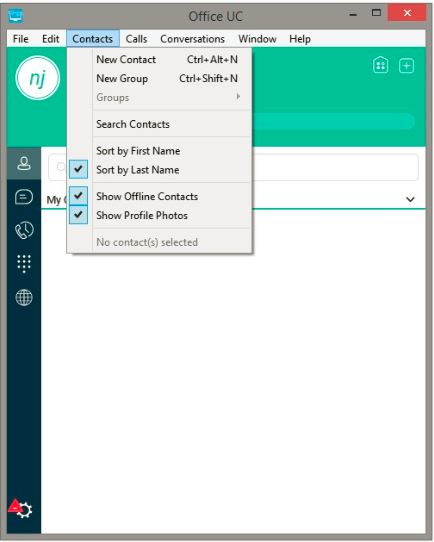
You can also use via the Tool Bar
Click on the plus button in the green highlighted area which will bring up a new contact window and complete all the relevant details
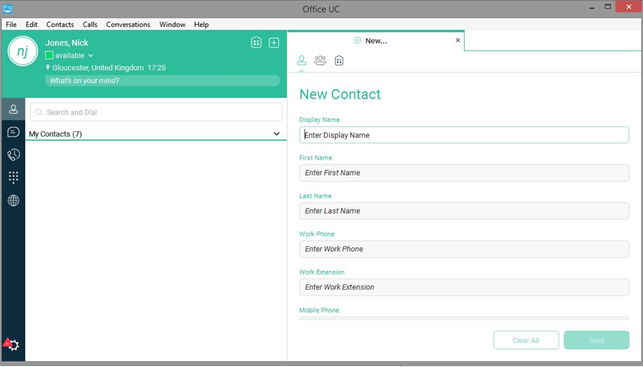
By default, your presence information is always shared with a new contact if an IM Address is provided. In the IM address the following will need to be typed in:
The username is the name of the other user as built on the WHC service, and the username must be entered all in lowercase, this will then send a Presence request, which you can decline or accept it. If you decline the request, you can always share your presence information later by selecting Subscribe from the contact card. Note that the contact must accept your subscription request for you to establish the presence relationship successfully.
Conference Contacts can also be added manually by tapping the ‘+’ button in the main screen and scroll down to dial in number and complete the conference call details . This can then act as a conference contact, to avoid having to remember a PIN code and a conference number, for example, for a recurring conference.
Conference Contacts can also be added manually by going to the Contacts tab in the ribbon and click New Group This can then act as a container for groups of contacts.
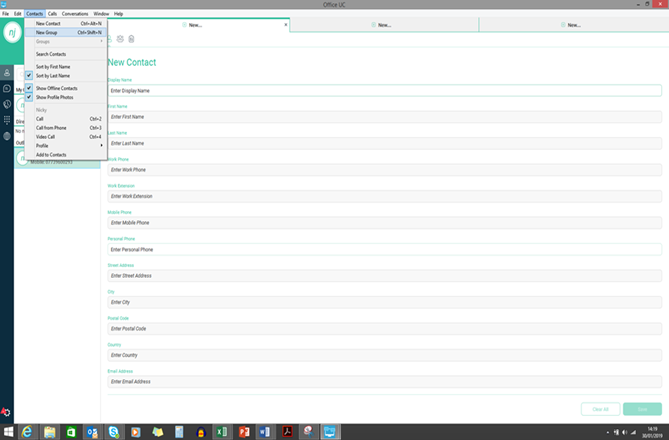
You can filter contacts in two ways:
- Use the filter field to search by contact name. The contact list is filtered in real time as you type.
- Alternatively, use the filter menus available by right-clicking the Contacts icon in the left pane to display only specific types of contacts such as favorites or online contacts. You can also sort contacts based on first or last name or choose whether to display the contact’s avatar and availability status in the contact list.
Tap a contact from the Contacts list to open a contact card. This is the same for presence-enable and non-presence-enabled contacts.
- The Edit button opens the Contact Information dialog box where you can add, edit or remove information. This works for both presence-enabled and non-presence-enabled contacts.
- Select Unsubscribe to remove the presence relationship between you and that contact. This means you do not see the contact’s presence information and your contact does not see yours.
- Select Subscribe to re-establish a presence relationship. An unsubscribed contact remains on the Contacts list and is always shown as “offline”.
- Select Remove to remove the contact from your Contacts list.
Presence (UC Business & Team only)
For each contact to which you have subscribed, you can see their presence. Similarly, your contacts can see your presence on their Contacts list. Presence means that your friends are able to see whether you are available, for example, “I’m available” or “I’m busy”.
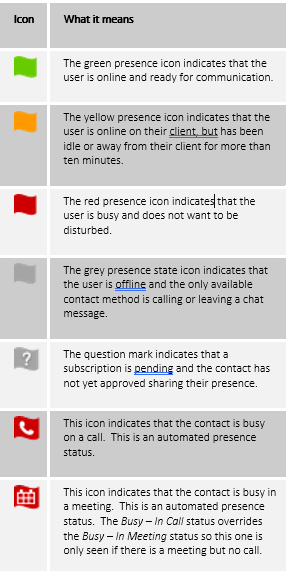
The list of presence flags are as follows:
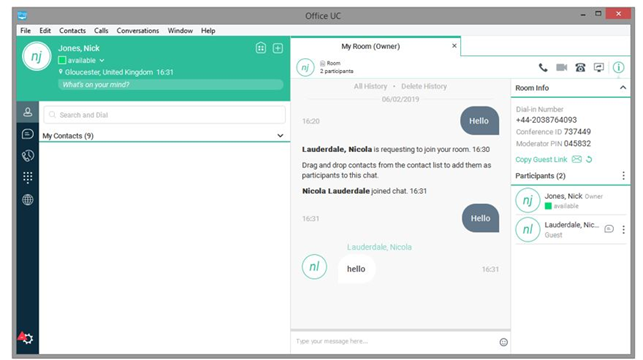
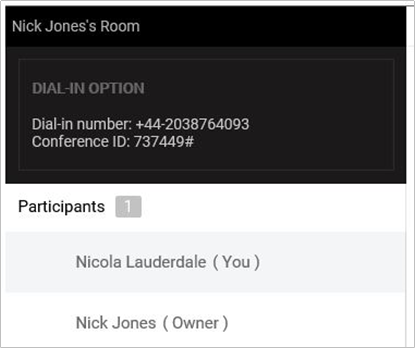
My Room is an always available and a permanent room that you can use to chat with anyone that joins. My Room is accessible using the My Room icon in the Tab bar or by selecting My Room from the Conversations menu bar.
You can add more participants using the add participants icon or they can join your room from your contact card. Once participants join the chat room, they can tap on the Call button of that screen to automatically join the conference.
My Room uses your permanent chat room and a conference bridge (audio or video). All My Room sessions start as chats but a call can be added to the session while in progress. Others join your room by clicking your name on their Contacts list and selecting Join Room from the contact card.
My Room Audio Conferencing 8 provides Personal Audio Conferences for up to 8 attendees per conference. It is included in the chargeable UC Team Add-On that can be applied to Users. It is a personal, reservation less audio conferencing service that can be accessed from any phone.
My Room Audio Conferencing requires a My Room Bridge to be added at the Site level. If the bridge exists, a user conference is automatically created for the user with default settings. If the bridge does not yet exist, no conference will be created. The required My Room Conferencing 8 conference will then be automatically added when the Site’s My Room Bridge is created from the Business Portal.
The default settings for the conference can be changed from the user’s Business Portal under “My Room” in their Feature Settings. The user can also see their conference ID and PIN from this page. If the user conference does not exist (meaning the bridge does not exist), the user is informed to contact the system administrator.
For security reasons, only the user can reset the PINs associated to his conference. This is achieved by deleting and re-adding the conference (options are transferred to the new conference automatically).
Contacts outside of the Company can attend Audio Conferences by being sent the access details within an email invitation.
Screenshot of My Room Feature Settings page in the Business Portal:
My Room Desktop Share - Internal
To share your desktop with an internal party, someone who has Office UC, simply click on the Start Sharing icon from within My Room.
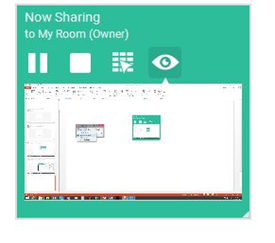
Presenters screen will see the now sharing display box
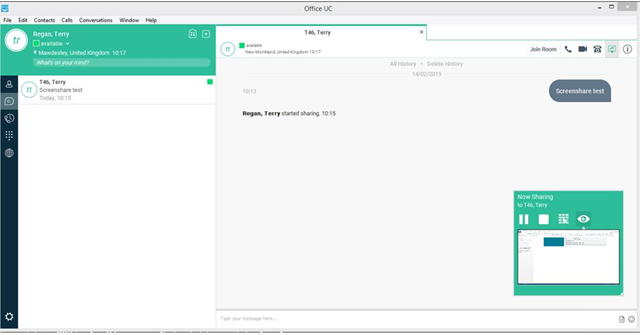
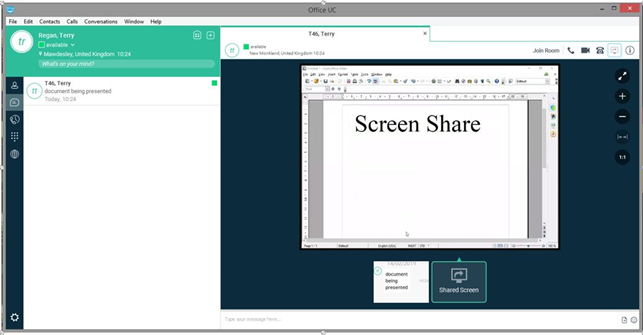
Image showing Document being shared
My Room Desktop Share - External
To share your desktop with an external party, someone who does not have Office UC, simply right click on the My Room icon to display a list of available options:
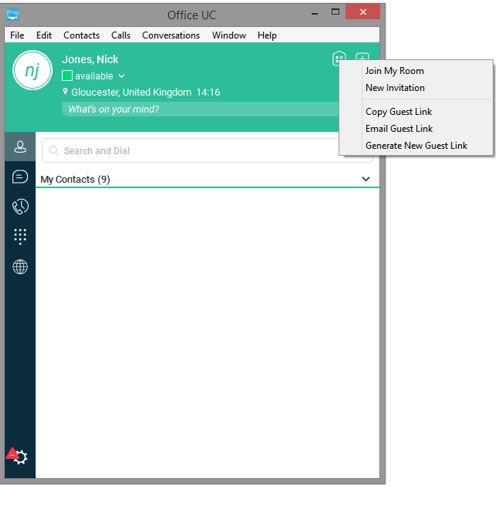
If you select Copy Guest Link it will copy the desktop sharing and audio conferencing details to your PC. All you then need to do is paste then into an email or any others communications method, CTL+P on most PC’s, and it will add all of the details as per the image below.
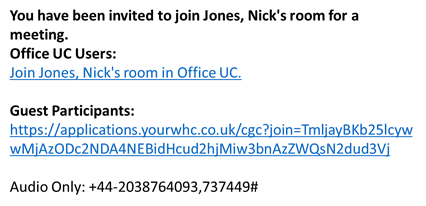
If you select Email My Room Invitation it will open up an email and copy the desktop sharing and audio conferencing details into this. All you then need to do is send the email to the individual/s concerned.
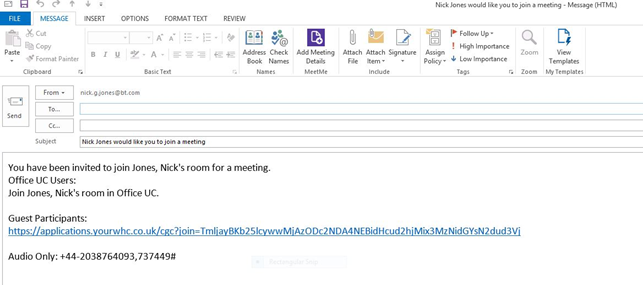
Selecting Copy Guest Join Link will just copy the URL, less the audio details and the other text. Selecting Reset Guest Join Link will generate a new guest link.
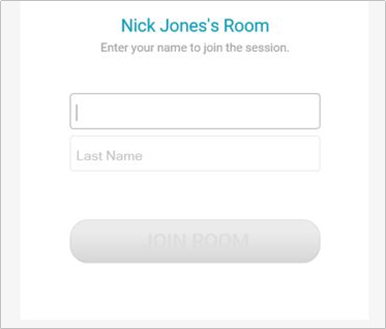
When an external user clicks or opens it in a browser, they will be presented with the following screen where they will need to enter their First Name and Last Name, followed by Join Room.
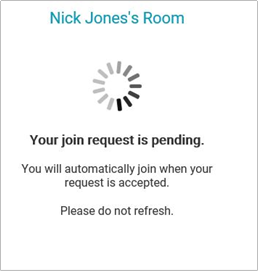
Whilst they are waiting for the organiser to join, they will see the following waiting screen
The organiser will now see a numerical notification against the My Room icon showing that a user is pending.
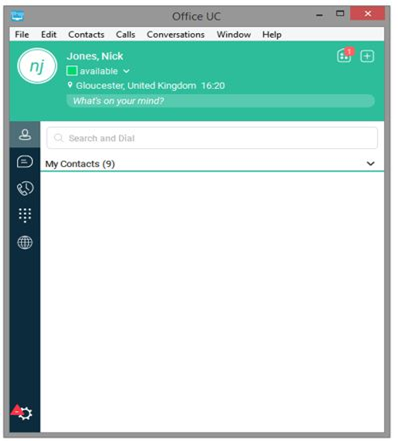
The organiser should click on the My Room Icon to launch the room and they will see a pending user. Click on the tick box to allow the User to enter the room.
Once accepted, the guest will appear as a participant in your room.
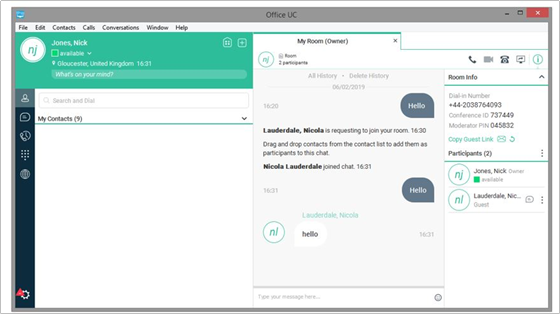
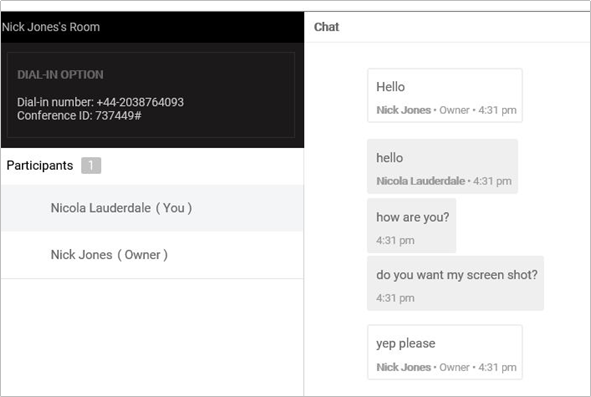
Once accepted, the guest will see the following in their internet browser.
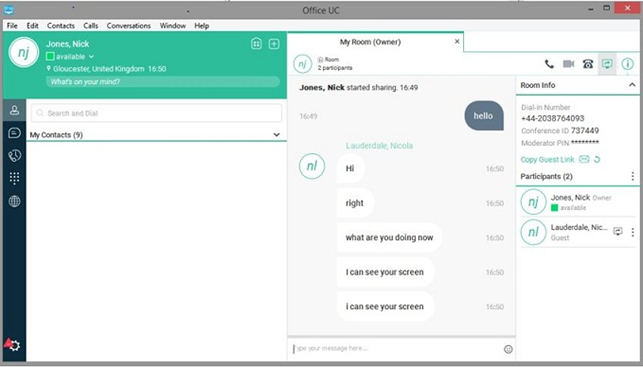
To share their Desktop, the organiser should click on the Share Icon.
The following field will appear on the owners PC screen:
The guest will now see the following:
Two tabs show Call History and Chat History. The application saves a call history for placed, received, and missed calls. The call history makes it easy for you to redial and call back when you have missed a call or you want to easily dial a contact with whom you have recently spoken.
Chat history for group chats, both in My Room and in instant group chat, are stored locally on the desktop client, just like in one-to-one chat, but only for the time the user is joined into the session.
Right-click on a name in the list to call back directly and select the Call options.
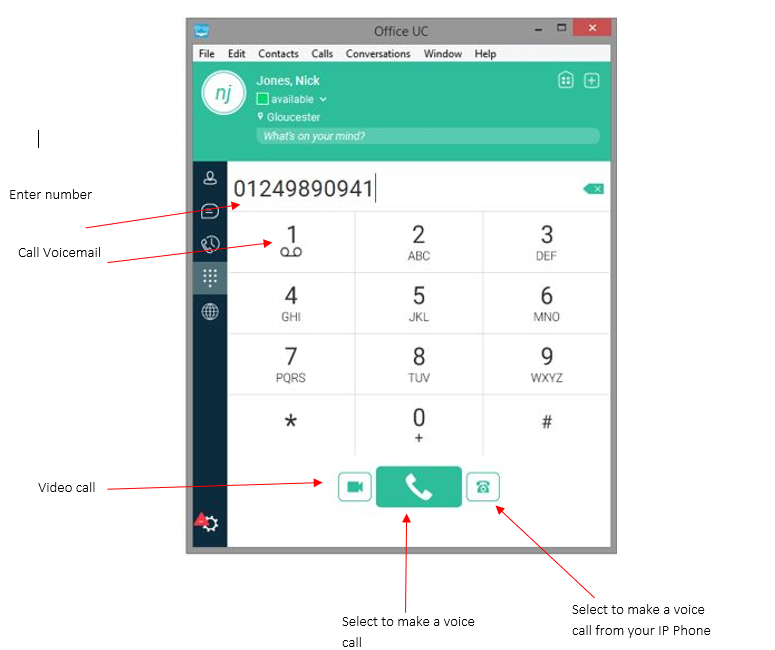
The Dial pad tab displays a dial pad and a text field used to enter numbers. The dial pad is one of the options used to make audio or video calls. There are three buttons below the dial pad: Video call, Audio Call, and IP Phone Call. The top text field also has a delete button that, when pressed, deletes one character at a time.
A badge notification appears on the Dial pad tab when there are messages in the voicemail box. A long press on the “1” digit connects you to the voicemail box. When there is no voicemail in your voicemail box, no notification badge is shown.
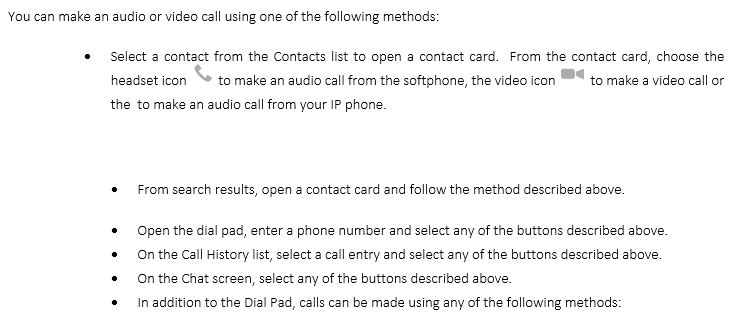
If dialling a phone number that requires additional dual-tone multi-frequency (DTMF) tones (for example, a conference bridge), you can type the numbers on your keyboard while the Communications window has focus or open the dial pad in the Communications window.
During a call the following additional Communications window icons appear:
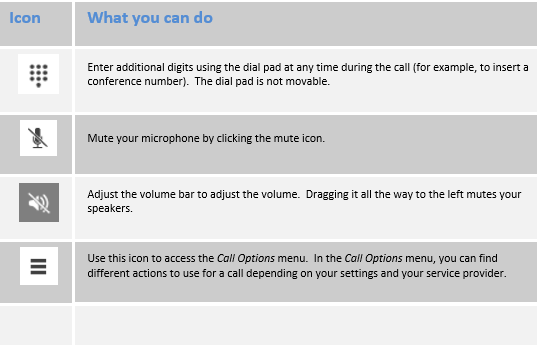
In the Options menu, there are the following options:
- Transfer a call to a third party.
- Put the call on hold. Note that if you hold the call, the other party cannot “unhold”. This freezes a video call to the last frame of the video feed. In both voice and video calls, this is communicated to all parties by a notification appearing in the middle of the screen.
- Hide or show your own video.
Dial a number in the combined Search and Dial field to make a call. Once you type your numbers, the application searches for contacts on both the local contact list and the enterprise directory.
Choose your video size from the Preferences and the Video tab. Your selection is used by default for future video calls. The available sizes are automatically presented based on your camera.
Text can be highlighted anywhere on a User’s desktop machine to make a call. Users can also select the keyboard Hotkeys used for making the call in the ‘Outgoing Calls’ section of the Preferences screen.

When someone is calling you, you see a pop-up notification appear on your screen.

If the application is open, you will also see the ringing options in the middle of the client
You can choose to answer the call decline the call, or silence the incoming call by closing the pop-up notification window. If you silence the call, the ringtone is silenced but the caller does not see anything on their end. If you close the incoming call pop-up notification to silence an incoming call, then you do not have an option to answer or reject it any more. If you reject the call, it causes the line to sound busy at the caller’s end and they know that you rejected the call.
When someone is calling you with a video, you see the same pop-up notification; however, the options are answer with video, answer as voice only, silence, reject, or silence (by closing the pop-up window). If you decide to answer as voice only, the call is voice only.
Contact Name Lookup for Incoming Calls
The application performs a local contact search for incoming calls. If the number matches one of the contacts on the contact list, the name is shown on the incoming call screen along with the alert. Both the display name and phone number are shown when available.
If there is no match to a local contact, the application looks for a match in the Telephony Directory, and if a match is found, the available information is shown for the incoming call. If there is no match in the Telephony Directory, the display name is taken from the available information in the incoming call.
Whenever you retrieve your call logs/history, the application does a lookup in the local contacts and populates the name if a match is found.
When you have one or more missed calls or other types of communications, there is a notification on the left-hand side of the navigation pane in the Main window. Clicking the icon takes you to the missed communication in the Communications History view.
Full screen mode can be activated by clicking the Full Screen button or by double-clicking anywhere on a video. Exiting full screen mode is done by pressing the Esc key (on both Windows and OS X) or by double-clicking the window. Exiting full screen makes the video call go back to its original state (even if there was resizing of the window previously before going full screen).
In a full-size window, you can see a similar Options menu at the top. It has the same functionality as it does in the normal view. When you move the mouse, the top bar and lower communication buttons appear on top of the video.
You can have one active call at any one time if you receive a new incoming call and accept it. The existing call is put on hold and you can change between these two calls by using the Hold and Unhold buttons.
Blind call transfer is available in the Communications window; choose the Transfer Call menu item to transfer the call to someone else.
Attended call transfer is also available in the same window, first call someone to check if the called party can take the incoming call and then transfer the incoming call to the desired called party.
Call Move can be used in scenarios where a user has Shared Call Appearance or Call Director. For instance, if the user has an active call on the desk phone, this can be transferred seamlessly to the smartphone via the Call Pull button. Depending on the application, dialing settings, and service configuration, the call can be pulled as a VoIP or circuit-switched call to the mobile phone. There is no interruption to the voice call.
To pull a call select the CTR and P key on the keyboard, or select Pull Call from the Calls menu. Ensure you have ‘Allow Call Move from Another Device’ ticked against the Device in the Business Portal.
Message waiting Indication and Voice Mail
The Message Waiting Indication (MWI) service allows you to receive a notification for a waiting voice mail. By clicking on the Voicemail button in the Communications History view, Office UC calls the predefined mailbox number to allow the user to listen to the voice mail or view the video mail. It is also possible to call voice mail from the dialer by long pressing the “1” icon in the dialer.
Missed calls are indicated by an icon in the Main window. Note that the MWI icon is in the same place when it indicates a new voice mail.
You can control incoming and ongoing calls from a compatible headset. The feature set supported is answer/hang up as well as mute/unmute. The following headsets have been tested, although other Plantronics devices should also work:
- Voyager Pro UC
- Savi 700 series
- Blackwire C3xx, C4xx, C5xx, and C7xx
- Calisto 620
- Audio 628USB
- Polycom U300
- Voyager Legend UC
- Logitech H570e
- Jabra Biz 2300/2400
- Jabra Speak 510
- Sennheiser SC 230/260
- Sennheiser SP 20
Team Telephony is a basic function BLF feature, comprised of a window showing the predefined team members and their related call states. When a monitored user has an inbound call, the user is alerted by a short ringing tone and the Team Telephony window will update with the monitored user’s status. Each team telephony member can have four call states: available, busy in call, ringing, and offline. The status for each member is shown in the team telephony window. All team members can see the full list of team members in the team telephony window. In order for the BLF feature to function correctly, users must have the BLF feature correctly provisioned and the device should also have the BLF function enabled via ‘Device Management’ in the Business Portal.
Office UC allows for the browsing of an entire enterprise directory. To view the enterprise directory, click the Directory button on the left-hand side of the navigation pane.
The application supports a search of the enterprise directory. This includes the personal directory, Company Contacts, and Group Contacts. This takes place in the same search field that is used for both a local and presence-enabled contact list search. The various directories have different purposes with the enterprise directory having the most data, and not all directories may be used in all deployments. All search results are combined into one common set of results.
The application automatically searches the local contacts and presence-enabled contact list in addition to the enterprise and other directories at the same time. As soon as there are results from the enterprise and other directories, these results are shown on a separate list in the Main window. Additionally, there may be other search result groups from other search sources such as Outlook.
The enterprise directory searches all available fields for the search string. By default, it waits for 1.5 seconds before it sends the search request to the server.
Typically when adding a contact using directory search results, there are phone numbers and first names in addition to last names available. In addition, the Extensible Messaging and Presence Protocol (XMPP) address and other fields are imported when found to allow presence and chat.
Outlook integration (search and calendar integration) on Windows requires one of the following versions installed on the desktop:
- Outlook 2007
- Outlook 2010
- Outlook 2013
Outlook search also works when several Outlook accounts are in use, but only one account is used at a time (default selected, which can be changed in Outlook). Additionally, other related considerations are as follows:
- The client searches for contacts and calendar entries in the default Outlook account. The account is set to the default via File → Info (left pane) → Account Settings → Account Settings → Data Files. Select an account and mark it as “Set as Default”. After making this change, sign out and sign back in to the client and it now searches that account for contacts and calendar entries.
- The client searches the Outlook contacts only on the local machine (that is, the Outlook Address Book). There is no Exchange server lookup performed. In addition, all directories in Outlook are searched for contacts, even deleted folders. The Contacts directory can also have multiple levels of subfolders.
Every minute, the application reads Outlook appointments. If there is an appointment running at the current time, then the presence is shown as Busy – In Meeting. Overlapping appointments are also handled. Following are some examples of Office UC operation with Outlook when time is 9:10 A.M.
- There is meeting “A” 9 A.M. through 10 A.M. Presence is shown as Busy – In Meeting.
- Presence is explicitly changed to Available at 9:15 A.M. Presence is shown as Available.
- In the next minute, Office UC again reads the appointments and sees that “A” meeting is running; however, the presence was already explicitly marked as Available and presence is not shown as Busy – In Meeting but Available.
- There is an overlapping meeting “B” 9:30 A.M. through 10:30 A.M. Presence is shown as Busy – In Meeting when the time is 9:30 A.M.
When deleting a meeting that is currently ongoing in Outlook, the presence status remains as Busy – In Meeting until the next time Outlook appointments are checked (once every minute) and after that, presence is shown as Available. This change may be instantaneous or it may take a minute depending on how close the timer is to being triggered.
The Outlook Object Security model was introduced in Outlook 2007. It has been tested with Outlook 2010 and Outlook 2007. For Outlook versions prior to 2007, the Allow/Deny pop-up window seen in previous releases should not be triggered. However, those versions are not officially supported. For Outlook 2013, the behaviour should be similar to 2007 and 2010, meaning the pop-up should not come up with Outlook 2007, 2010, and 2013 in Release 20.0.0 and onwards. However, more tests are needed for this before official support for Outlook 2013 can be declared.
The presence update is only triggered by appointments and meetings that are either accepted by the user or made by them. All day meetings do not trigger a presence change to Busy – In Meeting.
Chat (UC Business & Team only)
Start a chat using one of the following methods:
- Double-click a contact from the Contacts list or search results.
- Left-click one or more contacts from the Contacts list or search results and click the Chat button.
- Right-click one or more contacts from the Contacts list or search results and click the Chat button.
- On the Communications History list, double-click a chat entry.
- In a Communications window, click the Chat button.
- In a one-to-one chat, transfer files by clicking the Send File button in the Communications window or use the “drag and drop method” so that they are moved to the Communications window.
When you initiate a chat, the Chat window opens. Chatting with a contact is possible only when you are both online. If your contact initiates a chat, you see a pop-up notification in the bottom right-hand corner of the screen. If you close the Chat window and open it again, sent chat messages are shown in the window as chat history.
At the top of the message area, there are four links: Yesterday, Last week, Last month, and All history. From these links, you can load history from your local storage and different time frames. You can delete the history using the drop-down menu.
In the text field, you can add a smiley emoticon. Smiley emoticons can also be added by manually entering the corresponding characters that represent that particular emoticon. You can send text by pressing ENTER.
To enter a line break in the text field, you can use the following key commands:
- CTRL+ENTER (COMMAND+ENTER on Mac)
- SHIFT+ENTER
- ALT+ENTER
Use either one of the short commands, CTRL+C or CTRL+V, or right-click the selection for a menu to copy or paste the text to or from the Chat window.
File transfer functionality is accessible only through the Chat window.
- To open the File Selection dialog box, click the Send File button to the side of the text field.
- Select the file to be sent from the dialog and then click Open. You can also drag and drop a file into the Chat window.
- Once the file offer is issued and during its transfer, you can cancel the transfer (at any time) by clicking Cancel.
- Accept an incoming file transfer by clicking the Accept button.
- Reject the file transfer offer by clicking the Decline button.
After the file transfer has completed, the received files can be opened or viewed in the file manager by using the Click to open and Show in folder links.
Start a group chat by “multi-selecting” and right-clicking the Main window contact list or by using ‘My Room’. More people can be added later to the chat by “drag and drop”. Only the owner can add more participants.
A group chat works the same way as a one-to-one chat. All messages from anyone are sent to everyone else. All contacts need to be online to be able to participate in a group chat. You cannot invite an offline contact or a contact that is not on a device that supports group chat. This does not affect the group chat in any way. A group chat history is saved in My Room and is available to view later in the Messages tab of the Main window.
In the text field, the contacts’ names appear in different colours to easily distinguish between who is writing. Only the newest chat room messages are stored on the server. One-to-one chat messages are only saved locally. Deleting a chat room is not supported.
Chat rooms can be moderated by the owner. Use the right-click menu options to remove a participant from your chat room. If needed, the removed participant can join later. The removal also applies to desktop share sessions.
Preferences provide access to available settings for Office UC.
The Preferences screen provides access to the available settings for the Office UC client. Clicking on the Cog icon accesses the Preferences screen. The Preferences screen is divided into the following sections, selected by using the drop-down menu at the top of the screen:
- General
- Login options
- Notification options
- Media
- Audio settings
- Video settings
- Incoming Calls
- Do not disturb
- Call handling
- Simultaneous ring
- Call Director
- Outgoing Calls
- Automatic callback
- Highlight to call
- Caller ID blocking
- Services
- Team Telephony
- Call Centre Queues
- Extensions
- Outlook Contacts and Calendar integration
- Advanced
- Troubleshooting
- Proxy – NB: These settings should not be altered
- Web Collaboration
Login
Enable or disable automatic login when starting the application.
Notifications
Usually there is a confirmation pop-up notification each time you remove a contact or call history record. By selecting one or all of the check boxes, you disable the confirmations when deleting information. Here you can also control whether there always is a pop-up notification for publishing location information. Typically, this is shown at login.
Depending on your service provider configuration, you can also have confirmations for the Office UC Application Programming Interface (API), which is used by third-party applications such as Outlook Add-in or compatible headsets. You can allow such third-party applications in Preferences to obtain information from Office UC and enable or disable confirmation pop-up notifications when third-party applications request information from Office UC. You can also choose default behaviour to always reject or accept requests from third-party applications and allow or reject individual third-party applications.
Audio
Choose a headset, PC-integrated speakers, or external speakers for voice output. Your external playback device is selected by default (if you have one connected).
Choose a headset microphone, PC-integrated microphone, or external microphone for voice input during calls. Your external recording device is selected by default (if you have one connected).
Select the ring device and ring signal that is played when you receive an incoming call. The same signal is used for both voice and video calls. You can also select your own ring signal.
Video
Select a camera that you want to use for video calls. Your external web cam is selected by default (if you have one connected). You can also select one of the available video sizes. Note, however, that higher sizes require more bandwidth and a more capable central processing unit (CPU).
Do Not Disturb
When you activate this service, all calls are typically blocked by the server and sent to voice mail. Enable this service by clicking the Enable check box.
Anonymous Call Rejection
Setting this option instructs the platform to reject inbound calls that have their number withheld. A message is played to the caller informing them of this.
Call Forwarding
Enter a number to which your calls should be forwarded. Different variants of Call Forwarding are supported, such as forwarding always, forwarding when busy, and forwarding when you cannot answer or when you are unreachable. Call Forward No Answer also includes an option to set the number of rings before the inbound call is forwarded.
Simultaneous Ring
Add up to ten additional numbers that you would like to ring in addition to your primary number when you receive a call. In addition, specify whether you want answer confirmations. This service is an older variant of Call Director.
Remote Office
This service allows the use of any phone as the office phone from a charging and numbering perspective. For instance, a hotel room phone can be used as the office phone.
Enable Remote Office by clicking the Edit icon and specifying a phone number to be used as the Remote Office number.
Call Waiting
Call Waiting allows the user to be notified of an incoming call while on an existing call. The existing call can be put on hold to take the second call, since only one call can be active at a time. A number of calls can be on hold at the same time.
Call Director
Call Director simplifies communications for on-the-go users and remote users by extending the features of a desk phone to any other fixed or mobile device, regardless of the network or handset manufacturer. Callers dial one number and can reach you on any phone the user chooses. A desk phone, cell phone, and/or a soft phone may ring simultaneously.
Enjoy voice call continuity with the ability to move live calls from one device to another without hanging up.
Add locations (numbers) that can be used in the service by entering a number in the Add Number box. Use the Alert all enabled locations for Click-to-Dial check box to activate parallel ringing.
Please note: Due to a change in the way the Call Director feature works, an error message may be displayed if a location is activated without first including a description. This limitation will be addressed in a platform update in the near future.
When adding new locations, please ensure the following instructions are followed to ensure the location is added correctly and activated:
Add a new location by typing the phone number in the ‘Add number’ field and pressing ‘Enter’

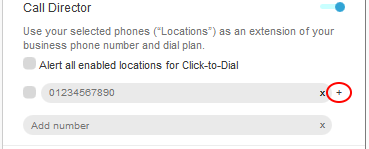
Click on the ‘+’ icon to the right of the newly added location to show the additional options for the location:
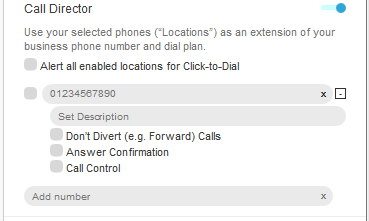
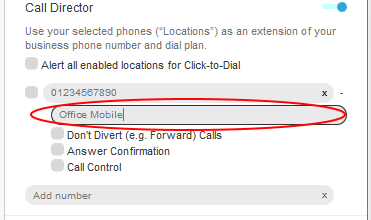
Enter a description for the location in the ‘Set Description’ field and press ‘Enter’:
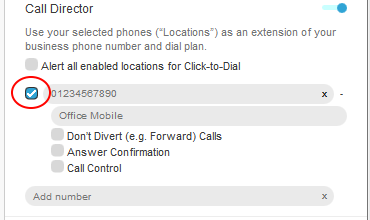
Finally, click on the check-box to the left of the location number to activate it:
Automatic Callback
Select this to receive notification when a busy called party becomes available. The user is notified by a special tone alert sent to the Office UC client.
Block My Caller ID
You can prevent your number from being presented on outbound calls by selecting this option
Highlight to call
A number can be highlighted anywhere in the desktop machine and used to make a call. Go to calls on the ribbon bar and select outgoing calls
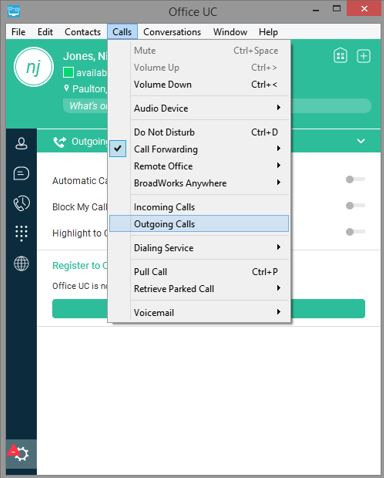
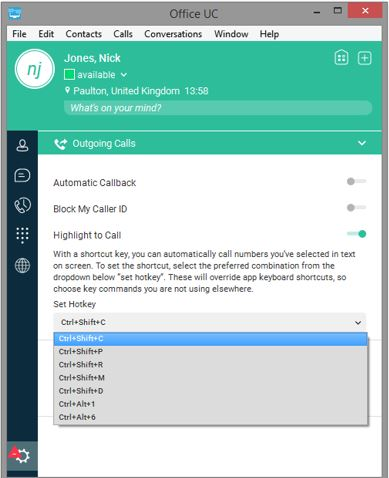
The choice of hotkey combination is selected from the Set Hotkey drop-down menu. Once the option is set, a number can be selected, and called by using the defined keyboard Hotkey combination.
Register to call
You can use this to dial numbers on websites using your client. Click on the Register to Call button.
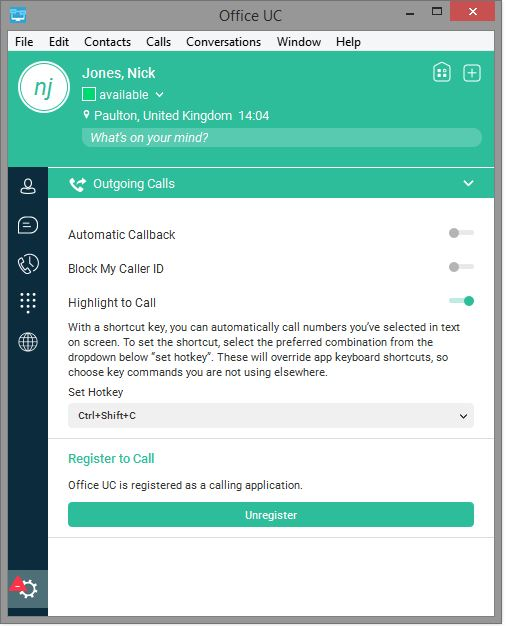
From Desktop Release 22.4.0, support for registering Communicator as the primary application for Callto and Tel URLs was enabled. This allows using Communicator for generic clickable links in various applications.
Team Telephony
This section shows the various options available when the user has the BLF (Busy Lamp Field) feature assigned to their HIPCOM user. See chapter 8 – “Team Telephony” for more information.
Queues
If the user is a member of one or more Call Centres, this section enables them to control their state within each Call Centre. Note that the option to remove yourself from the call Centre is only available if the correct option is set in the Business Portal. See chapter 10 – “Call Centre Agent Login” for more information.
Select these options to integrate with Outlook calendar and contacts.
Troubleshooting
Logging is used for troubleshooting. You may be asked by your service provider to turn on logging and then send a log file directory.
Proxy
These settings should not be altered.
Credentials
Web collaboration credentials may need to be manually entered and can be viewed and edited.
The application supports Call Centre ACD agents login into the ACD queue directly from the client. Call Centre Agents using the application can now have the following functionality:
- View assigned Call Centres
- Join Call Centre queues (dependant on settings – see below)
- Leave Call Centre queues (dependant on settings – see below)
- Set Automatic Call Distribution (ACD) startus for each assigned Call Centre
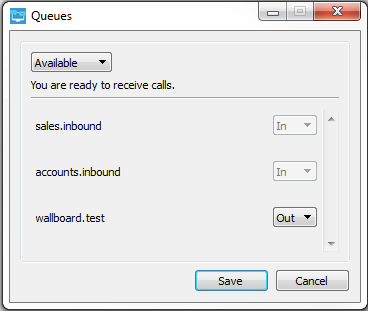
This functionality is available to users by selecting ‘Queues’ from the Desktop menu. If the Call Centre Agent Settings on the Business Portal are configured to allow agents to join or leave the Call Centre, this option will be available to the user via the Desktop client. Users will also have the ability to change their ACD (Automatic Call Distribution) state.
Selecting ‘Queues’ from the menu button opens the Queues dialog box:
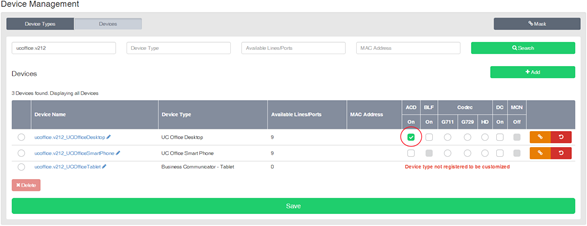
To enable the Call Centre ‘Queues’ feature to work within the Office UC Desktop client, the corresponding device should have the ACD option selected in the Business Portal, under ‘Device Management’ (shown below). Once the device has been updated on the Business Portal, the user should logout then login again to affect the change. The ‘Queues’ option should then be visible under the ‘Services’ section of the ‘Preferences’ menu drop-down.
For users that are assigned as an agent of a Call Centre, the Call Centre login feature includes the following functionality:
- Viewing assigned Call Centres
- Joining \ Leaving Call Centres
- Setting Automatic Call Distribution (ACD) status for each assigned Call Centre
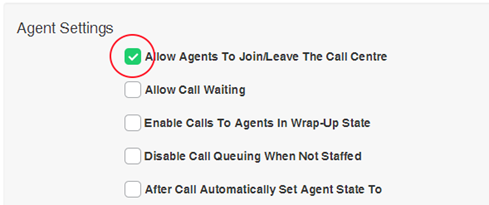
Users then have the ability to change their ACD state (Available, Wrap-up, etc) by selecting from the drop-down list in the ‘Queues’ section of the ‘Services’ preferences. It is also possible for them to join or leave a particular Call Centre if the Call Centre Agent Settings in the Business Portal allow this – please see below.
Office UC provides support for users with multiple devices. This includes several features:
- Chat invitations are sent to all devices. Before the session is accepted, messages are sent to all devices, and once answered, the chat messages go to the device that has sent a reply message.
- Retrieving one’s own presence notifications, when another client updates the user’s presence. The client updates its own status based on the information it receives from the server.
- Accepting a shared presence invitation in one client is also recognized by another client, and both clients start receiving presence updates.
- A new presence subscription made in one client is recognized in another. If the contact blocks the invitation, there are presence notifications from the server to all of the user’s clients indicating that the subscription was terminated, and this information is shown to the user. If the client receives two presence authorization requests from two or more devices for the same user, it only shows one request to the user.
- Removing a contact from a Contacts list in one device is recognized in another client, and the Contacts list is updated (that is, the contact is removed) in the other client as well.
Product Support & Fault Handling
Please refer to the WHC T2R Fault Management - Business Zone User Guide, available on the document centre, to review the steps needed to raise a fault.
The UC Desktop application is chargeable as a standalone client but is included in the UC Business and UC Team packs, which are also chargeable Add On’s.
All pricing is available from within the WHC Pricing charge books which are provided at the point of contract signature, and available to download from the WHC document centre. If you are unable to locate these then please raise a P4 support ticket.

