Broadcast Dialler
Overview
The Broadcast module allows you to broadcast a message to a predefined list of phone numbers. You can decide to use different messages or destinations based upon whether a person or answering machine/voicemail answers the call.
Terminology:
- Campaign: A set of instructions on when to dial, which call group(s) to dial, and where to route the call. Also known as a Broadcast Campaign.
- Call Group: A list of names and numbers. A campaign can contain one or more call groups.
Logging In
To navigate to the Broadcast module:
- In the top menu, go to Modules then under Applications
- In the drop-down, choose Broadcast
You will see a screen like this, landing on the Groups tab:
In this wiki, we'll go over the tabs from left to right, starting with Status.
Status
Click the Status tab. This page works like an on/off switch for the broadcast service as a whole, and shows whether the service is running. It also shows which campaigns are active, whether they have been started, how many calls have been placed, and how many calls still need to be placed. You can download a report for the campaign.
When the broadcast service is running, calls will be placed for any active campaigns. When the service is stopped, no calls will be placed.
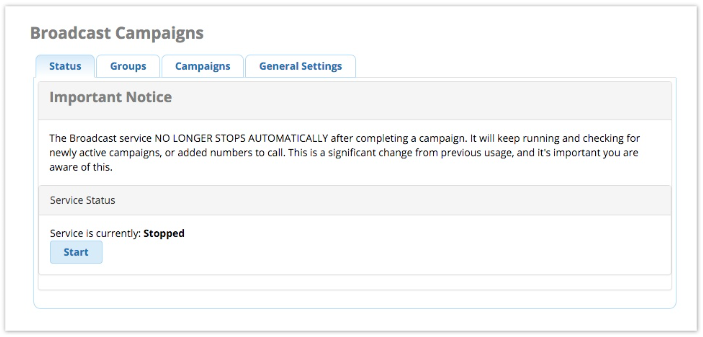
Service Status
The Start/Stop button starts or stops the broadcast. Click the button to toggle the status. Changes take effect immediately. The status will be updated above the button to say "Stopped" or "Running" depending on the current status.
Current Campaigns
This section shows campaigns that have not yet completed. The Active checkbox indicates whether a campaign is active. However, remember that the broadcast service also needs to be running (see service status, above) in order for calls to be placed.
You can check / un-check the box to activate/deactivate a campaign.
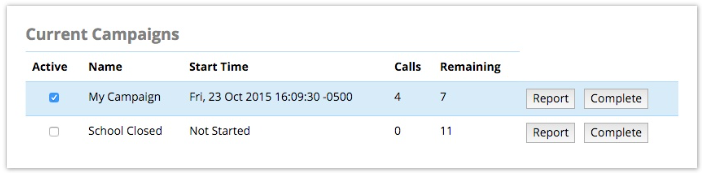
Report
Click the Report button to download a CSV file containing a report for the campaign.
Example:
| last_updated | campaign | callee_name | callee_number | initiated_dial | answer | delivered_to |
| 10/23/15 16:09 | 3 | Tango Frog | 5555551212 | yes | yes | person |
| 10/23/15 16:09 | 3 | Digit | 5555551234 | yes | no |
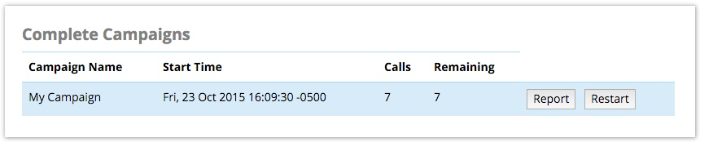
Complete
Click the Complete button if you would like to manually mark a campaign as complete.
Complete Campaigns
This section shows campaigns that have been completed.
Report
Click the Report button to download a CSV file containing a report for the campaign.
Restart
Click the Restart button to move a completed campaign back to the Current Campaigns section.
Delete
Click the Delete button to delete a completed campaign.
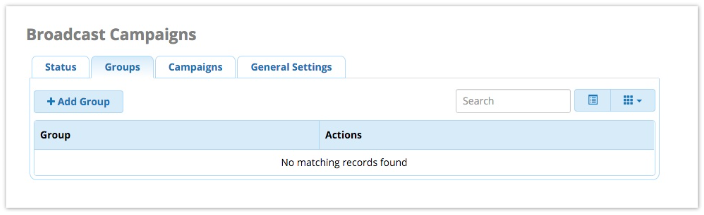
Groups
Click the Groups tab.
From here, you can add, edit, or delete lists of names and numbers. You can include one or more call group within a single broadcast campaign. Any existing groups will be shown.

- To Add: Click the Add Group button.
- To Edit: Click the pencil button
 next to an existing group.
 - To Delete: Click the trash button
 next to an existing group. Then click OK to confirm the deletion.
Group Options
You'll be taken to the Group Options tab when you add or edit a group.
The Call Group Name field is mandatory. Others are optional, as you are not required to use a CSV file. You will have the option to enter names and numbers manually after submitting the data in this tab.
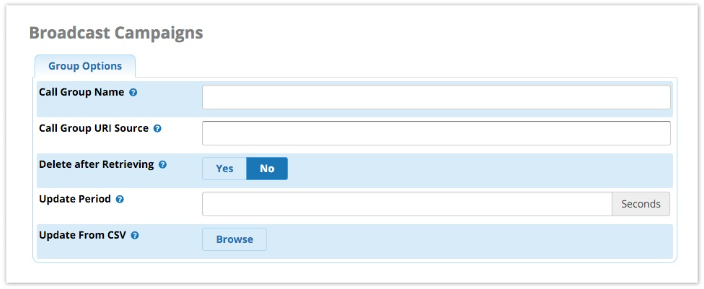
Call Group Name
The name of this call group.
Call Group URI Source
A URI to import the call group from. This currently supports FTP and HTTP in CSV format. FTP format would be "ftp://username:passsword@myserver.com/mylist.csv"
Delete after Retrieving
(FTP ONLY.) Yes/No: Whether to attempt to delete the file after downloading it from the URI provided above. If the system is unable to delete the file for whatever reason, then the import will not proceed.
Update Period
The time, in seconds, between URI updates.
Update From CSV
You can import a CSV file formatted as follows:
Names should be enclosed by '"' and fields separated by ',' Example:
"Name",Number,command
The command is either 'add' or 'remove', is optional, and defaults to 'add'. Examples:
"John Doe",12345678,add
"John Doe",12345687,remove
Click the Browse button to upload a CSV file. Choose the CSV file from your computer.
Save
Click the Submit button when done.
Numbers to Call
Click the Numbers to Call tab. (Note: This tab is only visible after you have submitted information in the Group Options tab).
- To add a new callee: Enter the name and number in the blank fields, and click the Add/Edit Callee button.
- To edit an existing callee: Click the Edit link for the entry, edit the name/number, and click the Add/Edit Callee button.
- To delete an existing callee: Click the Delete link for the entry, and click OK in the pop-up window to confirm deletion.
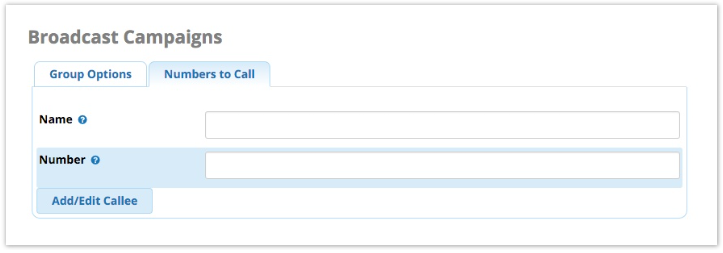
Name
The name of the callee.
Number
The phone number of the callee.
Add/Edit Callee
Click the Add/Edit Callee button to save changes.
Campaigns
Click the Campaigns tab. From here, you can add, edit, or delete broadcast campaigns. You can activate/deactivate a campaign when adding or editing it. Any existing campaigns will be shown in a list.
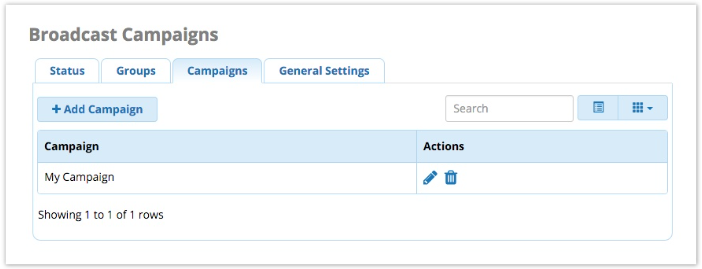
- To Add: Click the Add Campaign button.
- To Edit: Click the pencil button
 next to an existing campaign.
 - To Delete: Click the trash button
 next to an existing campaign. Then click OK to confirm the deletion.
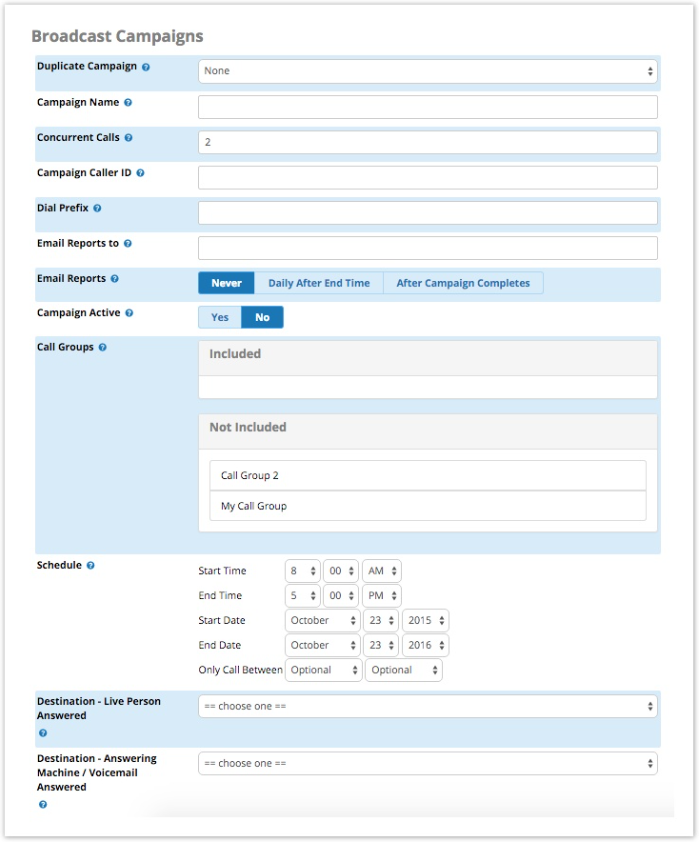
Duplicate Campaign
(Optional; Visible when you are creating a new campaign.) You can choose to duplicate an existing campaign. Select the campaign you wish to duplicate, then skip to clicking Submit. This allows you to run the same campaign after it is completed while keeping previous campaign reports intact.
Campaign Name
A unique name for this campaign.
Concurrent Calls
Maximum number of concurrent calls this campaign can make.
Campaign Caller ID
The caller ID that outbound calls will use for this campaign.
Dial Prefix
(Optional) A prefix to be appended to every number before it is dialled. This is useful, for example, to force calls to go out through a specific outbound route.
Email Reports to
The email address you wish the report to be emailed to.
Email Reports
Never / Daily After End Time / After Campaign Completes: When to e-mail a report.
- Never: A report is not sent.
- Daily After End Time: A report is sent each day after the end time is reached, and also after the campaign is completed.
- After Campaign Completes: A report is sent after the campaign completes.
Campaign Active
Yes/No: Whether the campaign will be active after submitting the data on this page. Select Yes to activate the campaign upon addition/modification.
The broadcast service must be running in order for the campaign to begin, even if you select Yes here. You will need to visit the Status tab if you haven't yet started the broadcast service.
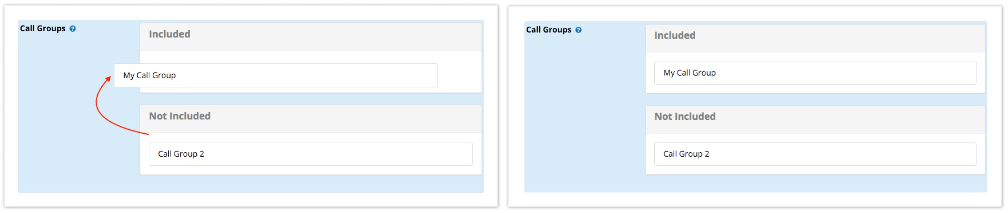
Call Groups
To specify which call group(s) will be included in this campaign, drag one or more call groups out of the Not Included bin and drop in the Included bin.
Schedule
Date and time options for this campaign.
Destination - Live Person Answered
Where to send calls answered by a live person.
Destination - Answering Machine / Voicemail Answered
Where to send calls answered by an answering machine or voicemail. Please note, the system makes all attempts to detect a voicemail or answering machine, but this is not guaranteed to be reliable. Answering Machine Detection (AMD) is handled by Asterisk, and must be configured independently. The default settings for AMD may work, but may need to be adjusted for your specific system and trunks. You can manually review and edit Asterisk AMD settings in the file amd.conf using the Config Edit module.
Save
Click the Submit button, then click the Apply Config button. (Remember, the broadcast service must be running in order for this campaign to begin. Please visit the Status tab to check status.)
General Settings
Click on the General Settings tab.
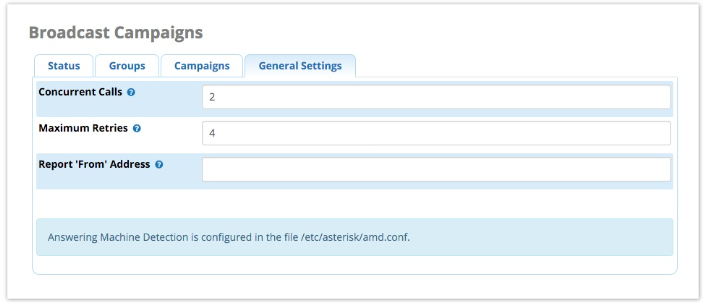
Concurrent Calls
The maximum number of calls ALL running campaigns (combined) can place at any given time. This should be less than the total number of channels available on the system, in order to still allow other calls to be made and received while a broadcast campaign is in progress.
Maximum Retries
The maximum number of times to try calling busy numbers back.
Report 'From' Address
(Optional) If you would like to customize the "from" e-mail address that reports appear to come from, enter the e-mail address here.
How to Toggle a Campaign On or Off Remotely
If you point a destination of your PBX to a start and stop toggle for a campaign, you can activate/deactivate the campaign at any time simply by dialling the destination.
If the broadcast service is stopped, it will begin running automatically if you activate a campaign through dialling a toggle.
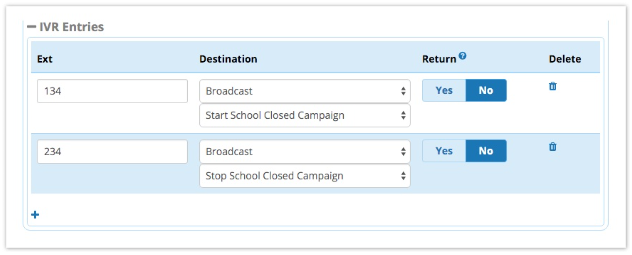
For example, if you have a campaign set up (but not active) to alert parents that school is closed for the day due to weather, you could create a hidden IVR with an option to press 134 to activate the "School Closed" campaign, and 234 to deactivate it. Dialling 134 from the IVR would be the same as checking the Active box in the Status tab of the Broadcast Campaigns GUI page. You could route an inbound DID to the IVR to allow someone to access it remotely.
Example IVR entries: