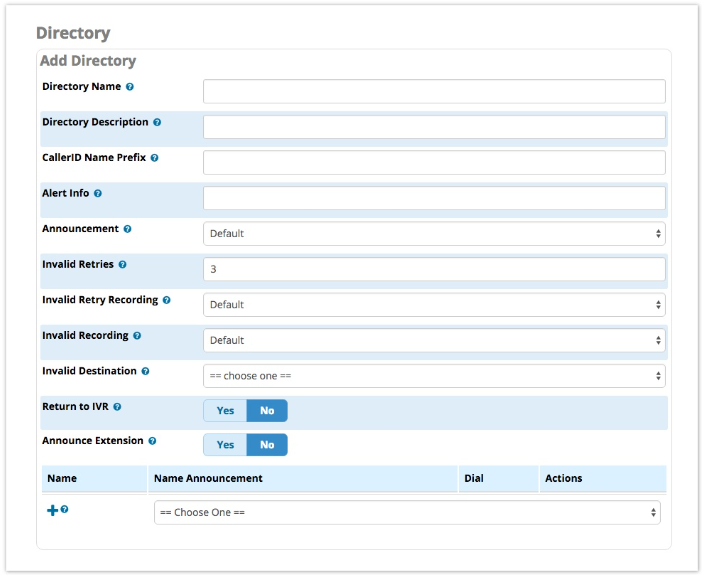
Directory
Introduction
The directory module allows you to create dial-by-name directories of users that can be accessed by callers through modules like the IVR. You can create a company-wide directory or one for an individual department. You may also specify where the user goes when they choose a directory member. For example, you might set it up so that entering the CEO's name will result in dialling the CEO's assistant.
Accessing the Directory Module
- On the top menu click Modules / Applications
- In the drop down click Directory
Adding a Directory
- Click the Add Directory button.
- Fill in the form as described below.

Directory Name
A friendly name for the directory, such as "Sales" or "Support" for example.
Directory Description
Optional - A description of the directory.
CallerID Name Prefix
Optional - A prefix added to the Caller ID name of the caller when they call through the directory. For example, you could enter "DIR-" to help users identify callers who have come from the directory.
Alert Info
Optional - ALERT_INFO to be sent to SIP devices called from this directory. Can be used for distinctive ring for SIP devices when supported.
Announcement
The greeting played to callers when they enter the directory. The default built-in announcement is "Welcome to the directory. Please enter the first three or more letters of the party's first or last name, using your touch tone keypad. Use the 1 key for punctuation. Press 0 to exit the directory and obtain further assistance." If desired, you can select a different announcement from your list of available System Recordings.
Invalid Retries
Number of times to retry when receiving an invalid/unmatched input from the caller.
Invalid Retry Recording
Prompt to be played when an invalid/unmatched response is received. The default message is "I'm sorry, there's no entry matching the keys you have entered." If desired, you can select a different announcement from your list of available System Recordings .
Invalid Recording
Message played to caller when they press 0 or when they have run out of retries, prior to sending them to the invalid destination. The default message is "We are now transferring you out of the directory. Please hold on for further assistance." If desired, you can select a different announcement from your list of available System Recordings .
Invalid Destination
Where to send callers when they run out of retries or press 0. May be overridden by the "Return to IVR" option below.
Return to IVR
Yes/No - Whether to send the caller back to the originating IVR (if the caller came from an IVR), upon reaching the invalid retry limit or pressing 0. If the caller came from an IVR, a "Yes" setting here overrides the "Invalid Destination" set above.
Announce Extension
Yes/No - Whether to announce the destination's extension number to the caller prior to the transfer. This can be useful if you want to let callers know how to direct-dial an extension in the future.
Adding Directory Entries
- Choose the type of entry from the drop-down menu. (All Users, Custom Entry, or an Extension as described below.) To add additional entries, click the plus sign


All Users
This will add an entry for every extension.
Custom Entry
This will allow you to specify a full dial string. This is useful if you wanted to add a cell phone or external resource.
Extension
Select an individual extension to add to the list.
Extension Fields

Name
This should auto-populate with the extension's descriptive name. This is what users will search by when asked to enter the first 3 letters of the person's name. For example, if the name is Bartholomew, the caller would enter 227 for BAR.
Name Announcement
What is played back to the caller upon a match. This can be the voicemail greeting, text to speech, spell name, or a system recording.
Dial
What to dial. By default, this is the user's extension. However, this can be changed to another extension. This is useful if you want an executive's calls to go to their assistant for example.
Save
- Click the Submit button
- Click the Apply Config button
Viewing, Editing, or Deleting a Directory
- If not already viewing the Directory module home page, click the List Directories button to go back to the list.

- To view or edit a directory, click the pencil icon
 .
. - To delete a directory, click the trash icon
 .
.

