Time Schedules
Time Schedules
Description
The Time Schedule feature can be used to define Time Schedules that can be applied to the features used by the Site. The Time Schedules you create for a Site are visible to and can be used by its Site features and End Users.
Create a Time Schedule if you want a feature to use different behaviour during business and non-business hours, or at different times during the day to handle calls during peak times, or times where Users are routinely unavailable, differently.
For example, if you apply a Time Schedule to an Auto Attendant you can present different menu options or capabilities to incoming callers based on what day and/or time of day they called.
Function
Time Schedules you define can be used for the following features:
- Auto Attendant
- Call Notify
- Selective Call Acceptance
- Selective Call Rejection
- Distinctive and Priority Ringing
- Call Forwarding Selective
Each Time Schedule consists of up to 20 date or time ranges for a week. Depending on the feature to which you intend to apply it, you can use Time Schedules to perform tasks like distinguishing between business hours and after hours for an Auto Attendant or for identifying Call Centre hours.
By default, all undefined periods are designated as non-business hours or “after hours”. If you apply a Time Schedule to an Auto Attendant that has different behaviour defined for handling calls during business hours and after hours, the Auto Attendant uses the appropriate behaviour based on the selected Time Schedule.
A Time Schedule will only apply to a feature if you select it from the Time Schedule list when you create or edit that particular feature.
Configuration
The Group or Company Administrator can create and edit Time Schedules for use by Auto Attendants, Call Notify, Selective Call Acceptance/Rejection and Priority ringing through the Business Portal Site Feature Settings page, under ‘Time Schedules’.
- Navigate to:- Sites (select Site) > Features > Time Schedules
- Click ‘Add’

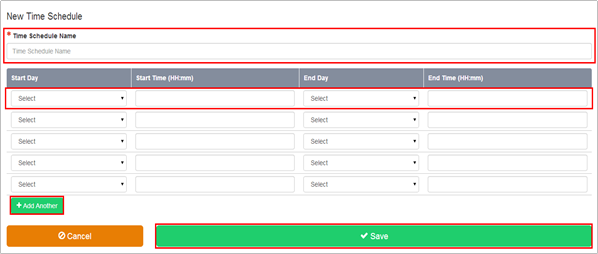
- Enter a name for the Time Schedule in the ‘Time Schedule Name’ box.

Use the fields provided to specify up to 20 time ranges over the course of a given week. Please note that only 5 rows are visible in the table by default. To add more, simply use the ‘Add Another’ button.
- Each line in the list represents one period
- The time schedule is applied on a weekly basis
- A 24 hour clock is used
- The time separator is a colon :
- Start Day - The day of the week on which the time period will begin
- Start Time - The time of day at which that time period will begin
- End Day - The day of the week on which the time period will end
- End Time - The time of day at which that time period will end
- Click Save
The Time Schedules page is displayed on the Time Schedules page with a link to your new Time Schedule.


