Contacts / Central User Phone Book
Contacts / Central User Phone Book
Most physical handsets are capable of storing your contacts BUT these will be local to that 1 handset only and if you reset or change the handset you will lose them. For a more central approach and to have your contacts across all handsets and apps you have please see below.
Personal Contacts
Description
The Personal Contact Directory Feature provides the ability to create custom contact directories for use by an individual Employee / User. These directories will then be available from the Directories option across hard and soft phone devices.
Function
Administrators and End Users can use this feature to create a custom Personal Contact Directory that contains numbers frequently called by the End User, such as individual clients, suppliers etc.
You can also quickly add numbers to this list by importing a phone list and loading the numbers from a CSV file. Hover over the information (i) icon for the file format.
A directory can contain a maximum of 500 contacts.
If a user has the Company Contacts feature all the contacts are added into a single directory.
For SIPT users, contacts can be created, but won't be sync'd to the PBX phone. Contacts can however be used in UC apps.
If this feature has not been enabled on this user previously you will need to also enable phone services. Please make sure to see that section lower down.
Configuration/Operation
The Personal Contacts Feature is available to configure in the Business Portal under:
- Employees > Features > Contacts > Personal Contacts
Note: You will need to select the "employee" on the Employees page, click the green button with the magnifying glass to bring the list of "employees" up and then press the 'select' button.
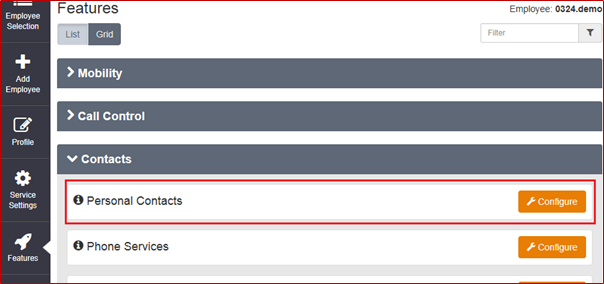
- Click Configure
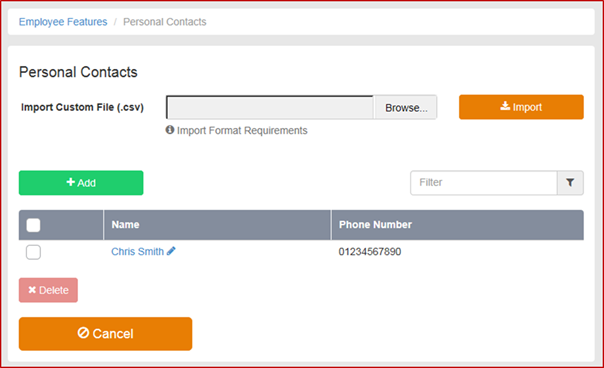
CSV Upload
The correct format for the csv file is:
Name,Number
- Telephone numbers should be formatted without the leading zero i.e. 1782667788
- Duplicate entries are not permitted in either column. There is also a 50 character limit on each entry.
- To Import a list of contacts in .CSV format browse to the file and click ‘Import’
Manually amending entries
- To Manually add an entry click ‘+Add’
- To Edit an existing entry click on the entries ‘Name’
- To delete an entry select the entry via the right hand tick box and click ‘x Delete’
- To delete all entries select the tick box on the right hand side of the header bar and then click ‘x Delete’

- Click ‘Add’ to add an entry

- Click Save
Phones normally update the phone books on reboot / reload of the configuration like;
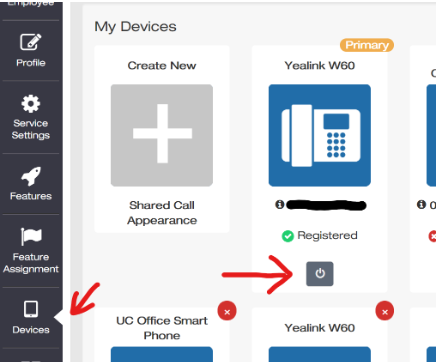
Locate your device you want to reload by clicking devices in the menu and then the power icon under the device you want to load in the new configuration / phone books to.
Limiting Conditions
The Business Portal supports the use of Alpha Numeric Characters A to Z, both upper and lower case, and 0 to 9. Special Characters Hyphen (-) and Apostrophe (‘) are also supported. All other Special Characters are not supported in the Business Portal and any entry containing these characters will be rejected.
The following numbers are barred from the upload:
- 118xxx
- 999
Note: - We would advise against the use of Apostrophe in Personal Contacts as some handsets may not support this character. This may lead to issues when trying to access the contacts from the handset.
Phone Services
Description
This feature provides a method of pushing down personal and company contacts (in Personal and/or Company Directories) to a User’s devices.
Function
Administrators and End Users can use this feature to select which Company Contact Directory and/or the Personal Contact Directory is integrated with the User’s devices.
If Phone Services are enabled for a device, but the Phone Directory is turned ‘off’ then neither the Site Level Phone Services nor User level configuration will apply. This means that no directories will be integrated with the device(s) that the User has.
Configuration/Operation
The User Level Phone Services feature is available to configure in the Business Portal. Navigate to:
- Employees > Features > Contacts > Phone Services
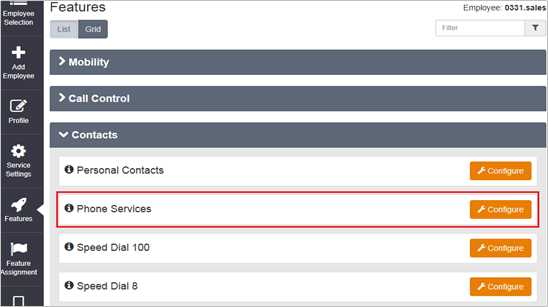
- The first page lists all the devices for which the user is able to use Phone Services with. The list only includes device profiles with a device type supporting Phone Services.
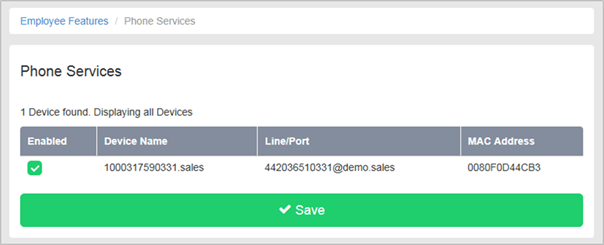
- Enabling and then Clicking on a Device Name allows you to go to the corresponding Phone Services configuration page for the device
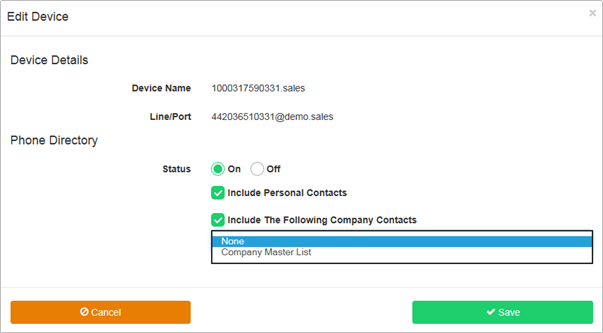
- Status
- Enable/Disable Phone Directory for the Device.
- Include Personal Contacts
- Include the following Company Contacts
- Select the list of Company Contacts
- Click Save
Please note:
- In Site Phone Services, when you select apply Company Directory, when you then enable Phone Services at a User level, you must not tick company directory again, or it will duplicate
- When you make a change to the Group or Company Directory, you must disable phone services before updating

